Wan2.1 Fun Control ComfyUI Workflows - Complete Guide
This tutorial provides a detailed introduction on how to use the Wan Fun Control model in ComfyUI, including complete model installation, workflow usage, and more.
Wan2.1-Fun-Control is the latest video control capability released by the Alibaba team, which can achieve video control capabilities such as depth, openpose, and canny. Currently, this model is divided into two categories: 1.3B and 14B models.
- Wan2.1-Fun-1.3B-Control
- Wan2.1-Fun-14B-Control
- Corresponding code repository:VideoX-Fun This guide will cover two types of workflows:
- ComfyUI Native Workflow
-
- Fully native (does not rely on third-party custom nodes)
-
- Improved version of the native workflow (uses custom nodes)
- Workflow using Kijai's ComfyUI-WanVideoWrapper
- Both workflows are essentially the same in terms of models, but I used models from different sources to better align with the original workflow and model usage.
- For video-related tasks, you can use the ComfyUI-VideoHelperSuite custom node package to perform video loading, saving as mp4, merging, and other rich video operations.
- For plugin installation, please refer to the guide on how to install custom nodes.
ComfyUI Native Wan2.1 Fun Control Workflow
Currently, ComfyUI officially supports the Wan Fun Control model natively, but as of now (2025-04-10), there is no officially released workflow example.
Before you start, ensure your ComfyUI version is at least after this commit so you can find the corresponding WanFunControlToVideo node. Please refer to how to update ComfyUI to update your ComfyUI version.
1.1 Wan2.1 Fun Control Workflow File Download
1.1.1 Workflow File
Download the image below and drag it into ComfyUI, which will load the corresponding workflow and prompt for the model download.

Download in Json format
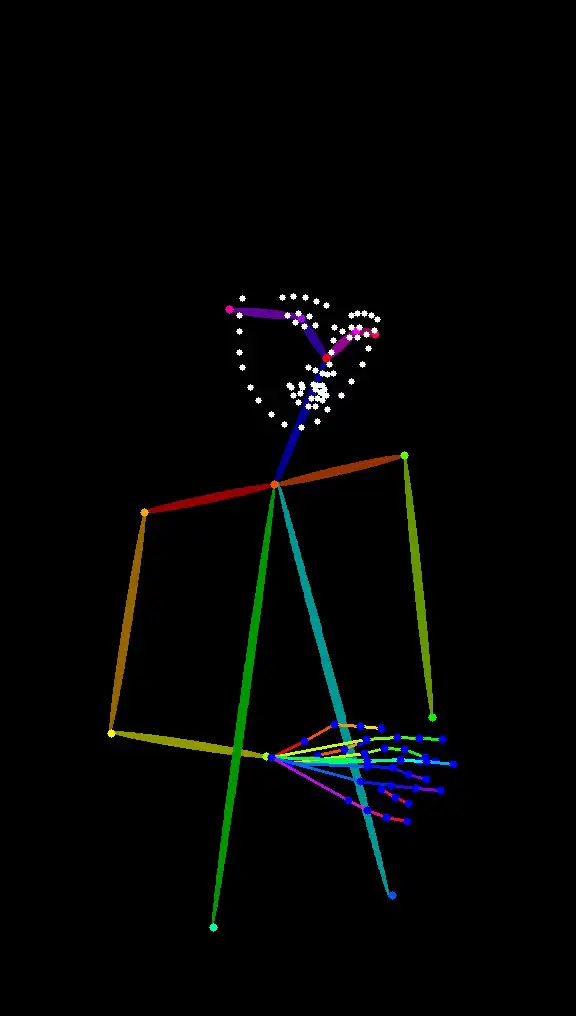
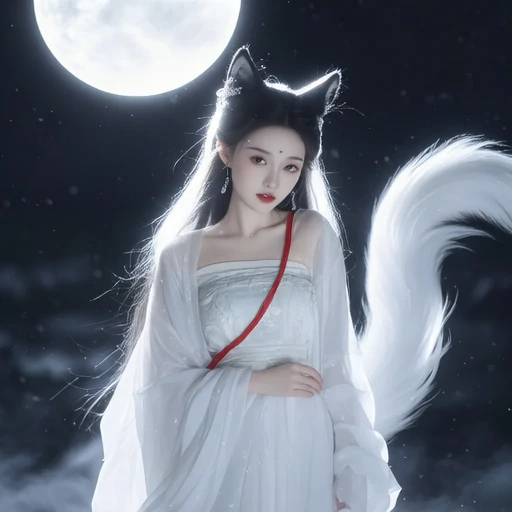
1.1.2 Start Frame and Control Video
Download the images and videos below, which we will use as input conditions.

1.2 Manual Model Installation
If the corresponding model did not download successfully, here are the download links for the models.
Diffusion models Choose between 1.3B or 14B. The 14B model is larger in size and offers better performance but also requires higher device performance.
- Wan2.1-Fun-1.3B-Control: After downloading, rename it to
Wan2.1-Fun-1.3B-Control.safetensors - Wan2.1-Fun-14B-Control: After downloading, rename it to
Wan2.1-Fun-14B-Control.safetensors
Text encoders Choose one of the two models below, fp16 is larger in size and requires higher performance.
VAE
CLIP Vision Used for extracting image features
File save location
📂 ComfyUI/
├── 📂 models/
│   ├── 📂 diffusion_models/
│   │   └── Wan2.1-Fun-1.3B-Control.safetensors        # or the version you choose
│   ├── 📂 text_encoders/
│   │   └─── umt5_xxl_fp8_e4m3fn_scaled.safetensors    # or the version you choose
│   └── 📂 vae/
│   │   └── wan_2.1_vae.safetensors
│   └── 📂 clip_vision/
│       └──  clip_vision_h.safetensors
1.3 Step-by-Step Workflow Execution
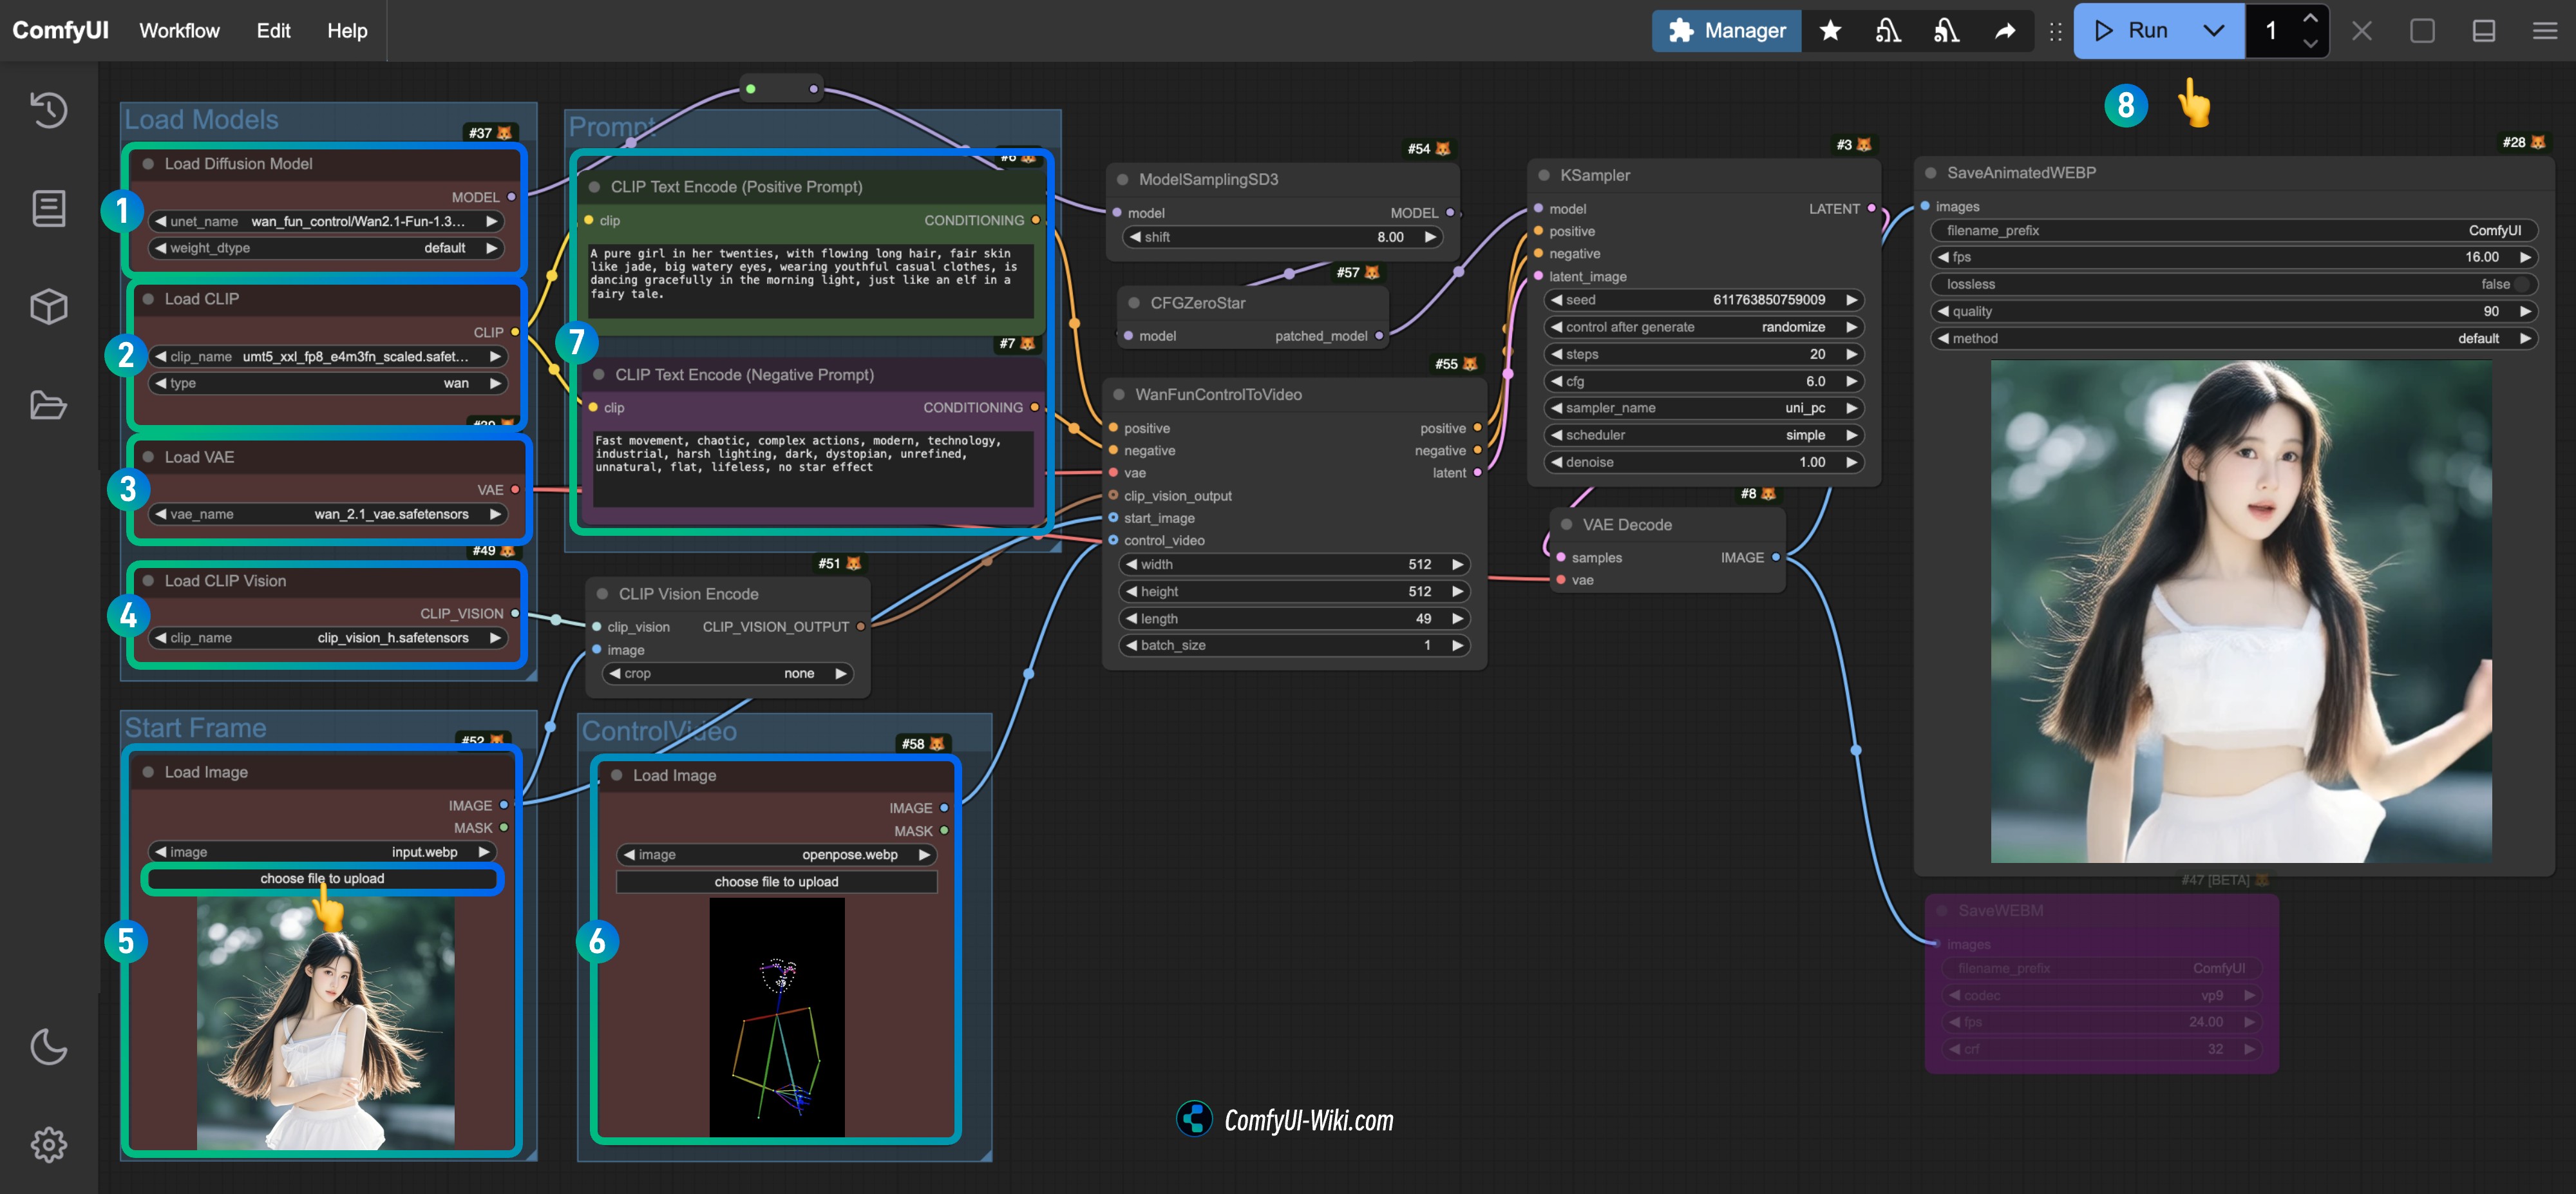
- Ensure the
Load Diffusion Modelnode has loaded theWan2.1-Fun-1.3B-Control.safetensorsmodel. - Ensure the
Load CLIPnode has loaded theumt5_xxl_fp8_e4m3fn_scaled.safetensorsmodel. - Ensure the
Load VAEnode has loaded thewan_2.1_vae.safetensorsmodel. - Ensure the
Load CLIP Visionnode has loaded theclip_vision_h.safetensorsmodel. - Load the provided input image as the start frame in the
Load Imagenode. - Upload the provided video in the
Load Imagenode as the control condition. - (Optional) Modify the video prompt in the
CLIP Text Encodernode. - Click the
Runbutton or use the shortcutCtrl(cmd) + Enterto execute video generation.
1.4 Workflow Analysis
The native workflow primarily focuses on video frame acquisition. The default Length provided by the WanFunControlToVideo node is 81 (which generates a 5-second video at 15 frames per second), but the control video I provided only has 49 frames, so I made adjustments. Additionally, you might notice the character being suddenly zoomed in after video generation. This is because the start frame image and control video have different dimensions, leading to cropping and zooming during processing.
2. Adjusted Version of Wan2.1 Fun Control Native Workflow
Since the fully native workflow is not very convenient for video size and frame count calculations, I used some nodes from the following custom node packages in this improved version:
- ComfyUI-KJNodes for adjusting video size and obtaining image frame count.
- ComfyUI-comfyui_controlnet_aux for video image preprocessing.
Before starting, ensure you have installed these two custom node packages, or use ComfyUI-Manager to install them after loading the workflow.
2.1 Workflow File Download
2.1.1 Workflow File Download
Download the image below and drag it into ComfyUI to load the corresponding workflow, which will prompt the model download.
2.1.2 Input Video Download
Download the image and video below for input conditions.

Due to time constraints, the video with the sudden zoom effect is still used as input.
2.2 Step-by-Step Workflow Execution
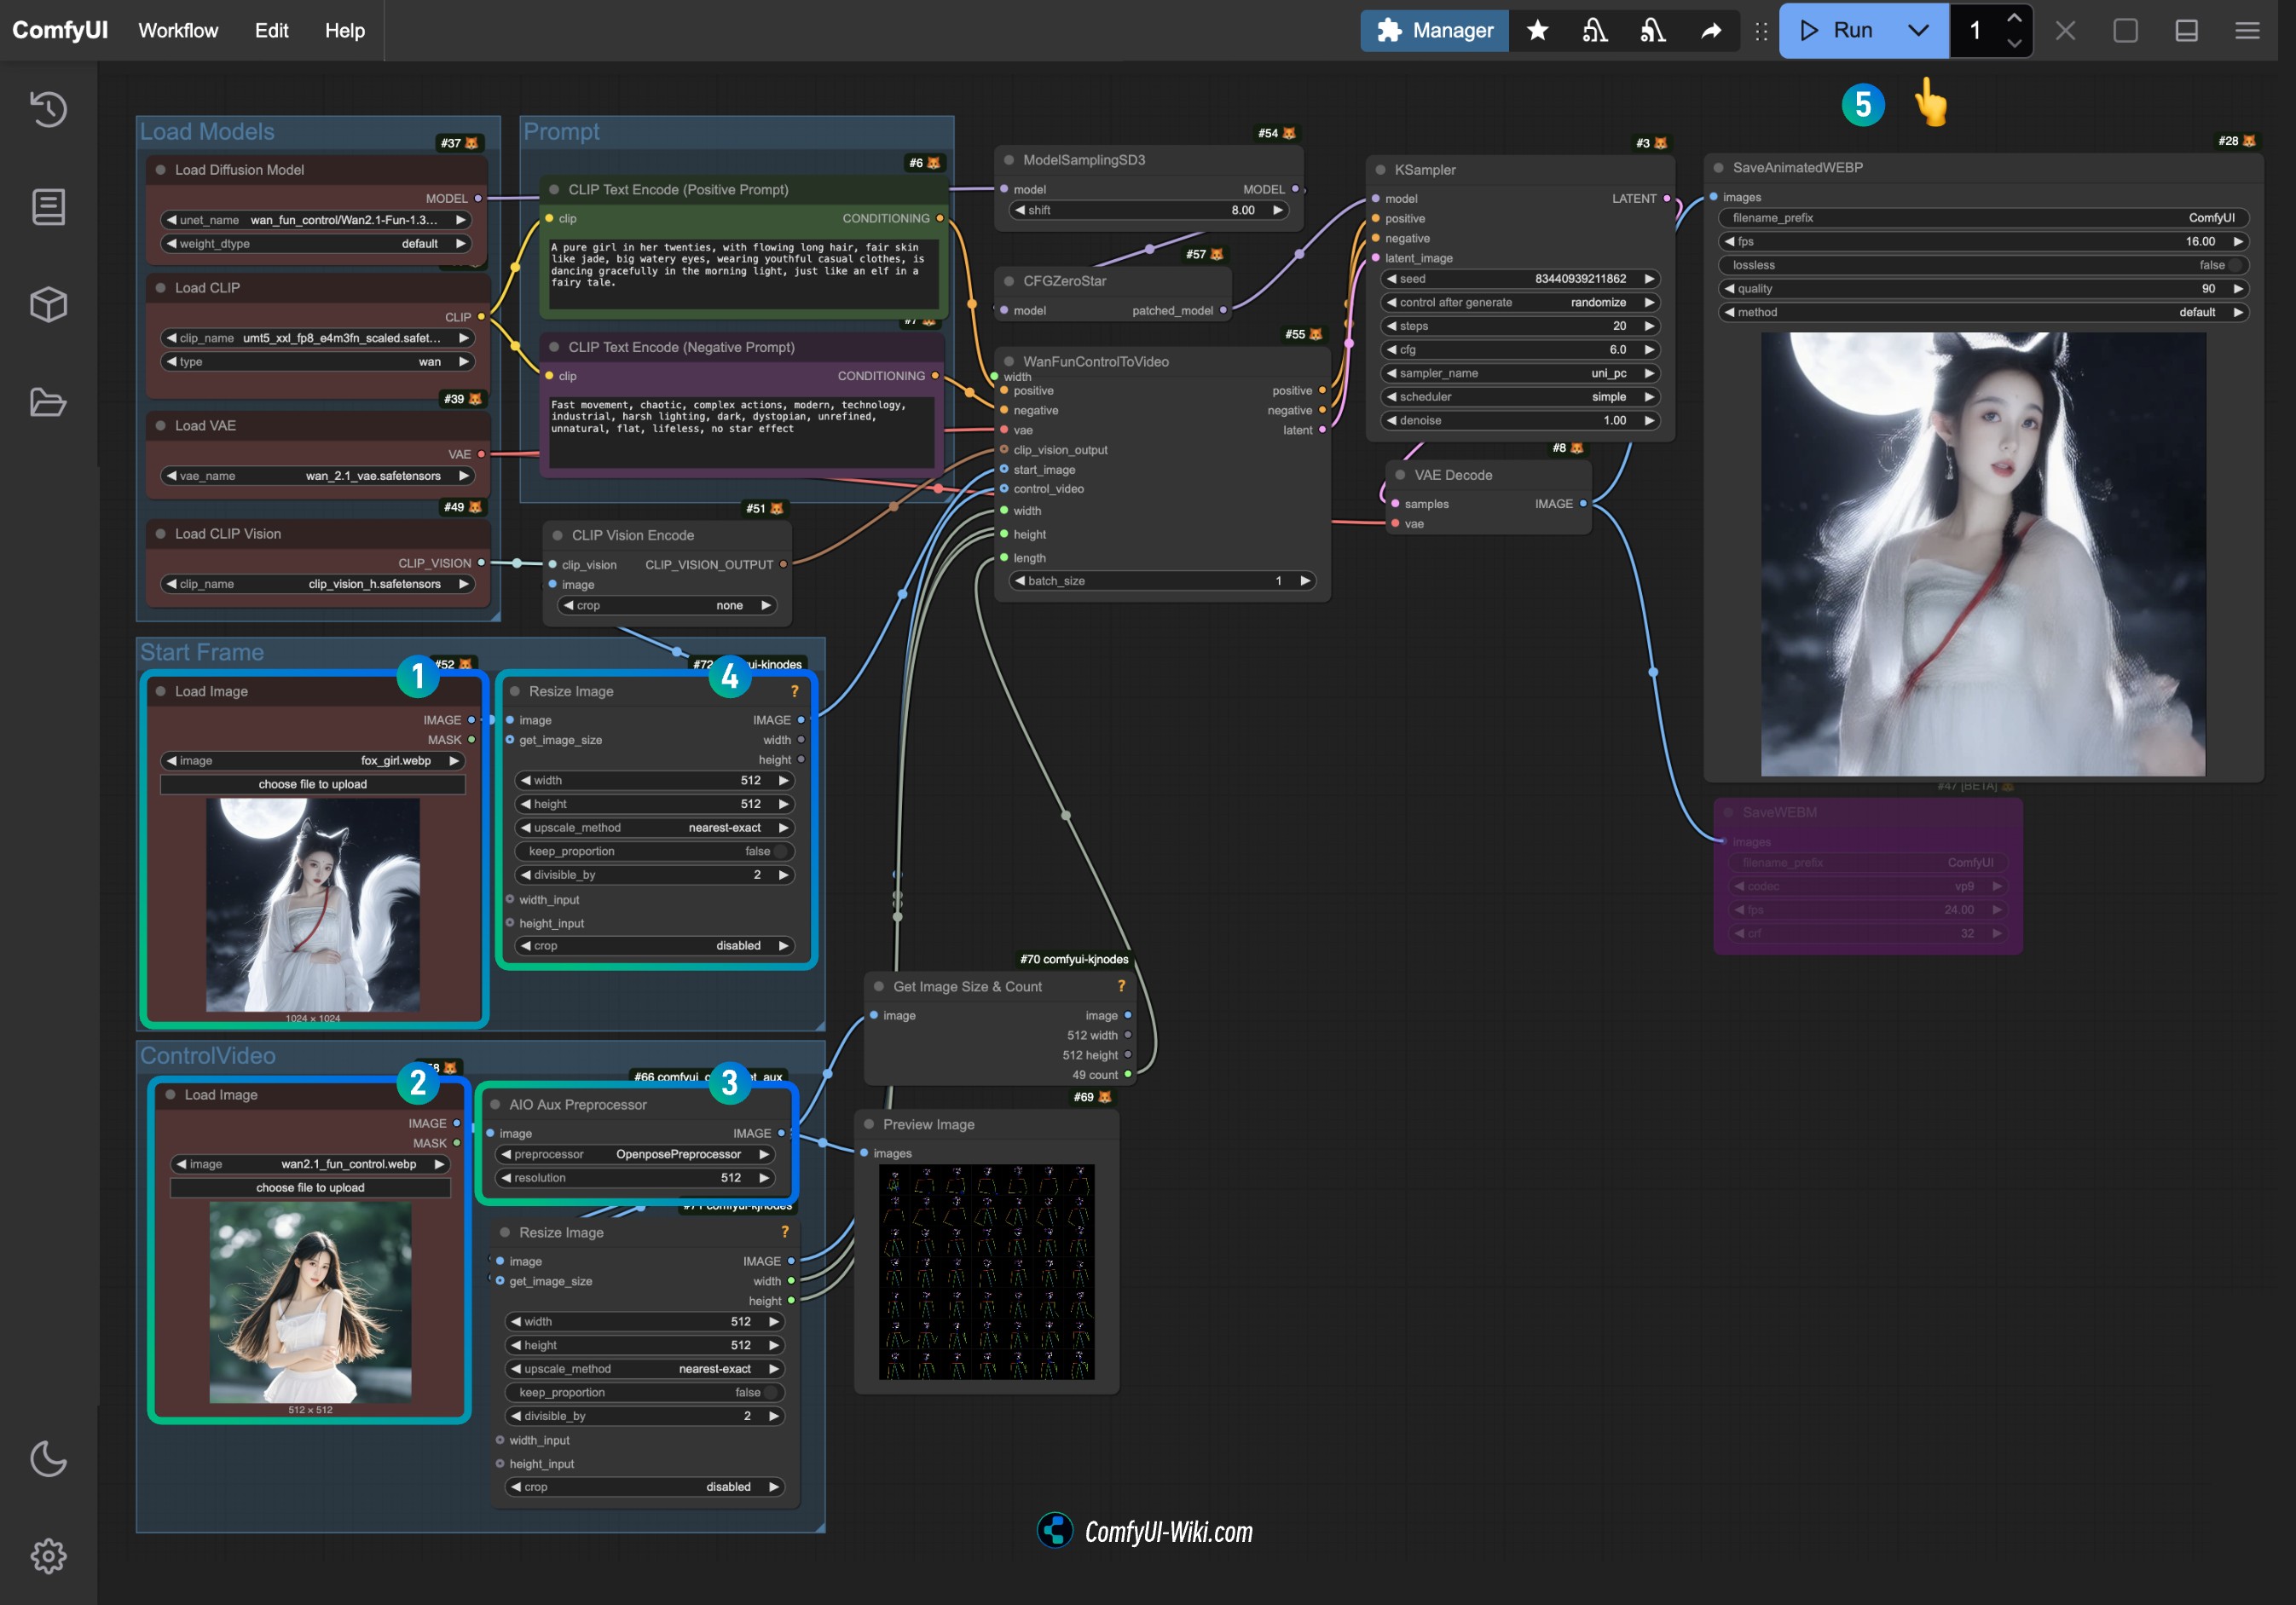
- Upload the provided input image in the
Load Imagenode of the Start Frame. - Upload the provided video in the
Load Imagenode of the Control Video as the control condition. - Select the preprocessor you wish to use on the
AIO Aux Preprocessor(the corresponding model will be downloaded from Hugging Face on the first run). - If you need to adjust the size, you can modify the size settings of the
Resize Imagenode, ensuring both nodes remain consistent. - Click the
Runbutton or use the shortcutCtrl(cmd) + Enterto execute video generation.
Load Image node currently does not support mp4 videos, if you wish to have input videos, you can use the Load Video (Upload) node from ComfyUI-VideoHelperSuite to handle various video formats.
3. Related Extensions
You can add corresponding image generation nodes to these workflows to generate the final video without relying on input reference images.
Kijai Wan Fun Control Workflow
We will use Kijai's ComfyUI-WanVideoWrapper plugin to complete the Fun-Control example. You can find the original workflow provided by Kijai here.
The workflow involved in this guide has been reorganized by ComfyUI Wiki.
This section of the workflow will be divided into two categories:
- Control workflow for text-to-video image using only video control conditions
- Control workflow for image reference video generation that analyzes and extracts features from reference images using Clip_vision and adds video control conditions
Related Installation
Custom Node Installation
You need to install the following plugins to ensure the workflow runs smoothly:
- ComfyUI-WanVideoWrapper: needs to be updated to the latest version
- ComfyUI-VideoHelperSuite
- ComfyUI-KJNodes
- ComfyUI-comfyui_controlnet_aux: for preprocessing video images, or you can replace it with your commonly used image preprocessing nodes
You can use ComfyUI Manager to update or install the custom nodes mentioned above, or refer to how to install custom nodes to complete the corresponding installation.
ComfyUI-comfyui_controlnet_aux will download the corresponding model on the first run, please ensure you can access huggingface normally.
Model Installation
Wan2.1 Fun Control Provides two models: 1.3B and 14B, you can choose the appropriate model based on your device performance.
- Wan2.1-Fun-1.3B-Control: rename to
Wan2.1-Fun-1.3B-Control.safetensorsafter downloading - Wan2.1-Fun-14B-Control: rename to
Wan2.1-Fun-14B-Control.safetensorsafter downloading - Kijai/Wan2.1-Fun-Control-14B_fp8_e4m3fn.safetensors
Choose one version from Text encoders to download:
VAE
CLIP Vision
File save location
📂 ComfyUI/
├── 📂 models/
│   ├── 📂 diffusion_models/
│   │   └── Wan2.1-Fun-1.3B-Control.safetensors      # Or the version you choose
│   ├── 📂 text_encoders/
│   │   └─── umt5-xxl-enc-bf16.safetensors           # Or the version you choose
│   ├── 📂 vae/
│   │   └── Wan2_1_VAE_bf16.safetensors
│   └── 📂clip_vision/
│       └──  clip_vision_h.safetensors
1. Video Control Text-to-Video Workflow
1.1 Download Workflow Files
Download the image below and drag it into ComfyUI to load the corresponding workflow.

Download in JSON format.
Download the video below as the input video.
<video style={{ width: '100%', maxWidth: '680px' }} src="https://raw.githubusercontent.com/comfyui-wiki/ComfyUI-Wiki-Workflows/main/workflows/video/wan2.1_fun_control/input/pose.mp4" controls />
1.2 Complete the Workflow Steps
Download the image below and drag it into ComfyUI to load the corresponding workflow.
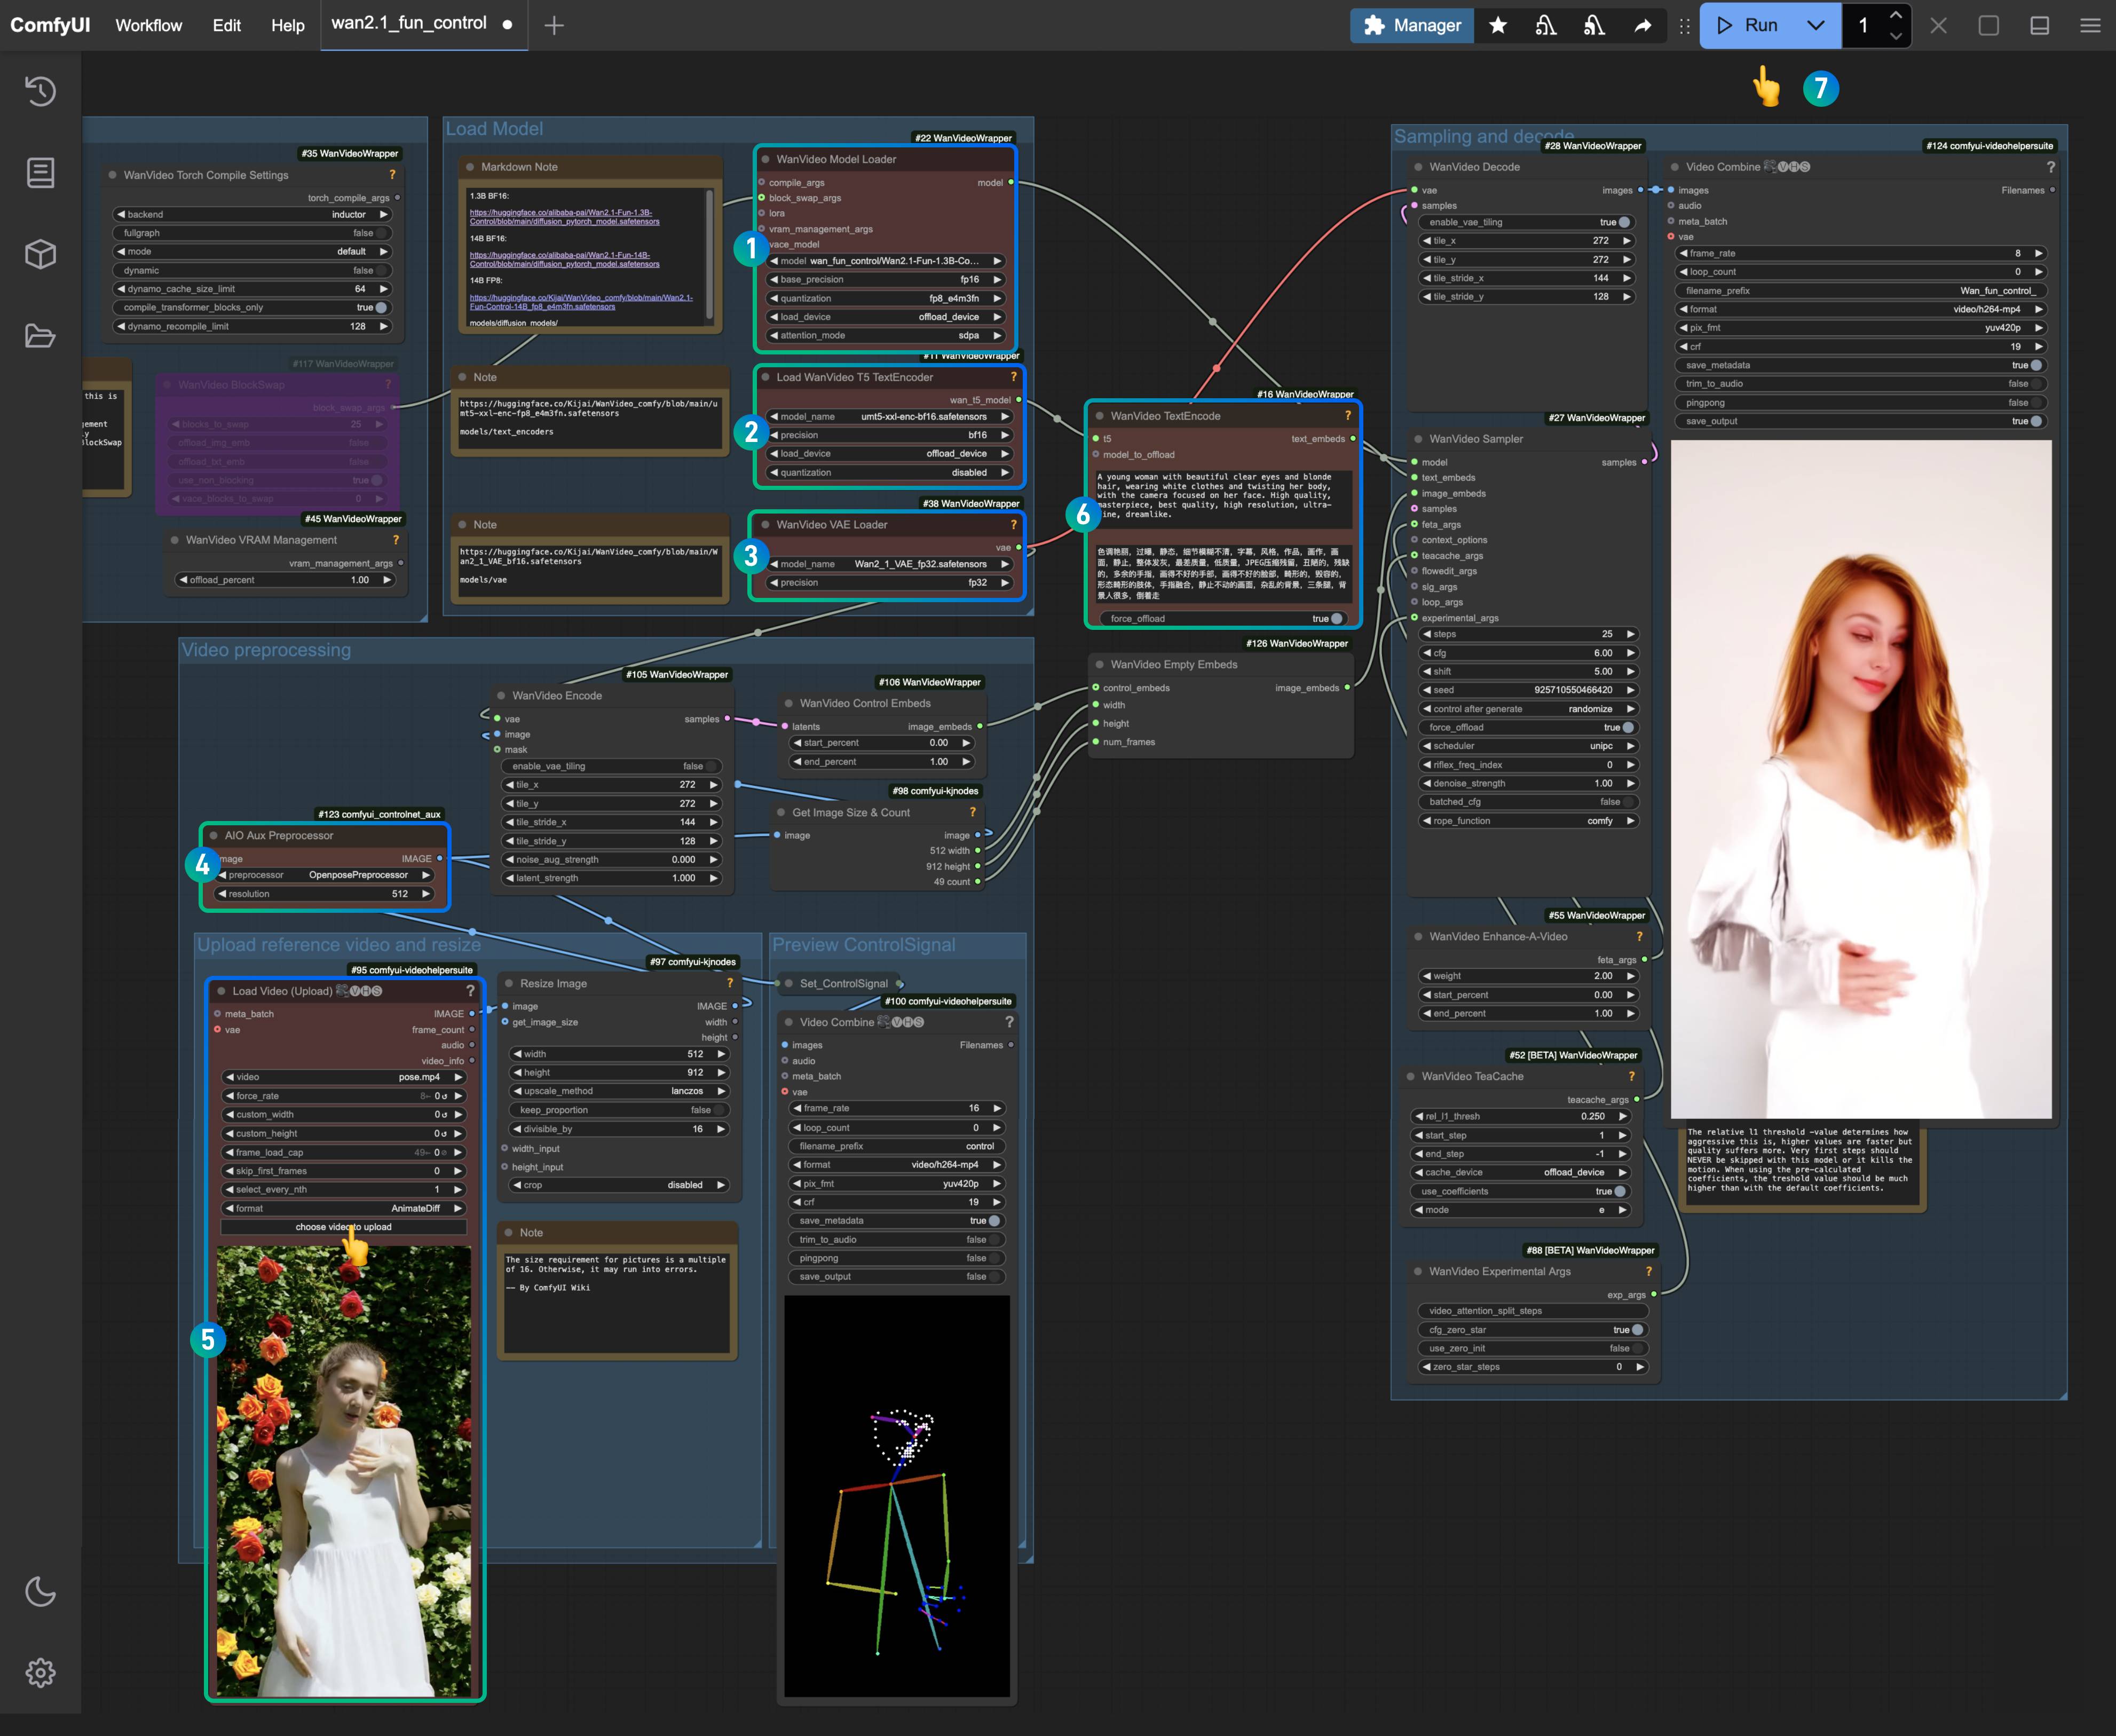
Ensure that the corresponding nodes have loaded the appropriate models, using the versions you downloaded.
- Ensure that the
WanVideo Model Loadernode has loaded theWan2.1-Fun-1.3B-Control.safetensorsmodel. - Ensure that the
Load WanVideo T5 TextEncodernode has loaded theumt5-xxl-enc-bf16.safetensorsmodel. - Ensure that the
WanVideo Vae Loadernode has loaded theWan2_1_VAE_bf16.safetensorsmodel. - In the
AIO AuxAux Preprocessornode, select theOpenposePreprocessornode. - In the
Load Video(Upload)node, upload the input video we provided earlier. - In the
WanVideo TextEncode, enter the prompt for the video you want to generate (you can keep it as default). - Click the
Runbutton, or use the shortcutCtrl(cmd) + Enterto execute the video generation.
1.3 Workflow Analysis
This version of the workflow mainly encodes the preprocessed image conditions and then generates the video. In the image preprocessing node OpenposePreprocessor, you can choose various preprocessing methods, such as Openpose, Depth, Canny, etc. Here, we choose the Openpose preprocessing method to generate the corresponding character motion control and encoding.
2. Video Control Reference Image Video Generation Workflow
This workflow mainly loads a clip_vision_h.safetensors model, which can effectively understand the content of the reference image. However, it does not generate the video by completely preserving consistency but rather generates the video based on the features of the reference image.
2.1 Download Workflow Files
Download the image below and drag it into ComfyUI to load the corresponding workflow.

Download in JSON format.
Download the video and images below, which we will use as input conditions.
 

2.2 Complete the Workflow Steps
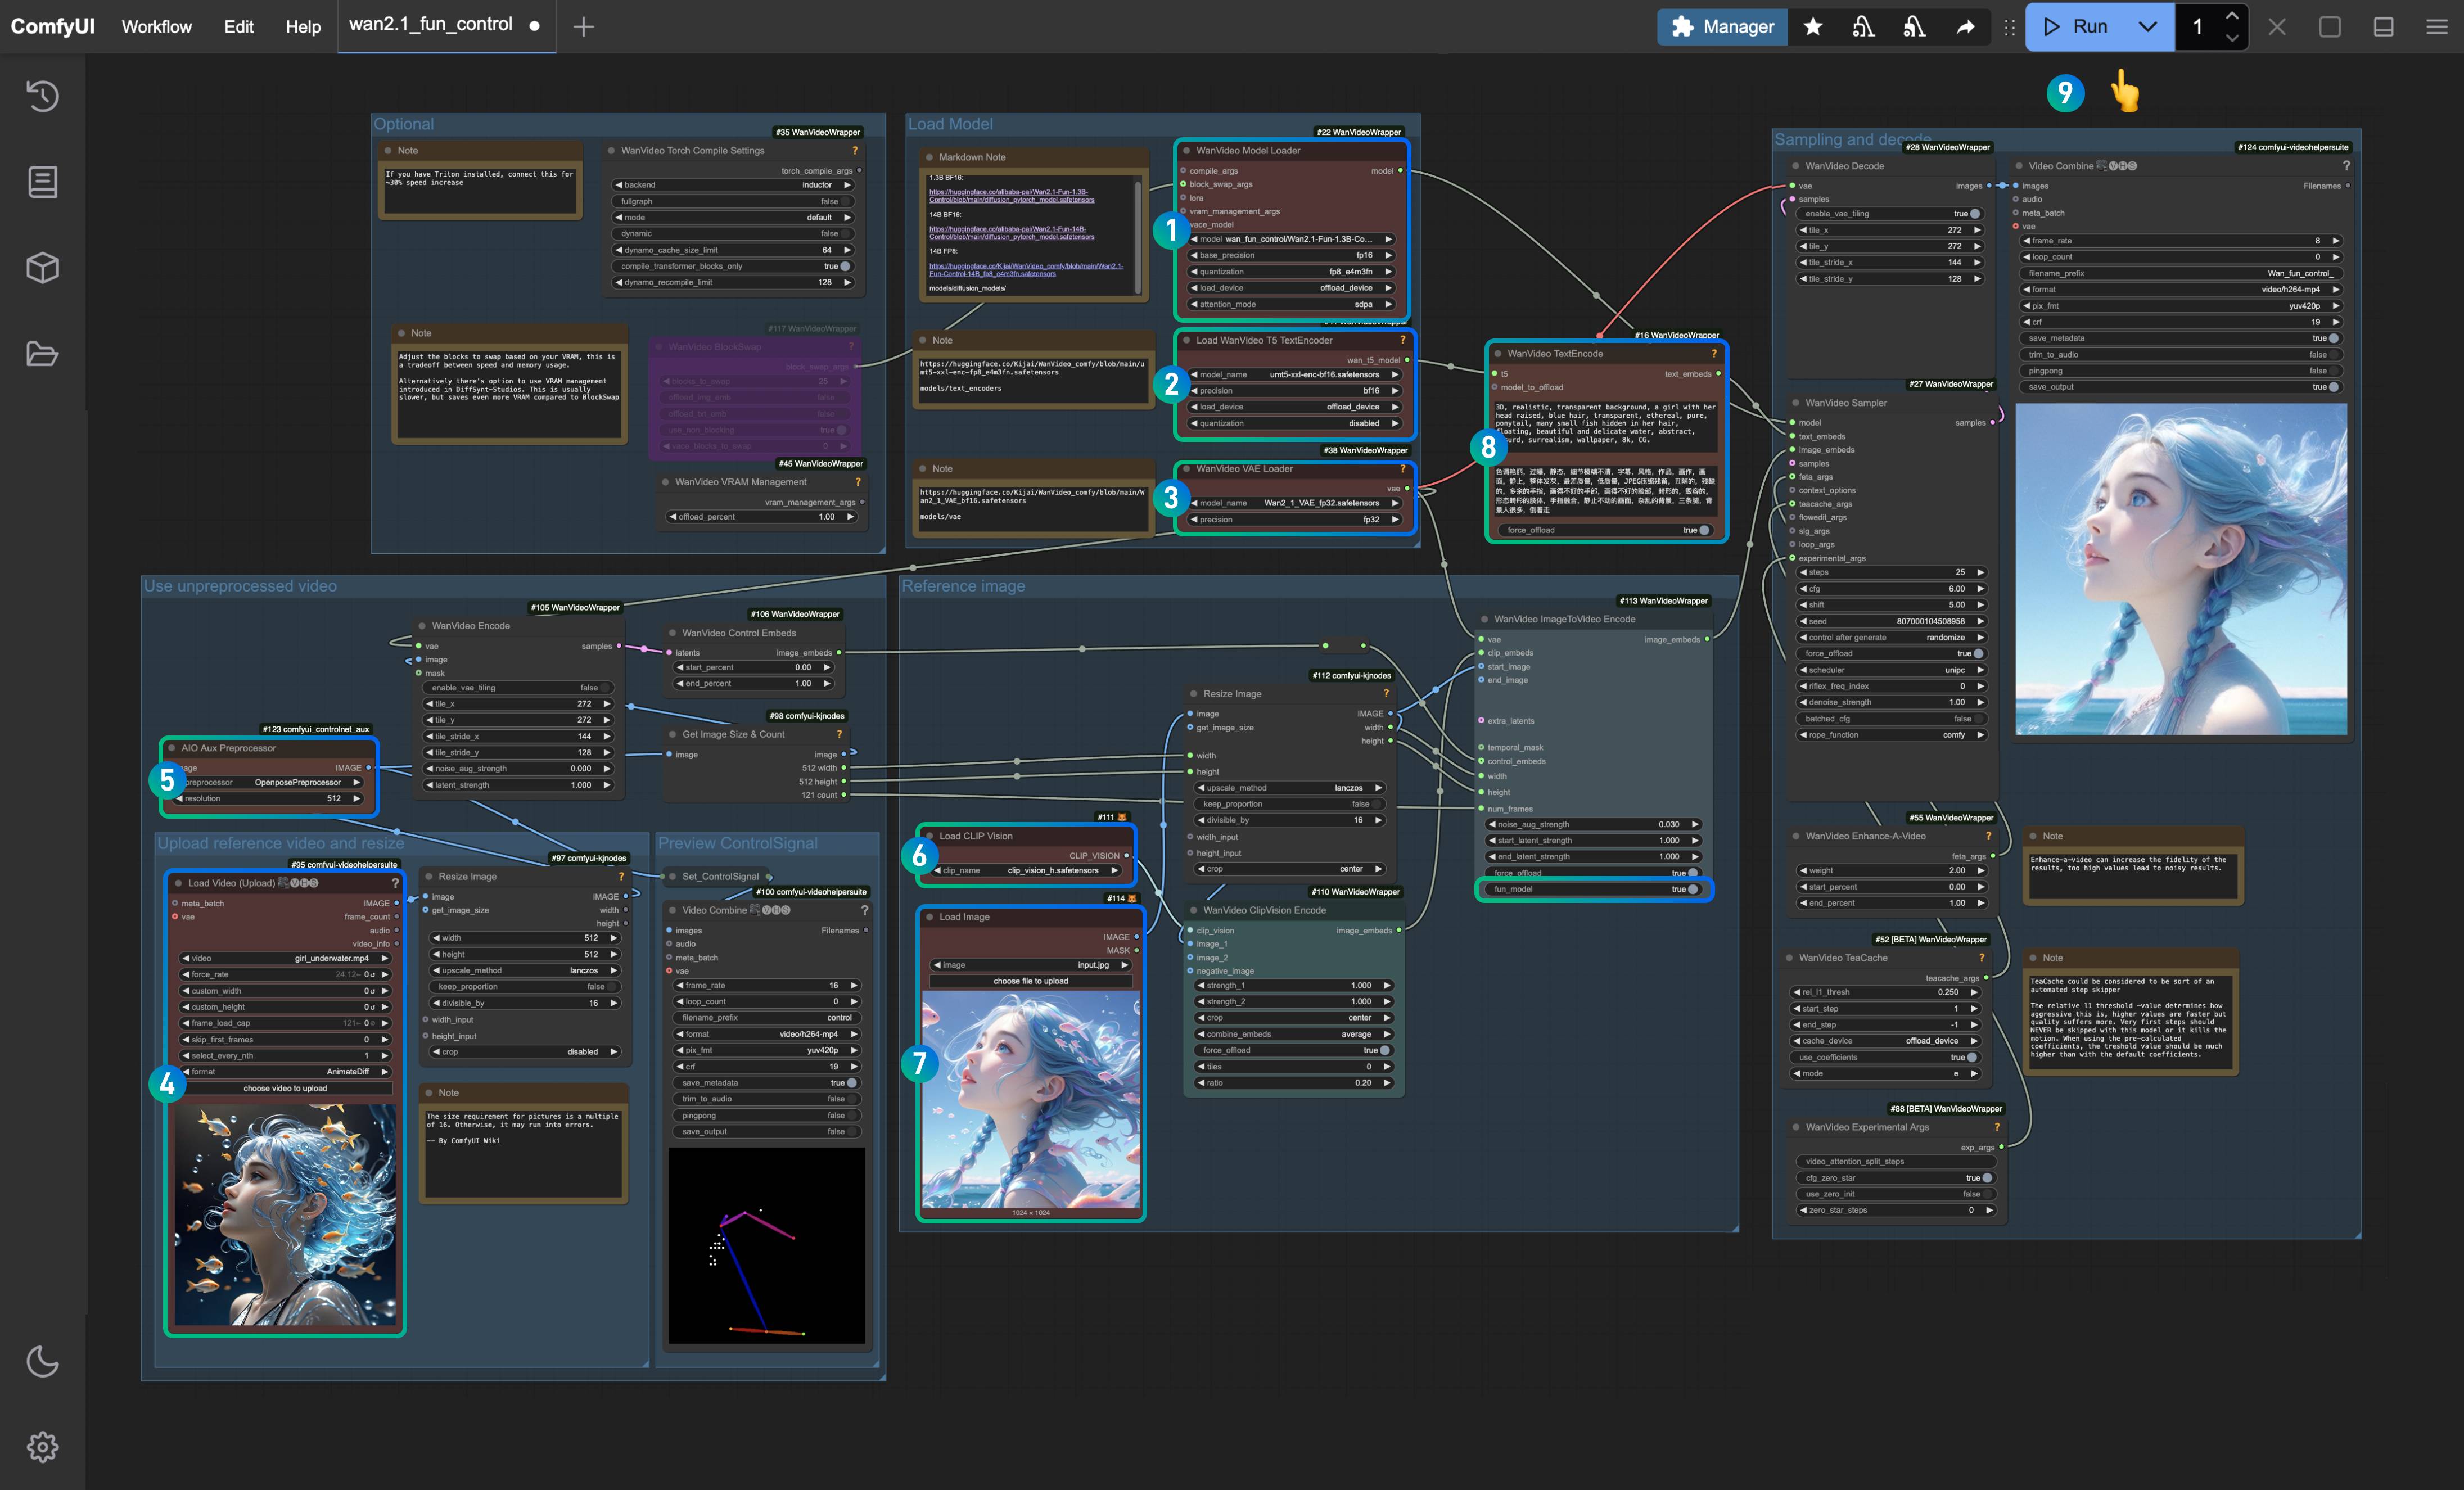
- Ensure that the
WanVideo Model Loadernode has loaded theWan2.1-Fun-1.3B-Control.safetensorsmodel. - Ensure that the
Load WanVideo T5 TextEncodernode has loaded theumt5-xxl-enc-bf16.safetensorsmodel. - Ensure that the
WanVideo Vae Loadernode has loaded theWan2_1_VAE_bf16.safetensorsmodel. - In the
Load Video(Upload)node, upload the input video we provided earlier. - In the
AIO AuxAux Preprocessornode, select theOpenposePreprocessornode. - In the
Load CLIP Visionnode, ensure that theclip_vision_h.safetensorsmodel is loaded, which will be used to extract features from the reference image. - In the
Load Imagenode, upload the previously provided reference image. - In the
WanVideo TextEncode, enter the prompt for the video you want to generate (you can keep it as default). - Click the
Runbutton, or use the shortcutCtrl(cmd) + Enterto execute the video generation.
2.3 Workflow Analysis
- Since Kijai has updated the corresponding nodes, please note that the
WanVideo ImageToVideo Encodenode has an option calledfun_modelthat needs to be set to true. - Compared to others, using the features of the reference image will be more fitting, so using a reference image is still necessary. However, since it only extracts image features, it cannot fully maintain character consistency.
- In the image preprocessing section, you can try combining multiple preprocessing nodes to generate richer control conditions.
Comments
Sign in with GitHub to join the discussion.