LTX Video Workflow Step-by-Step Guide

Introduction to LTX Video Model
LTX Video is a revolutionary DiT architecture video generation model with only 2B parameters, featuring:
- Real-time Generation: Capable of generating videos faster than real-time playback
- High-Quality Output: Smooth video output at 768x512 resolution and 24FPS
- Multiple Generation Modes: Supports text-to-video, image-to-video, and video-to-video conversion
Setup Requirements
System Requirements
- Python 3.10.5 or higher
- CUDA 12.2 or higher
- PyTorch >= 2.1.2
ComfyUI Environment
-
Update ComfyUI First, ensure your ComfyUI is updated to the latest version. If you’re unsure how to update ComfyUI, please refer to How to Update ComfyUI
-
Install ComfyUI-LTXVideo Custom Node There are two installation methods:
Method 1: Via ComfyUI Manager (Recommended)
- Open ComfyUI Manager
- Search for “LTXVideo”
- Click Install
Method 2: Manual Installation
- Navigate to ComfyUI’s
custom_nodesdirectory - Clone the repository:
git clone https://github.com/Lightricks/ComfyUI-LTXVideo- Install dependencies:
pip install -r requirements.txtIf you’re not familiar with plugin installation, please refer to ComfyUI Plugin Installation Guide
Required Models Download
You need to download the following model files:
| Model Name | File Name | Installation Path | Download Link |
|---|---|---|---|
| LTX Video Model | ltx-video-2b-v0.9.safetensors | models/checkpoints | Hugging Face |
| PixArt Text Encoder | model-00001-of-00002.safetensors | models/text_encoders/PixArt-XL-2-1024-MS/text_encoder | Hugging Face |
| T5 Text Encoder | t5xxl_fp16.safetensors | models/text_encoders | Hugging Face |
Note:
- The PixArt text encoder requires downloading the complete text_encoder folder contents
- The T5 text encoder file is large (approximately 9.79GB), using a download manager is recommended
Workflow Files
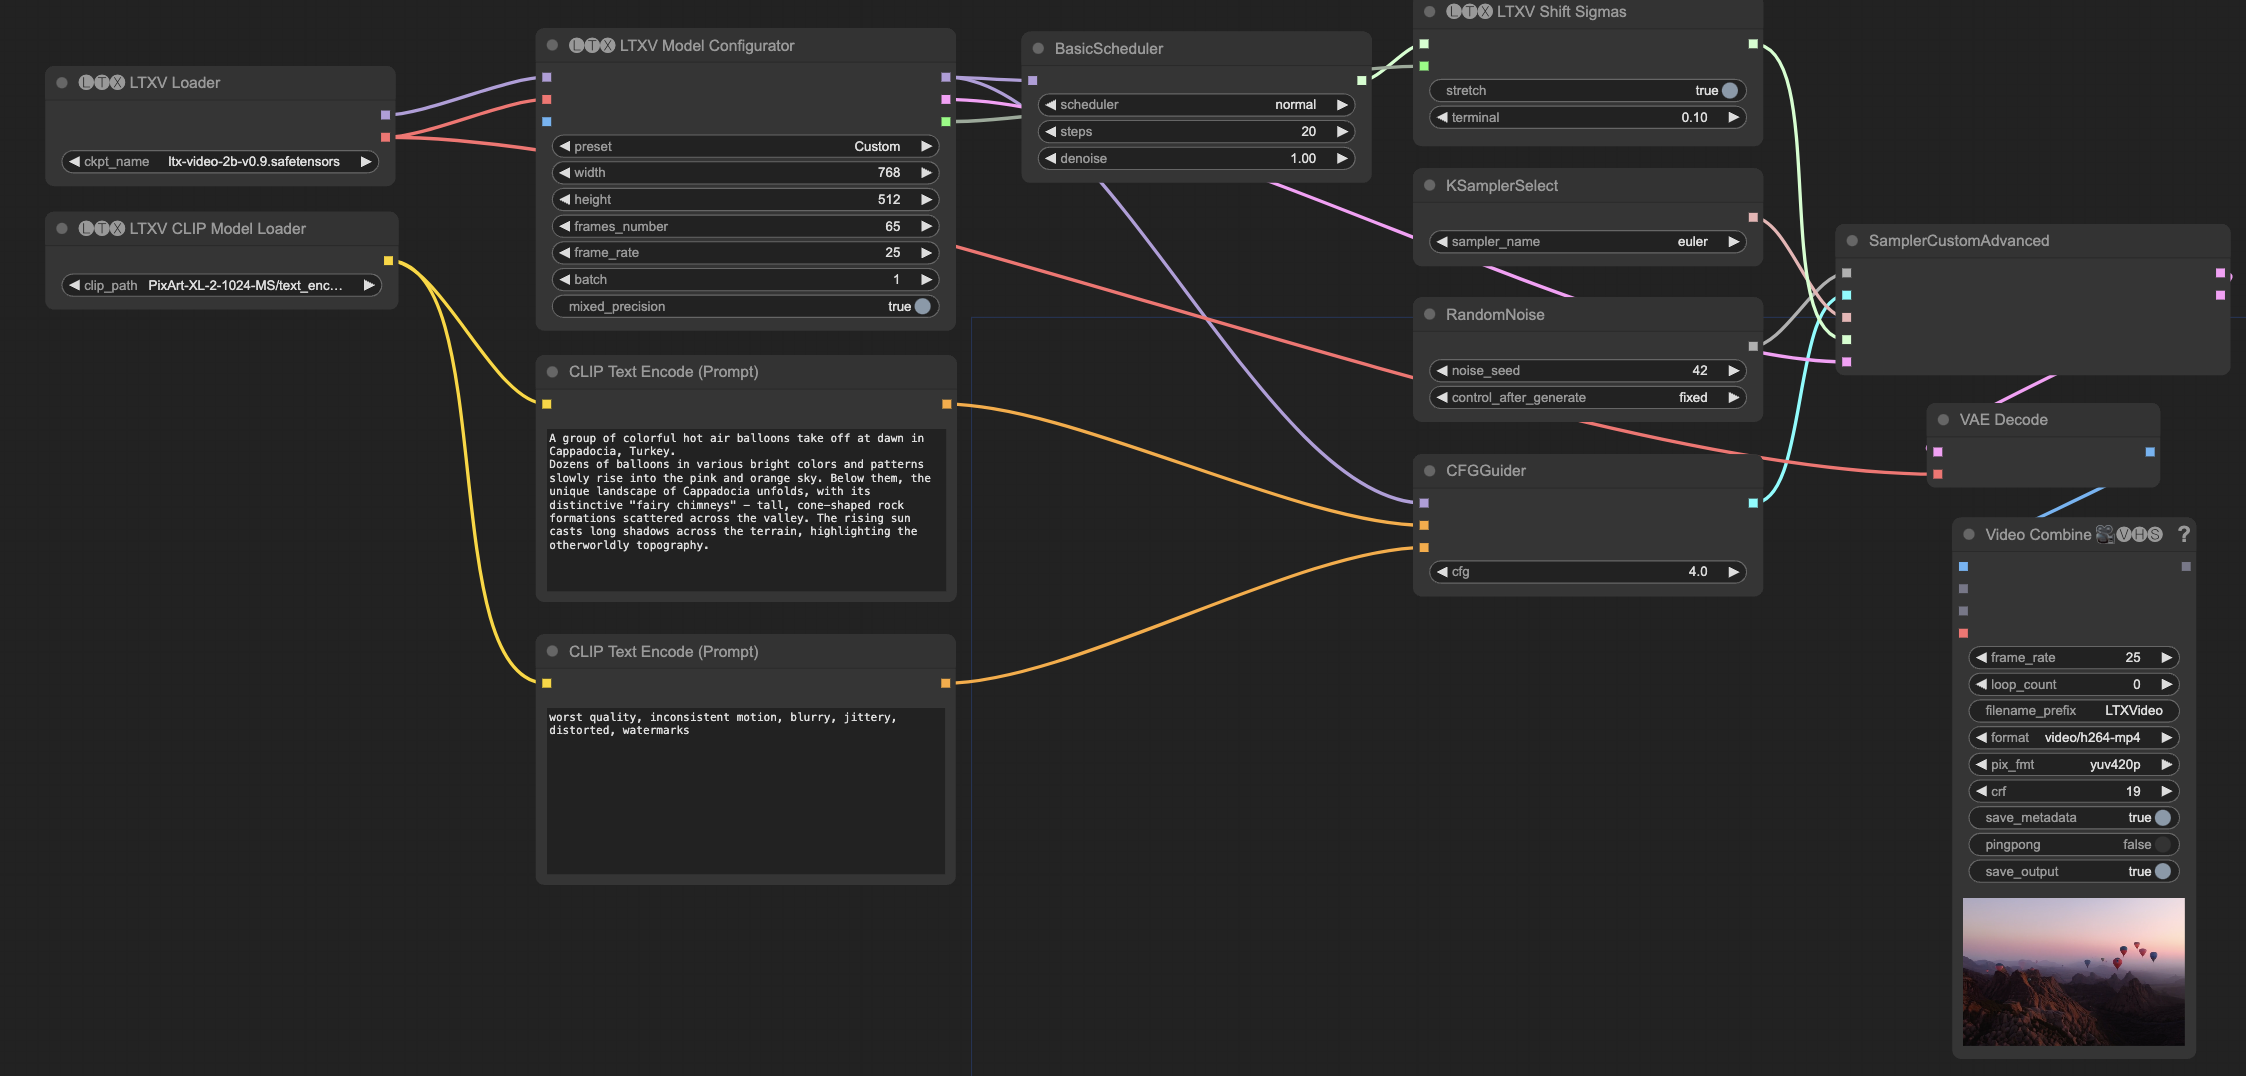
Text-to-Video Workflow

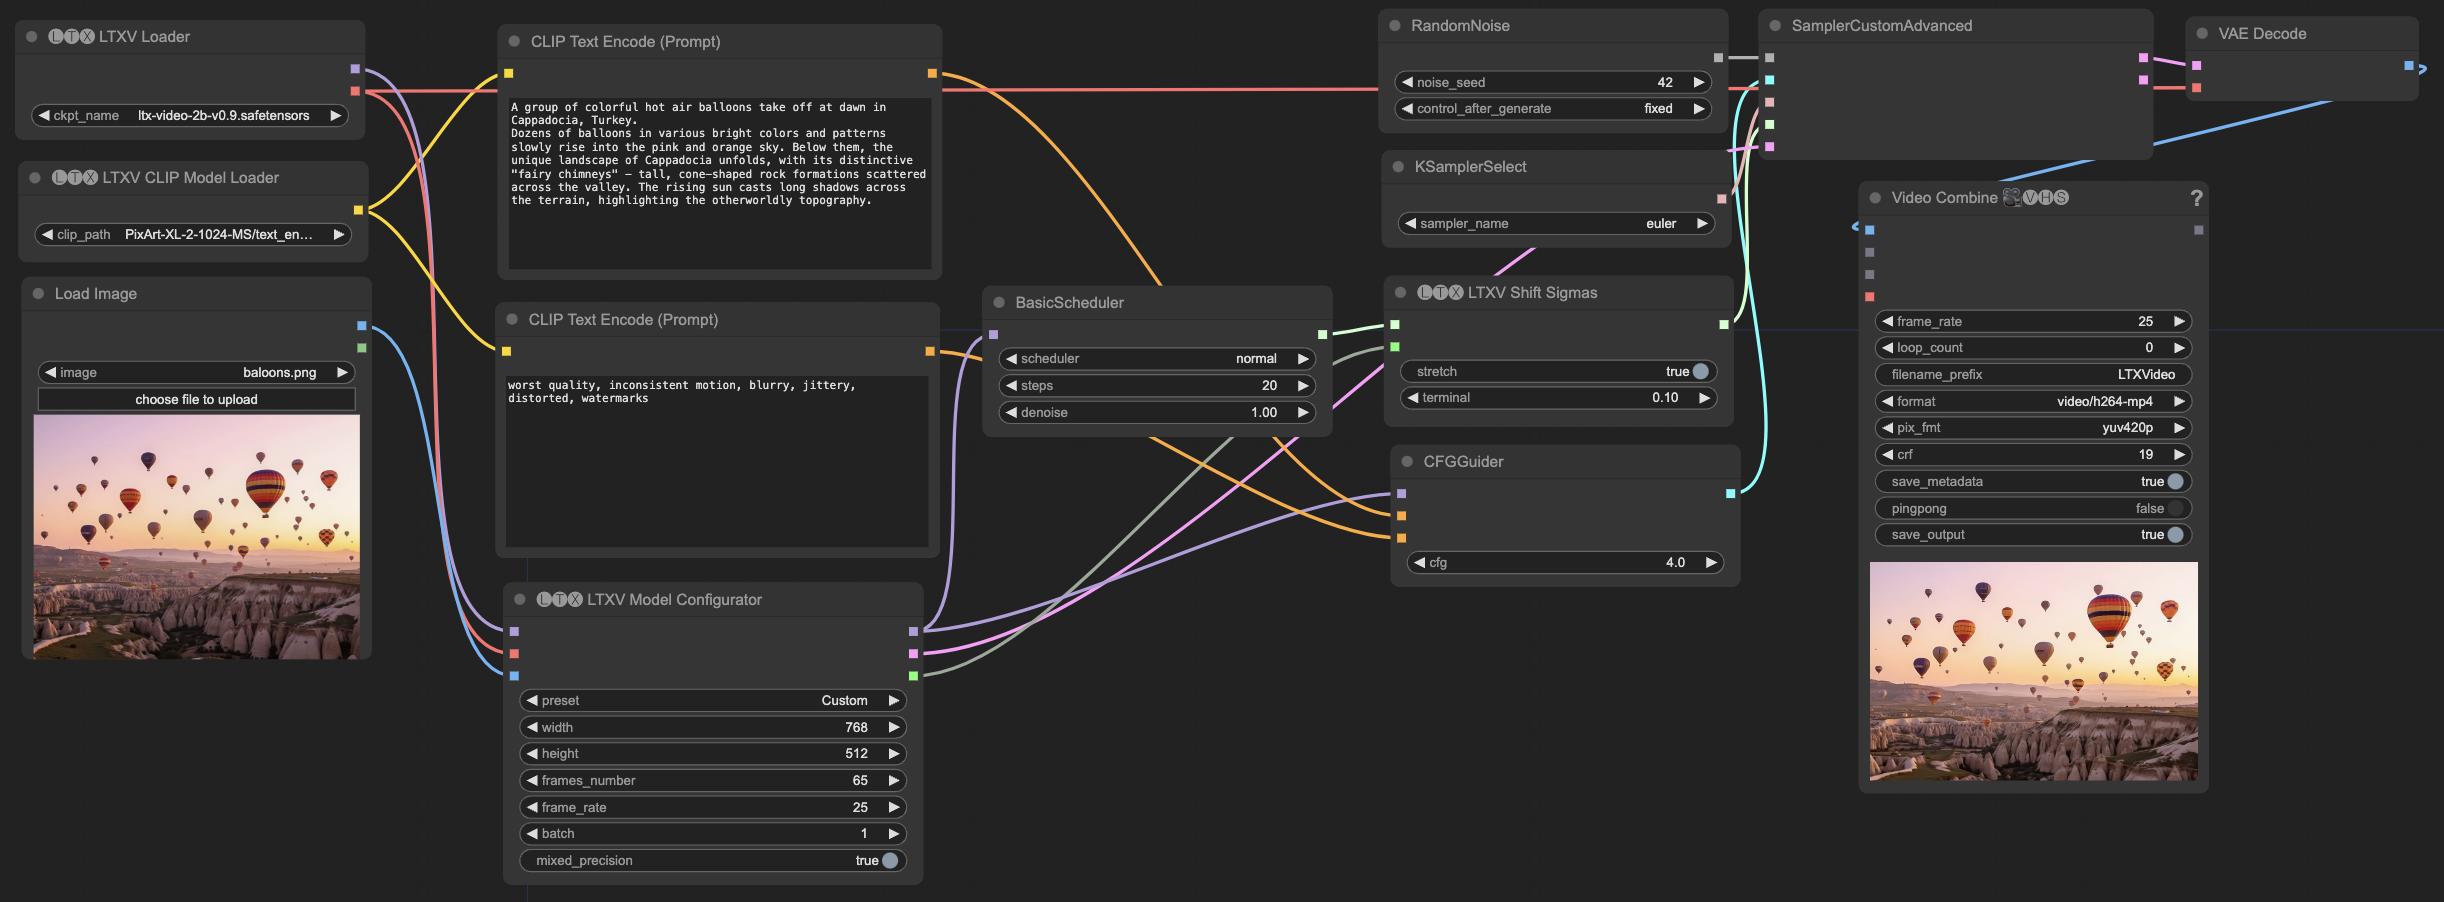
Image-to-Video Workflow

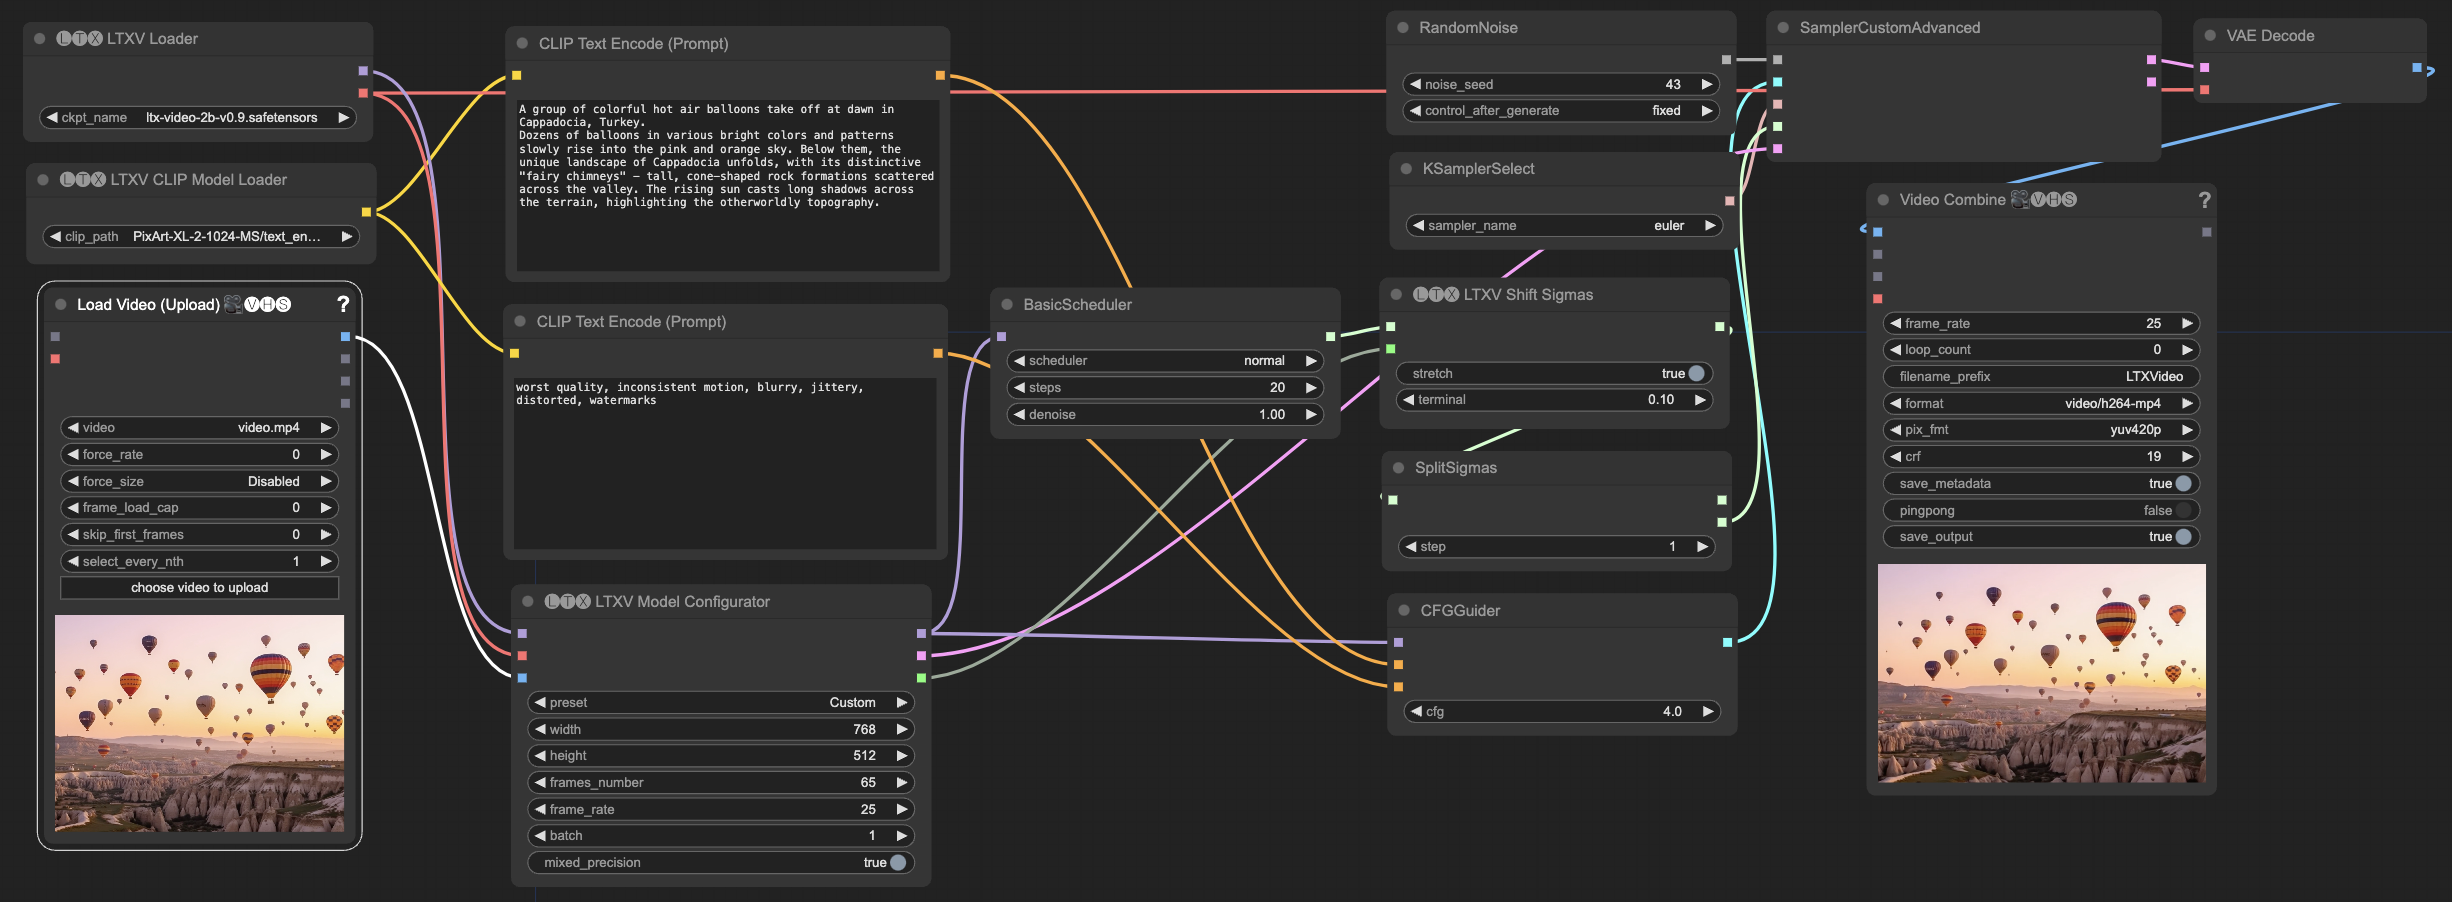
Video-to-Video Workflow

LTX Video Usage Limitations
Resolution and Frame Rate
- Resolution must be a multiple of 32
- Frame rate must be a multiple of 8 + 1 (e.g., 65 frames, 257 frames, etc.)
- Recommended resolution should not exceed 720x1280
- Recommended frame count should not exceed 257 frames
Prompt Guidelines
- Must be in English
- The more detailed the prompt, the better
- It is recommended to include complete descriptions of scenes, actions, and details
Workflow Usage Tutorial
Basic Node Descriptions
All workflows include the following basic nodes:
- Model Loading Node
LTXVLoader: Load the main LTX Video model- Select the
ltx-video-2b-v0.9.safetensorsfile
- Select the
LTXVCLIPModelLoader: Load the text encoder- Select the
PixArt-XL-2-1024-MS/text_encoder/model-00001-of-00002.safetensorsfile
- Select the
LTXVModelConfigurator: Configure model parameters- Set basic parameters such as resolution, frame count, and FPS
- Optionally enable conditioning input
- Prompt Processing Node
CLIPTextEncode (Positive): Positive prompt encoding- Use the PixArt encoder to process positive prompts
CLIPTextEncode (Negative): Negative prompt encoding- Use the PixArt encoder to process negative prompts
CFGGuider: Control the strength of prompt guidance- Recommended value range: 2-7
- The larger the value, the closer the generated content will be to the prompt description
- Sampling Control Node
KSamplerSelect: Select the sampler- It is recommended to use the Euler sampler
BasicScheduler: Set the number of sampling steps and scheduler- Step range: 10-25
- Scheduler type: normal
RandomNoise: Generate random noise- A fixed seed can be set for reproducible results
SamplerCustomAdvanced: Execute the sampling process- Integrate all sampling-related parameters for final generation
- Output Node
VAEDecode: Decode the generated frames- Use the built-in VAE decoder of LTX Video
VHS_VideoCombine: Combine the final video- Set output video frame rate, format, and encoding parameters
- Supports previewing the generated video
LTX Video Generation Mode Tutorial
Text-to-Video
- Set Basic Parameters
In
LTXVModelConfigurator:
- Resolution: 768x512
- Frame Count: 65 (approximately 2.5 seconds)
- FPS: 25
- Write Prompts
- Positive prompts should be as detailed as possible, describing scenes, actions, and details
- Negative prompts are recommended to include: “worst quality, inconsistent motion, blurry, jittery, distorted, watermarks”
- Adjust Sampling Parameters
- Steps: Recommended 20 steps
- CFG: Recommended 4-7
- Sampler: Euler
- Scheduler: Normal
Image-to-Video
In addition to basic settings, you also need:
- Prepare Reference Images
- Use the
LoadImagenode to load reference images - Images should ideally match the target resolution ratio
- Adjust Conversion Parameters
- Lower the CFG value (recommended 3-5) to maintain consistency with the reference image
- Sampling steps can be appropriately reduced (15-20)
Video-to-Video
- Load Source Video
Use the
VHS_LoadVideonode:
- Set an appropriate frame rate
- Choose whether to adjust the resolution
- Parameter Tuning
- Use a lower CFG (2-4)
- Reduce sampling steps (10-15)
- Adjust the
sigma_shiftparameter as needed
LTX Video Optimization Guide
Parameter Optimization
-
Prompt Optimization
- Use detailed and specific descriptions
- Include descriptions of actions and scene transitions
- Add vocabulary related to cinematography
-
Performance Optimization
- Reduce resolution appropriately to increase speed
- Decrease frame count for testing
- Use fewer sampling steps
-
Quality Optimization
- For shaky images: lower the CFG value
- For insufficient details: increase sampling steps
- For unnatural transitions: optimize prompt descriptions
LTX Video Advanced Application Tips
Long Video Production
- Generate multiple segments separately
- Maintain stylistic consistency through prompts
- Use video editing tools for post-production stitching
Style Control
- Include specific artistic style descriptions in prompts
- Use reference images to guide style
- Adjust style strength through CFG values
Action Control
- Describe action processes in detail in prompts
- Use keyframes as references
- Adjust frame rates appropriately for desired effects
LTX Video Examples and Templates
Scene Examples
- Simple Scene Transition
Positive Prompt: “A serene lake at sunrise, gentle ripples on the water surface, morning mist slowly rising, birds flying across the golden sky” Sampling Steps: 20 CFG: 4
- Complex Action Sequence Positive Prompt: “A professional dancer performing a graceful contemporary dance sequence, flowing movements, dynamic spins and leaps, soft lighting, studio setting” Sampling Steps: 25 CFG: 5
Remember to save your preferred parameter combinations for future use. Through continuous experimentation and adjustment, you will gradually master the usage of LTX Video.
LTX Video Prompt Template
The turquoise waves crash against the dark, jagged rocks of the shore, sending white foam spraying into the air. The scene is dominated by the stark contrast between the bright blue water and the dark, almost black rocks. The water is a clear, turquoise color, and the waves are capped with white foam. The rocks are dark and jagged, and they are covered in patches of green moss. The shore is lined with lush green vegetation, including trees and bushes. In the background, there are rolling hills covered in dense forest. The sky is cloudy, and the light is dim.LTX Video Resource Links
LTX Video Official Resources
- LTX Video Official Website
- LTX Video Technical Documentation
- LTX Video GitHub Repository
- ComfyUI-LTXVideo Plugin Repository