ControlNet Tutorial: Using ControlNet in ComfyUI for Precise Controlled Image Generation
This article explains how to install and use ControlNet models in ComfyUI.
In the AI image generation process, precisely controlling image generation is not a simple task. It typically requires numerous attempts to generate a satisfactory image, but with the emergence of ControlNet, this problem has been effectively solved.
ControlNet offers more than a dozen control network models, allowing us to further control image style, details, character poses, scene structure, and more. These conditions make AI image generation more controllable, and multiple ControlNet models can be used simultaneously during the drawing process to achieve better results.
You can think of ControlNet as a translation assistant that converts our reference image into instructions that AI can understand, transmitting them to the AI model to generate images that meet our requirements.
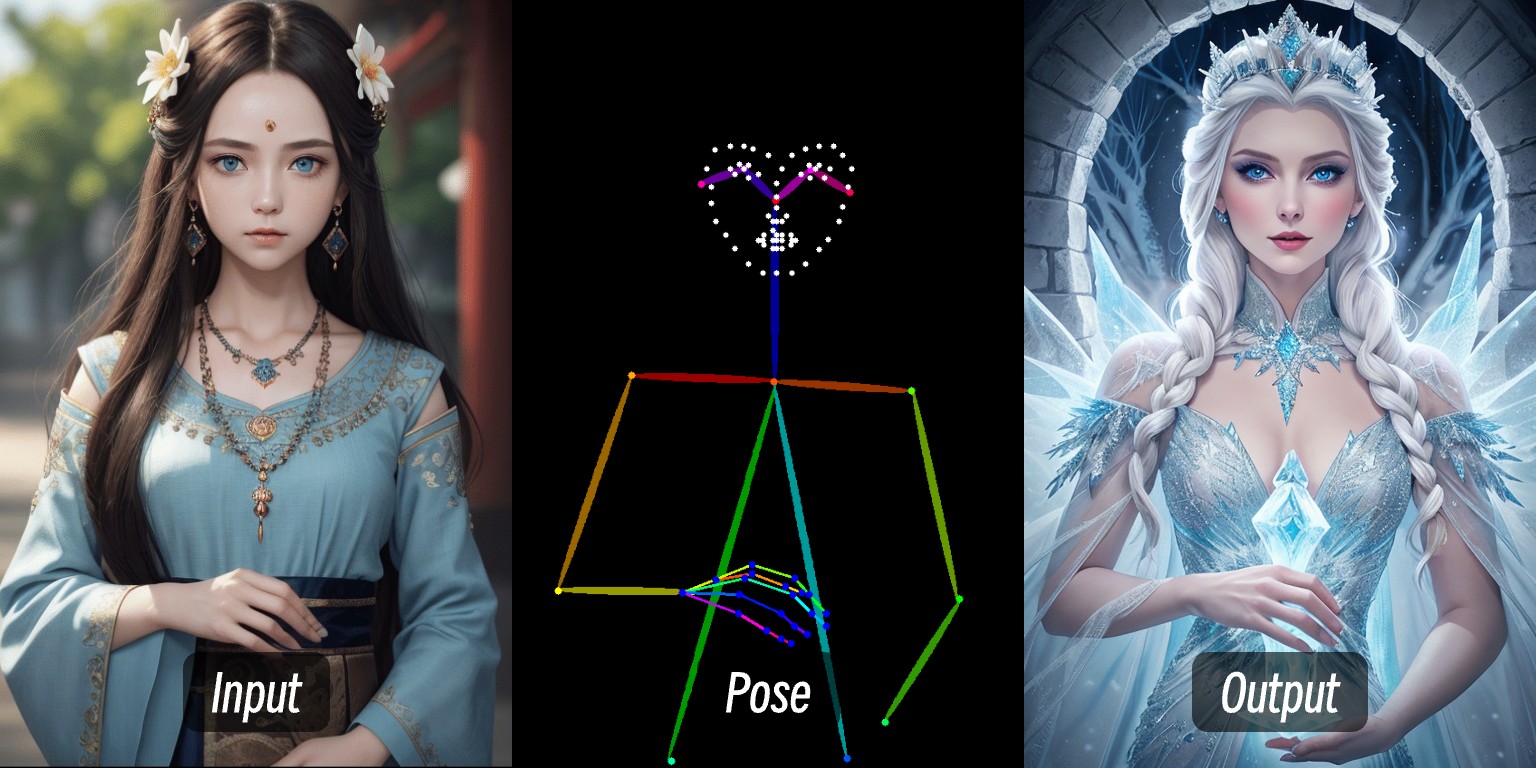
For example, in this image, by inputting an image of a person, extracting the person's control conditions through the preprocessor, and then applying the ControlNet model, an image of a person with consistent pose was generated.
This tutorial will cover:
- Basic introduction to ControlNet
- ControlNet workflow in ComfyUI
- ControlNet-related resources
- Composition of a typical ControlNet workflow in ComfyUI
Then, in other ControlNet-related articles on ComfyUI-Wiki, we will specifically explain how to use individual ControlNet models with relevant examples.
Brief Introduction to ControlNet
ControlNet is a condition-controlled generation model based on diffusion models (such as Stable Diffusion), initially proposed by Lvmin Zhang, Maneesh Agrawala, and others in 2023. This model significantly improves the controllability and detail restoration capability in image generation by introducing multimodal input conditions (such as edge detection, depth maps, pose keypoints, etc.).
Here are some ControlNet-related links:
- Author's homepage: lllyasviel
- ControlNet 1.0: ControlNet
- ControlNet-v1-1-nightly: ControlNet-v1-1-nightly
- Hugging Face: ControlNet-v1-1
- Paper: ControlNext-to-Image Diffusion Models
Common Control Types in ControlNet
With the development of ControlNet in recent years and community contributions, ControlNet currently supports more than a dozen control types. Below are some common types, each suitable for different scenarios.
1. Line Control Types
- Canny: Generates detailed lines through edge detection, ideal for precisely imitating the original structure.
- MLSD: Only detects straight lines, suitable for architecture, interior design, etc.
- Lineart: New generation line art recognition, more refined than Canny, supports anime line extraction.
- SoftEdge: Soft edge detection, prioritizes large contour lines, suitable for scenarios that don't require precise imitation.
- Scribble/Sketch: Doodle control, supports rough contour recognition or hand-drawn sketch image generation.
2. Depth and Structure Types
- Depth: Distinguishes the depth relationship between foreground and background through brightness, white areas are closer, black areas are farther.
- NormalMap: Normal map, controls object surface texture (such as recessed window effects).
- OpenPose: Skeletal pose recognition, can automatically detect or manually edit human posture.
3. Semantic and Segmentation Types
- Segmentation: Semantic segmentation, generates images based on colors corresponding to object categories (such as blue for sky).
- Inpaint/local redrawing: Modifies specific parts of the image while maintaining consistency with the original style.
4. Style and Color Types
- Shuffle: Random shuffling, rearranges semantic elements of the reference image to generate diverse scenes.
- Recolor: Recoloring black and white images, supports automatic or keyword-defined colors.
- IP-Adapter: Style/face imitation, maintains consistency in the generated image.
5. Functional Extension Types
- InstructP2P: Modifies images through text instructions (such as making a house "on fire").
- Instant_ID: AI face swapping, maintains facial consistency and supports multiple image fusion.
- Tile/Blur: High-definition enhancement and detail enhancement of blurry images.
Not compatible with OpenPose face/hand specialized processors and some semantic segmentation preprocessors.
ControlNet Workflow in ComfyUI
In ComfyUI, ControlNet functions as a condition controller that generally involves the following processing steps. Due to the many versions of ControlNet models currently in ComfyUI, the specific process may vary. Here we'll explain using the ControlNet V1.1 model as an example, and we'll add specific workflows in related tutorials later.
- Image Preprocessing
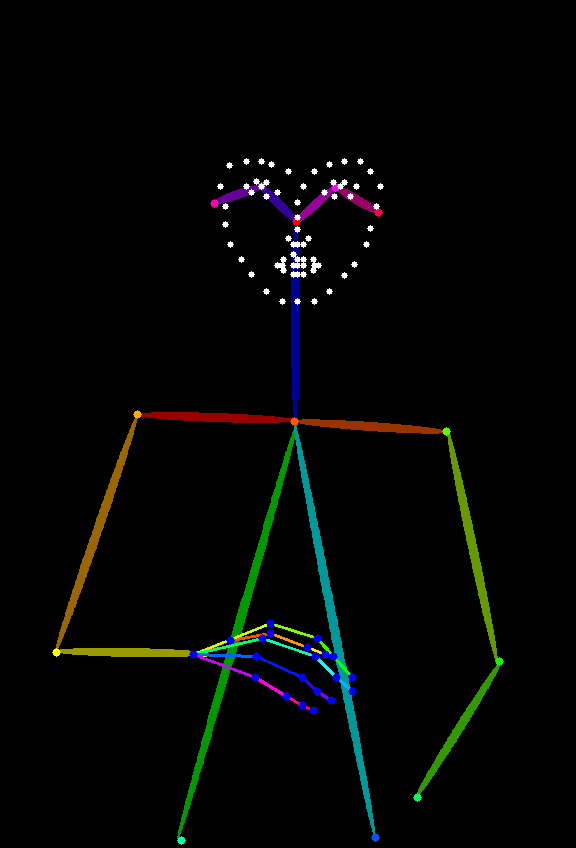
We need to upload a reference image, and the ControlNet preprocessor will extract key features (such as contours, lines, poses). For example, the person image at the beginning of this article becomes Openpose control conditions.
- Condition Injection
ControlNet transforms the extracted features into "condition signals" that are transmitted to the sampler (such as the K sampler). These signals tell the AI: "When generating the image, try to match the lines/poses/structures of the reference image."
- Image Generation by the Sampler
The sampler (such as the K sampler), during the noise removal process to generate the image, will consider the condition signals provided by ControlNet, ultimately producing an image that both meets the textual description and matches the reference image features.
ControlNet Workflow
ControlNet Workflow Without Preprocessor
This section will present a typical SD1.5 ControlNet workflow, without relying on any third-party plugins.
1. Model File Preparation
To use this workflow, make sure you have installed the following:
- Download Dreamshaper 8 and save it in the
ComfyUI/models/checkpoints/directory - Download control_v11p_sd15_openpose.pth and save it in the
ComfyUI/models/controlnet/directory
ComfyUI/models/checkpoints/sd1.5
- ComfyUI/models/controlnet/sd1.5
2. Workflow and Assets
Click the button below to download the corresponding workflow, then drag it into the ComfyUI interface or use the menu Workflows -> Open(Ctrl+O) to load it.
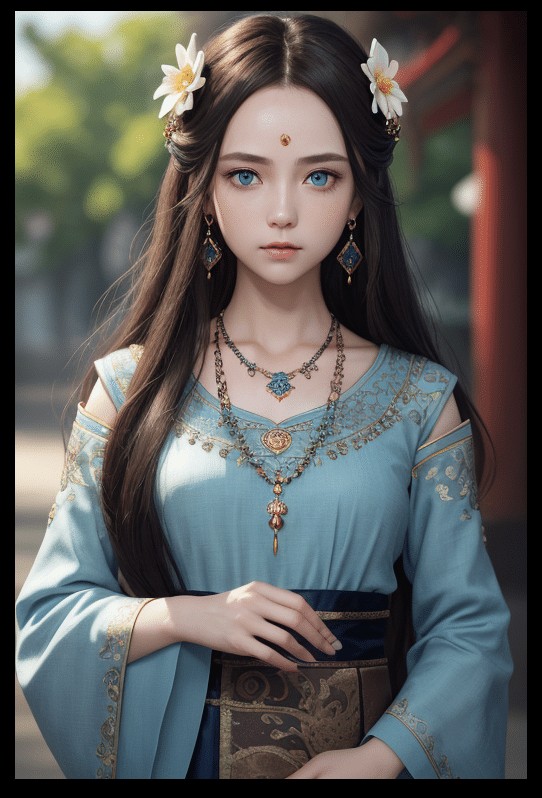
The following image will serve as a reference, please download and save it:
3. Workflow Execution
Following the numbers in the image, complete the corresponding operations to complete this ControlNet workflow.

- Make sure the SD1.5 model has been loaded in the
Load Checkpointnode - Make sure the
control_v11p_sd15_openpose.pthmodel can be recognized and loaded in theLoad ControlNet Modelnode - Load the reference image provided above in the
Load Imagenode - After completing the above operations, click the
Runbutton, or use the shortcutCtrl(cmd) + Enterto generate the image
Try adjusting different parameters in the Apply ControlNet node and generate images to observe how different strengths (Strength) and different start percentages (start_percent) and end percentages (end_percent) affect the generated result.
4. Workflow Explanation
In the above flow, if we compare with our text-to-image workflow:
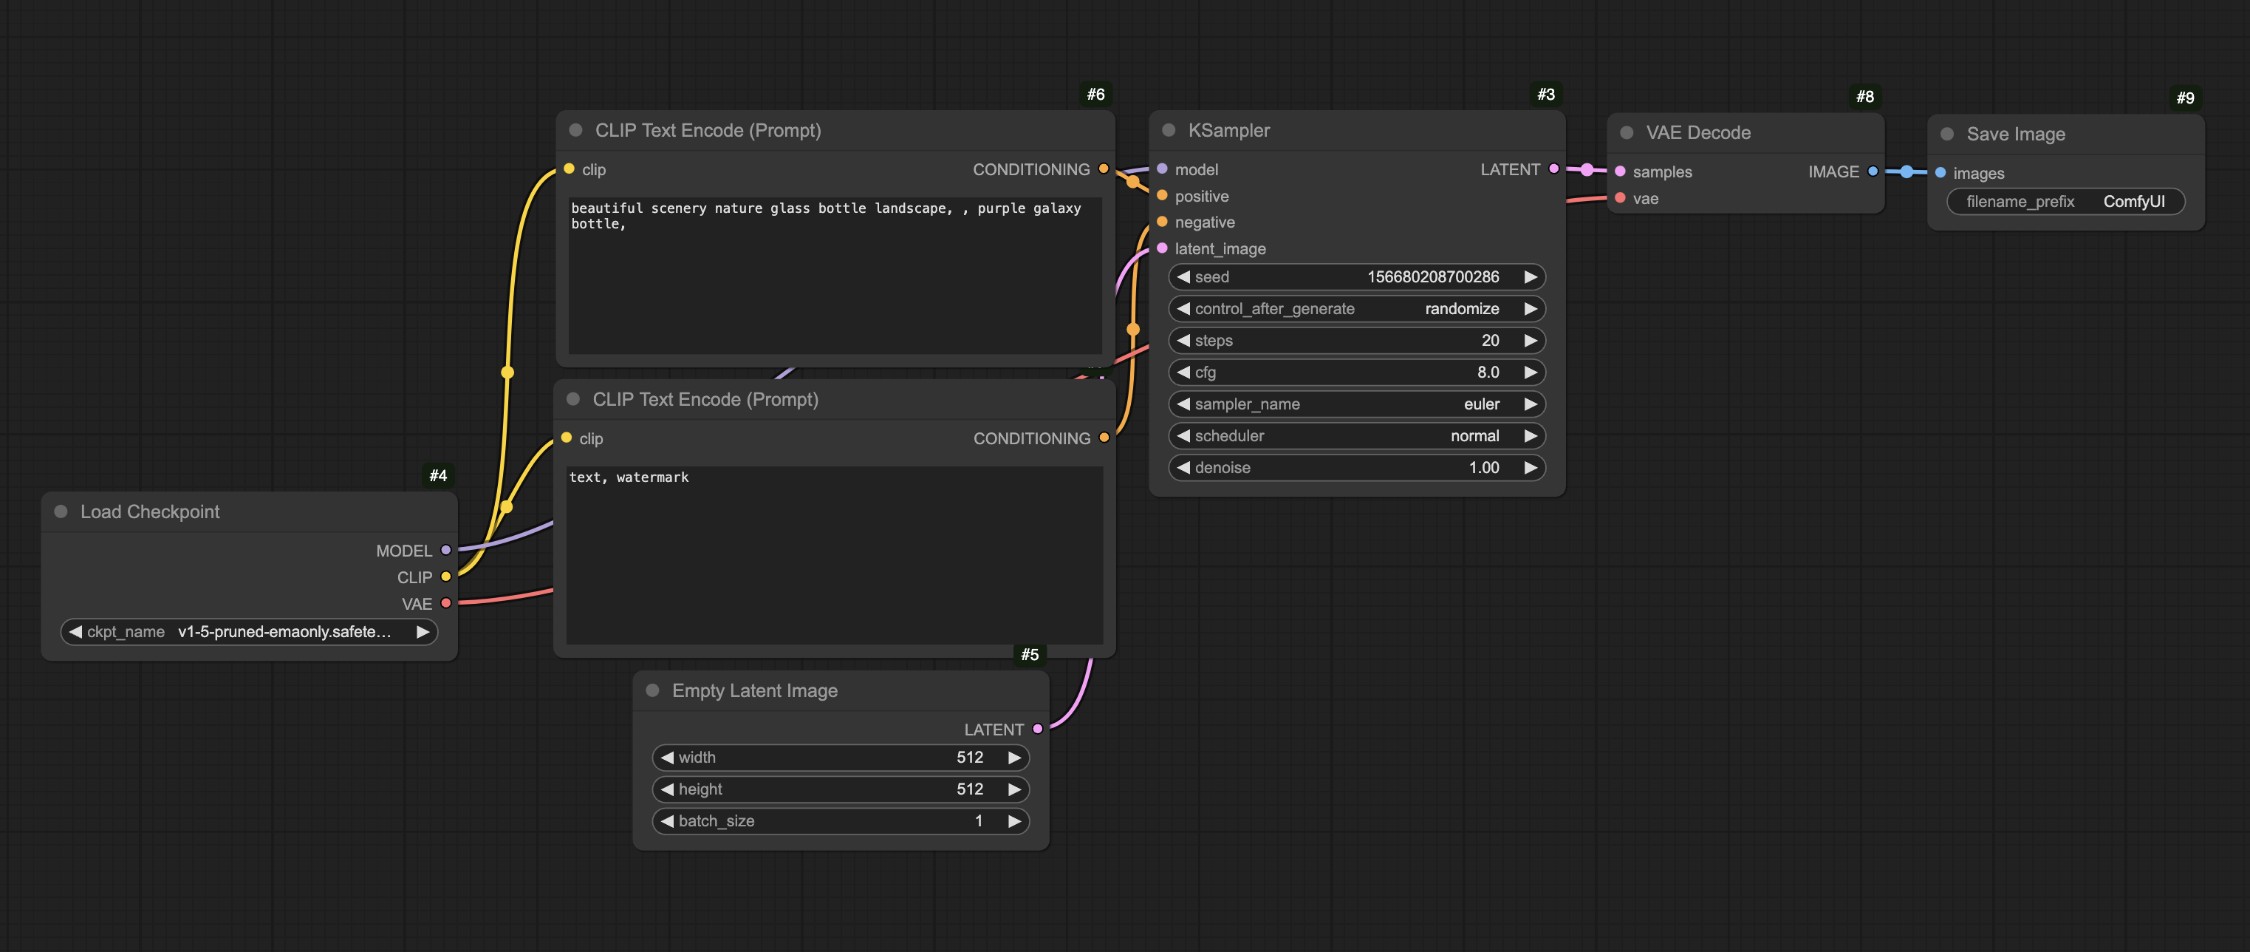
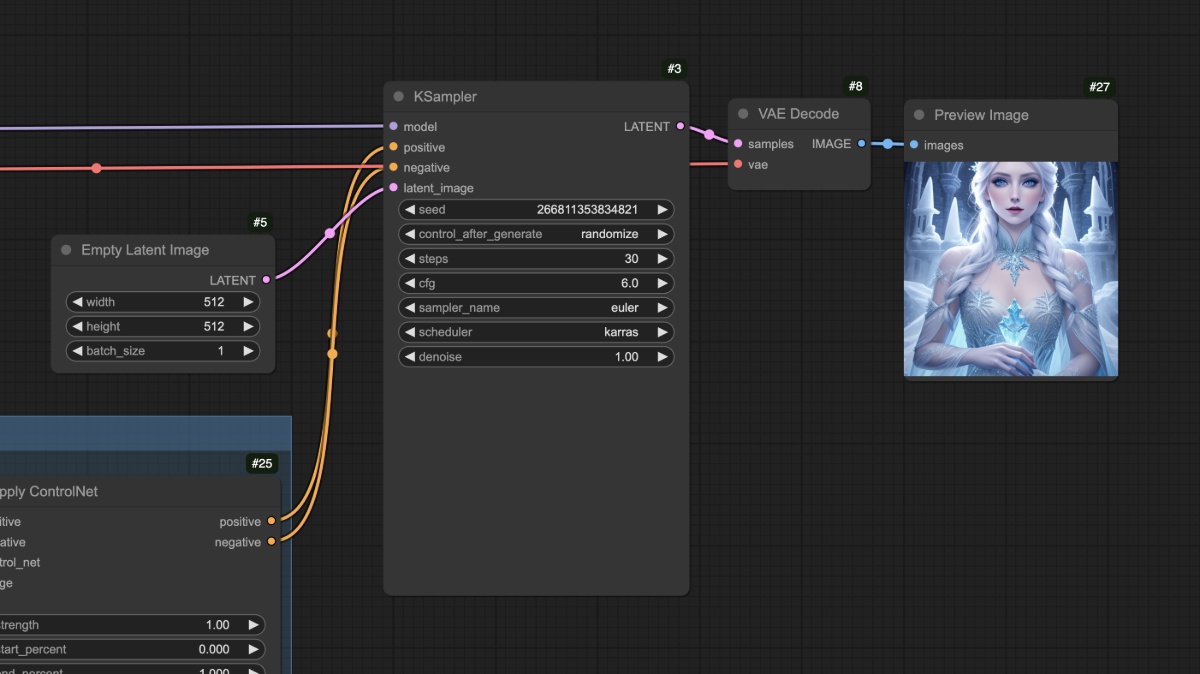
You'll notice that the main difference is that in the original text-to-image flow, we now input the corresponding conditions to the Apply ControlNet node, adding the corresponding control conditions through this node, and then send the resulting output conditions to the condition input of the KSampler node.
You can see that the character was generated well, and furthermore, the common limb errors in SD1.5 models do not appear in this workflow.
After completing the above operations, you can try modifying the size of the Empty Latent Image node, for example setting it to 512x512, and generate again to observe the differences between the generated image and the reference image.
You should be able to see that the final generated image only uses the central area of the reference image. Additionally, different types of reference images require different types of ControlNet models. For example, Openpose needs the control_v11p_sd15_openpose.pth model, while a Canny image needs the control_v11p_sd15_canny.pth model.
In the above workflow, we might have a question: the reference image we used (Openpose) is not so common, could we use other more common reference images to generate corresponding images? This is where we need to use preprocessors. Let's continue with a workflow that uses preprocessors in the next section.
ControlNet Workflow With Preprocessor
What is a preprocessor?
For example, in the image below, we used ComfyUI's Canny preprocessor, which extracts the contour edge features of the image.
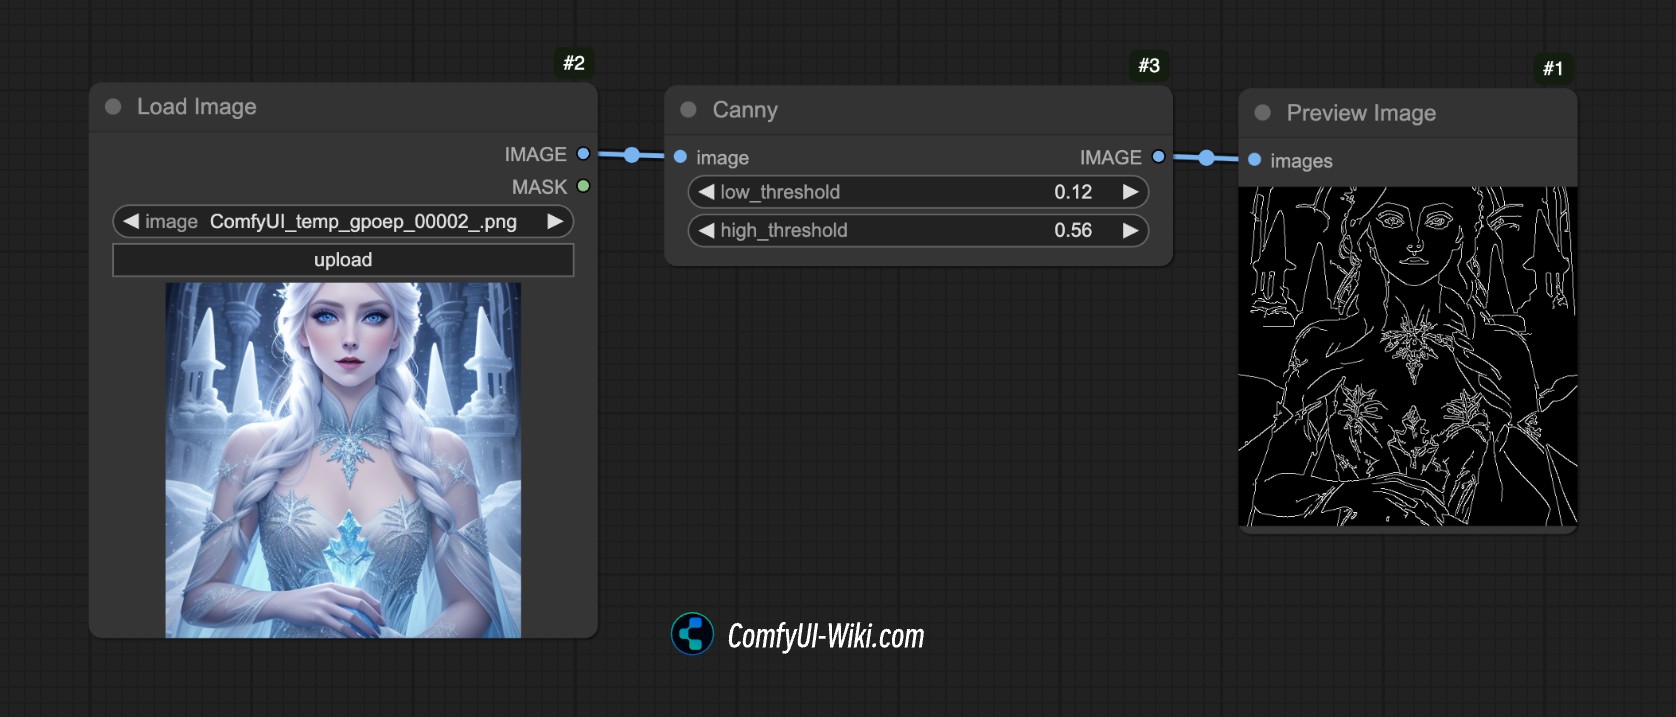
This is the purpose of a preprocessor: it converts our reference image (such as a photo, line art, doodle, etc.) into a structured feature map so that the ControlNet model can understand and guide the generated result.
There are many common types of preprocessors, such as:
- Line art preprocessors (such as canny, lineart): extract image edge contours, generating black and white line art.
- Depth map preprocessors (such as depth_midas): calculate the distance levels of objects in the image, generating a grayscale depth map.
- Pose preprocessors (such as openpose): recognize human skeleton keypoints, generating stick figure skeleton images.
However, in ComfyUI, there is only the Canny preprocessor, so we need to rely on other plugins to complete the image preprocessing work. Below we will proceed with the corresponding workflow content.
1. Related Plugin Installation
This tutorial requires the ComfyUI ControlNet Auxiliary Preprocessors plugin.
For plugin installation tutorials, you can refer to the ComfyUI Plugin Installation Tutorial.
2. Model File Preparation
In this example, we can keep the same model files as in the previous section:
- Download Dreamshaper 8 and save it in the
ComfyUI/models/checkpoints/directory - Download control_v11p_sd15_openpose.pth and save it in the
ComfyUI/models/controlnet/directory
3. Workflow and Input Image Materials
Download the workflow file below:
After running ComfyUI, drag in the workflow or use ComfyUI's shortcut `Ctrl+O` to open this workflow file.Please download the image below and load it in the Load Image node:
- Load the input image in the
1Load Image node - Select your installed model in the
2Load Checkpoint node - Select the
control_v11f1p_sd15_openpose.pthmodel in the3Apply ControlNet node - Use Queue or the shortcut
Ctrl+Enterto run the workflow and generate the image
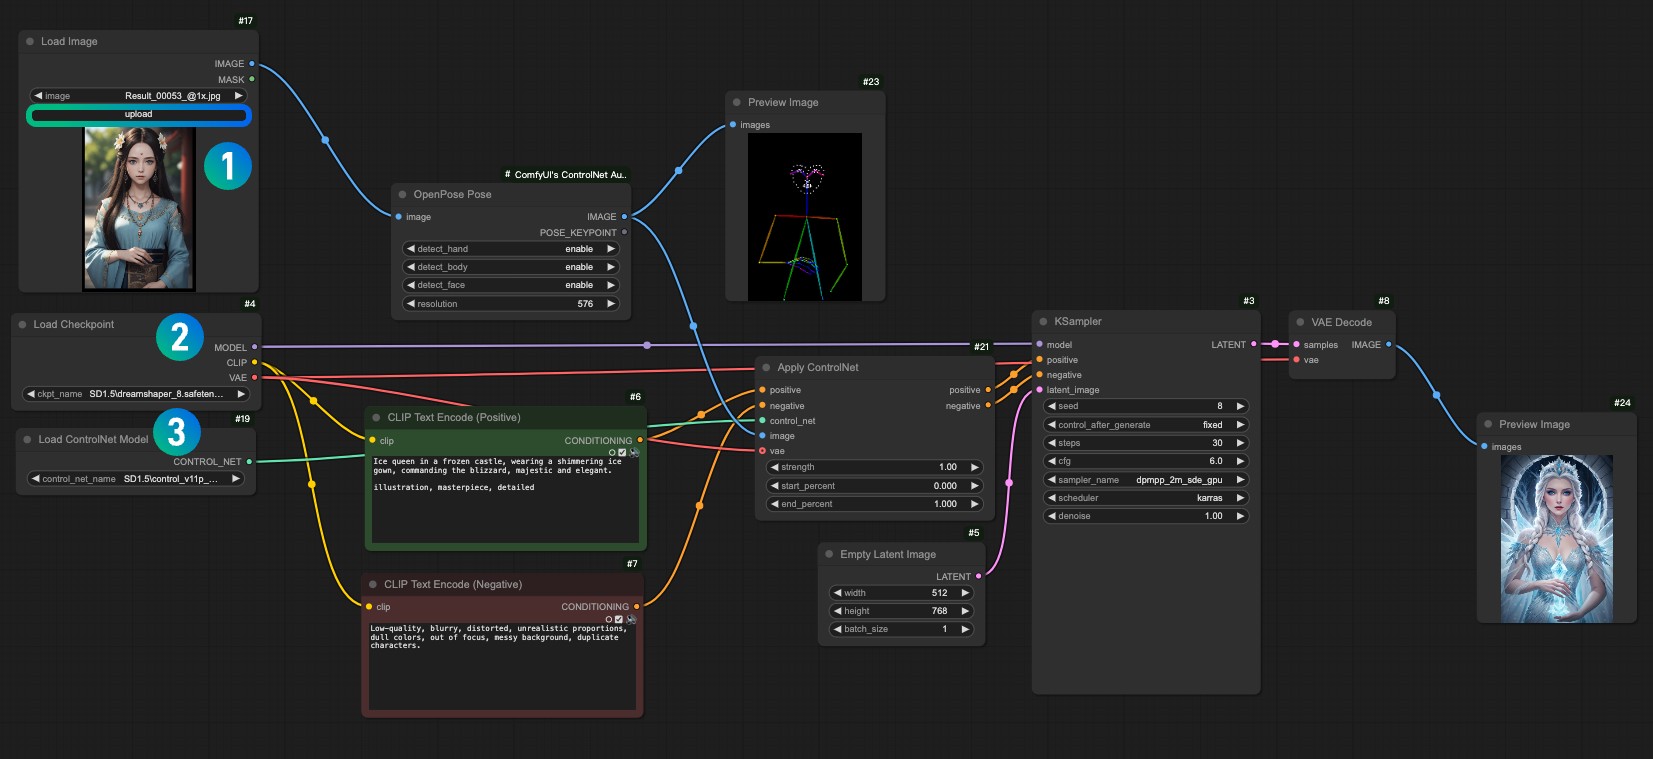
4. Workflow Explanation
This workflow compared to the previous one actually just adds an additional step of image preprocessing. We input the corresponding image to the OpenPose Pose preprocessor provided by ComfyUI ControlNet Auxiliary Preprocessors, completing the image preprocessing.
So that's a simple introduction to ControlNet in ComfyUI. In subsequent ControlNet-related tutorials, we will continue to introduce more ControlNet models and provide corresponding examples.