Different Methods and Detailed Tutorial for Image Upscaling in ComfyUI
In this article, ComfyUI Wiki will explain several basic methods for upscaling images in ComfyUI. Due to hardware performance limitations, we often cannot generate large-size images in one go, so we typically generate smaller images first and then upscale them.
Different image upscaling methods have different characteristics. Here are the methods we’ll cover in this tutorial:
- Pixel Resampling
- SD Secondary Sampling Upscaling
- Using Upscaling Models
Using Pixel Sampling for Image Upscaling in ComfyUI
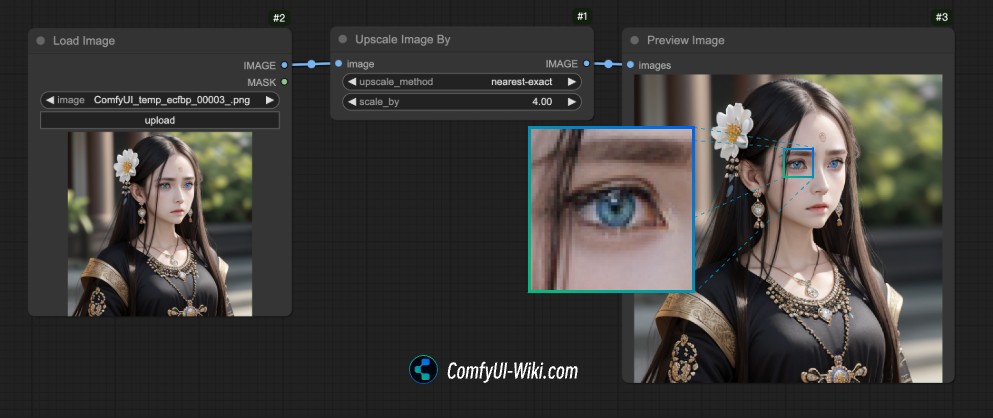 As shown in the image, using the Upscale Image By node, you can directly upscale input images through different pixel sampling methods. Here are its characteristics:
- Maintains consistency with the original content, no changes in image elements
- May result in pixelation and lack of detail after upscaling
Image Secondary Sampling Upscaling in ComfyUI
- This upscaling method primarily involves inputting the image into latent space and then performing a latent space sampling process
- Images generated using this method may have slight differences in details compared to the original, with some changes in image elements
- The key to using this method is to NOT set the k-Sampler denoise value to 1. If you set the denoise to 1, the image will completely turn into noise in the latent space, resulting in an output image that has no relation to the original
In the examples below, I’ll demonstrate different ways to use this method
Preparation Before Starting (Optional)
This workflow will use the following model, but it’s not mandatory unless you don’t have any corresponding models on your computer:
| Model Type | Model Name | Download Link | Description |
|---|---|---|---|
| SD1.5 Model | DreamShaper v8 | Download | SD1.5 Base Model |
After downloading, please save the model file in the following directory:
📁ComfyUI
├── 📁models
│   ├── 📁checkpoints
│   │   └── 📁SD1.5
│   │       └── dreamshaper_8.safetensors            // Store DreamShaper v8
1. Direct Image Secondary Sampling Upscaling
Please download the image and workflow file below, then open them in ComfyUI
Workflow usage and explanation:
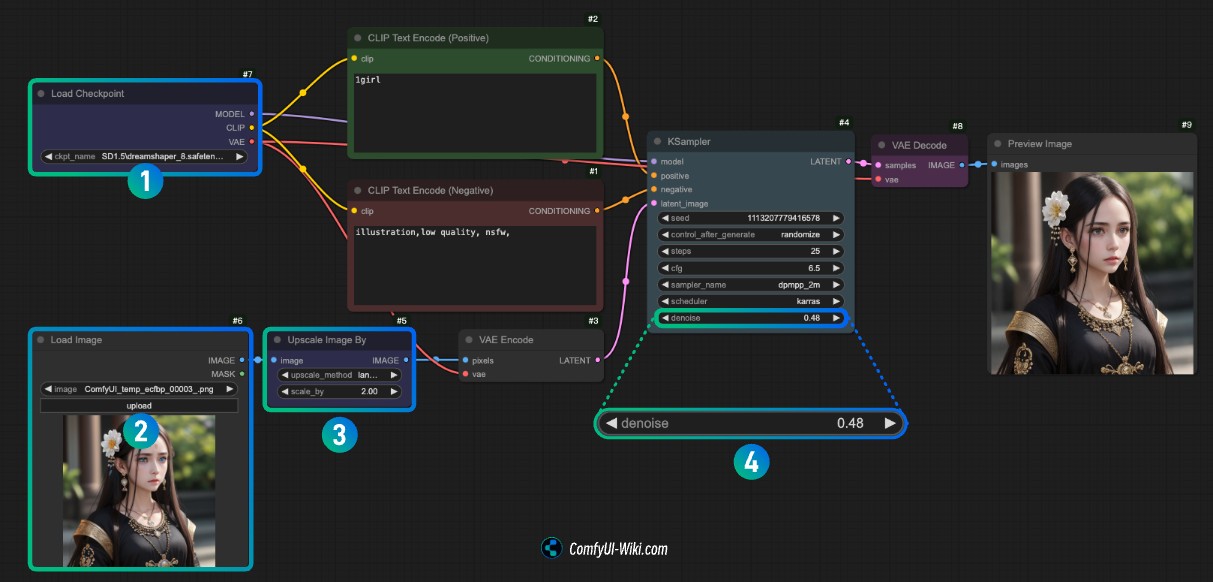
- Please load your model at position
1, or usedreamshaper_8 - Click
uploadat position2in the Load Image node to upload the previous image
After completing these two steps, you can use Ctrl(Command)+enter or click Run to start image upscaling. You can see that even with a simple prompt input of 1 girl, you still get the processed image
- In the Upscale Image By node, the image upscaling is set to 2 times
- In the k-Sampler node, remember to set the
denoiseto a small value. You can try different values to observe the effects
2. Direct Upscaling from Text-to-Image Workflow Results
The workflow below directly upscales the output from a text-to-image workflow
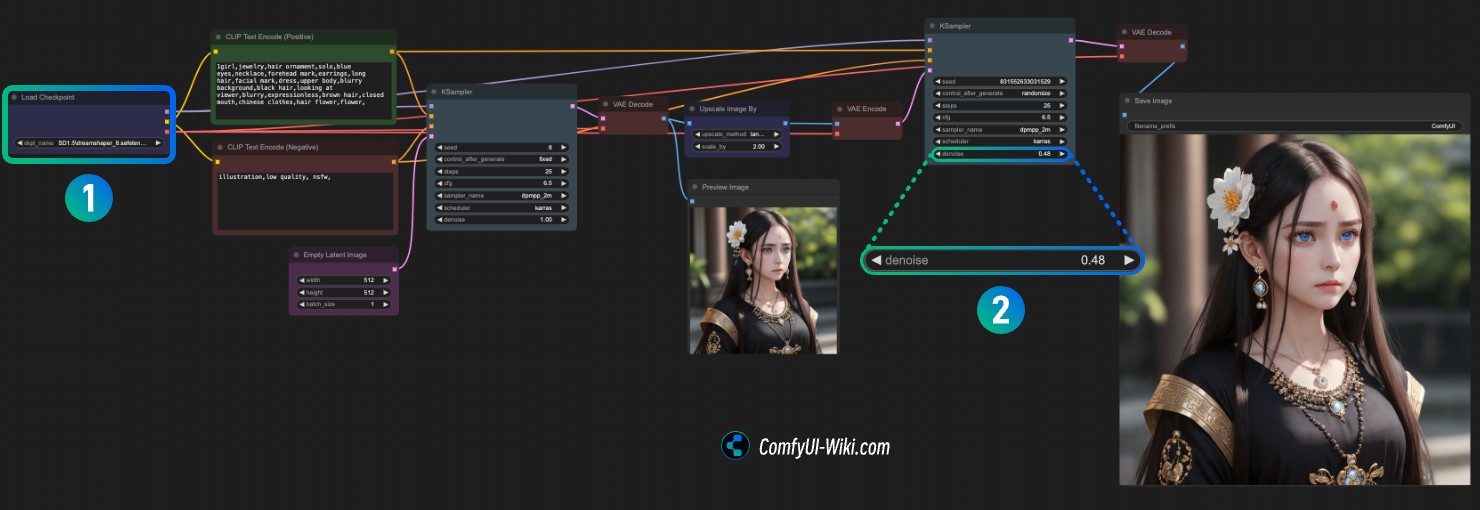
- Please load your model at position
1, or usedreamshaper_8, then you can useCtrl(Command)+enterto generate images - In the second k-Sampler node, still set the
denoiseto a small value
Using Upscaling Models in ComfyUI
ComfyUI provides the Upscale Image(using Model) node
- Faster than image resampling upscaling
- May have less detail compared to resampling generation methods
Preparation
You can find various upscaling models for photos, portraits, animations, etc., at https://openmodeldb.info/. Usually, these models specify their upscaling factors. Please visit the website and download models suitable for your use case
Please save the upscaling models in the following folder location:
📁ComfyUI
├── 📁models
│   ├── 📁upscale_models
│   │   └── BSRGANx2.pth           // Save your downloaded models in the upscale_models folder
After completion, refresh or restart ComfyUI to ensure the models are detected
ComfyUI Image Upscaling Workflow
Here’s the workflow for using upscaling models. Since it’s relatively simple, we won’t provide a separate workflow file
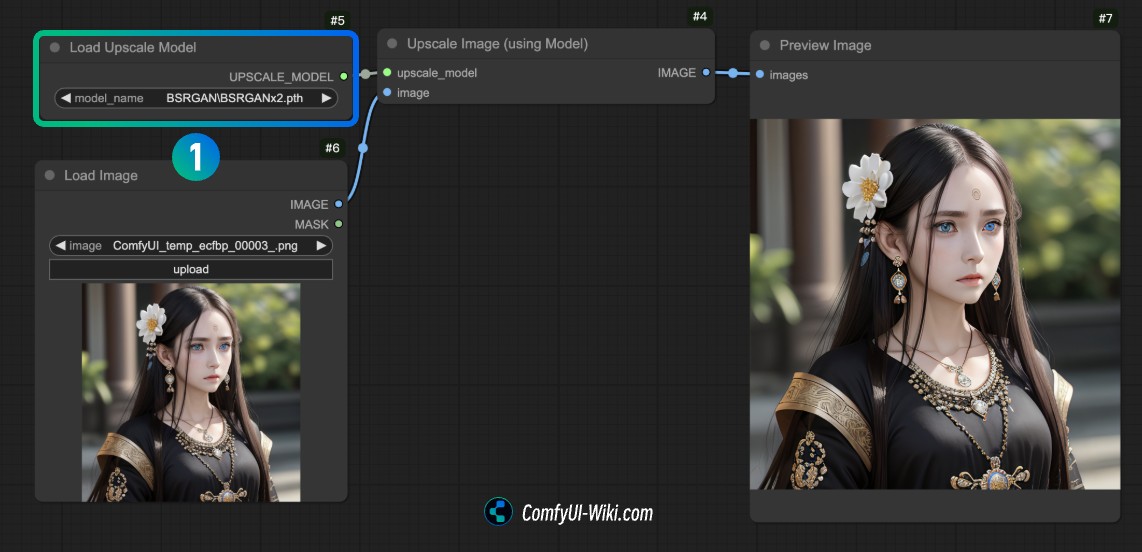
At position 1 in the Load Upscale Model node, please load your downloaded model, then use Ctrl(Command)+enter or click Run to generate images
Using Plugins for Image Upscaling
Some plugins provide tiled sampling upscaling functionality, but due to space limitations, we won’t expand on them here. The main plugins are:
- ComfyUI_TiledKSampler: https://github.com/BlenderNeko/ComfyUI_TiledKSampler
- ComfyUI_UltimateSDUpscale: https://github.com/ssitu/ComfyUI_UltimateSDUpscale