Apply ControlNet
This documentation is for the original Apply ControlNet(Advanced)
node. The earliest Apply ControlNet
node has been renamed to Apply ControlNet(Old)
. While you may still see the Apply ControlNet(Old)
node in many workflow folders you download from comfyui.org for compatibility reasons, you can no longer find the Apply ControlNet(Old)
node through search or node list. Please use the Apply ControlNet
node instead.
This node applies a ControlNet to a given image and conditioning, adjusting the image’s attributes based on the control network’s parameters and specified strength, such as Depth, OpenPose, Canny, HED, etc.
Documentation
- Class name:
ControlNetApply
- Category:
conditioning
- Output node:
False
Using controlNet requires preprocessing of input images. Since ComfyUI initial nodes do not come with preprocessors and controlNet models, please first install ContrlNet preprocessors download preprocessors here and corresponding controlNet models.
Input Types
Parameter | Data Type | Function |
---|---|---|
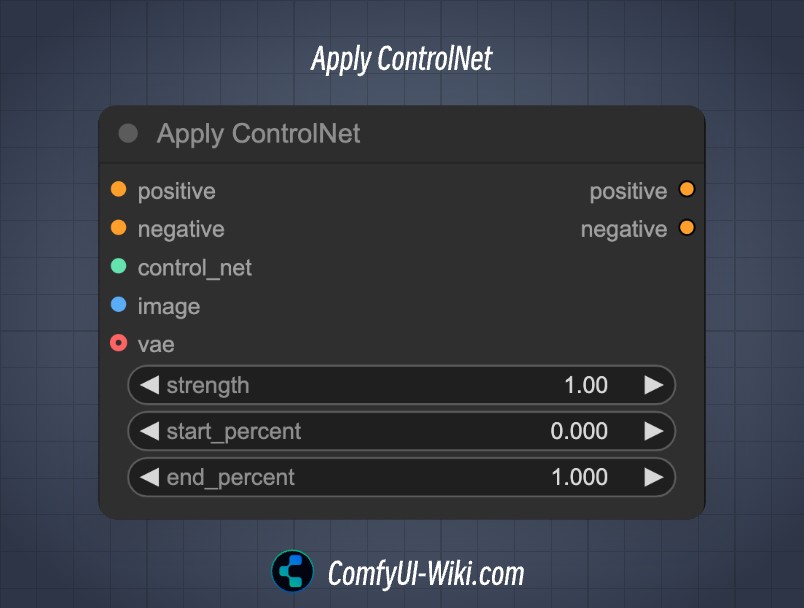
positive | CONDITIONING | Positive conditioning data, from CLIP Text Encoder or other conditioning inputs |
negative | CONDITIONING | Negative conditioning data, from CLIP Text Encoder or other conditioning inputs |
control_net | CONTROL_NET | The controlNet model to apply, typically input from ControlNet Loader |
image | IMAGE | Image for controlNet application, needs to be processed by preprocessor |
vae | VAE | Vae model input |
strength | FLOAT | Controls the strength of network adjustments, value range 0 |
start_percent | FLOAT | Value 0.000~1.000, determines when to start applying controlNet as a percentage, e.g., 0.2 means ControlNet guidance will start influencing image generation at 20% of the diffusion process |
end_percent | FLOAT | Value 0.000~1.000, determines when to stop applying controlNet as a percentage, e.g., 0.8 means ControlNet guidance will stop influencing image generation at 80% of the diffusion process |
Output Types
Parameter | Data Type | Function |
---|---|---|
positive | CONDITIONING | Positive conditioning data processed by ControlNet, can be output to next ControlNet or K Sampler nodes |
negative | CONDITIONING | Negative conditioning data processed by ControlNet, can be output to next ControlNet or K Sampler nodes |
If you want to use T2IAdaptor style models, please use the Apply Style Model
node instead
ComfyUI ControlNet Usage Examples
Visit the following pages for examples:
- ComfyUI OpenPose ControlNet Usage Example
- ComfyUI Depth ControlNet Usage Example
- ComfyUI Canny ControlNet Usage Example
- ComfyUI Multi ControlNet Usage Example
ControlNet Stage Control Settings
In the node settings, you can see two parameters start_percent
and end_percent
. These parameters can be used to control the application stage of ControlNet during the generation process. When using ControlNet:
- You can first set
start_percent
andend_percent
to the default values of 0.000 and 1.000, then adjust these values as needed to see the application effect
Below is a diagram explaining the stage control:
1. Parameter Configuration Reference for Different ControlNet Types
Type | Recommended Weight | Stage Range | Key Preprocessing Parameters | Best Use Cases | Special Techniques |
---|---|---|---|---|---|
Canny | 0.8-1.2 | 0.0-0.4 | Threshold:100/200, Sharpen 15% | Architecture/Product Design | Enable Invert for transparent materials, process complex structures in segments |
HED | 0.6-0.9 | 0.2-0.7 | Gaussian Blur σ=1.5, Smooth 20% | Portrait/Fashion Design | Anime mode for cartoon style, Realism mode for authentic details |
MLSD | 0.7-1.0 | 0.3-0.8 | Min Line Length 15px, Angle Tolerance 15° | Engineering Drawing | Increase weight by 0.2 for tilted walls, decrease by 0.3 for glass curtain walls |
Depth | 0.7-1.0 | 0.2-0.9 | MiDaS Large Model, 3D Mapping | VR/Medical Visualization | Near-view enhancement mode for subject details, ZoeDepth for macro scenes |
Normal | 0.5-0.8 | 0.4-1.0 | Resolution 2048px, AO 0.3 | Product Rendering | Enable Specular for metal materials, multi-light synthesis for enhanced 3D feel |
Scribble | 0.4-0.7 | 0.5-1.0 | SoftEdge Blur 3px, Hue Tolerance 15% | Concept Design | Use 50% opacity masks for gradients, Pantone library for brand consistency |
Lineart | 0.6-0.9 | 0.3-1.0 | Anti-aliasing On, Line Width ±2px | Character Art | Anime mode for simplified lines, Realism mode for complex folds |
OpenPose | 0.9-1.1 | 0.0-0.3 | 25-point Skeleton, Hand Detail Enhancement | Motion Capture | Motion blur compensation to prevent ghosting, increase weight to 1.2 for martial arts |
Segmentation | 0.8-1.0 | 0.0-0.7 | ADEPT 2.0, Mask Feather 10px | Ad Composition | Decrease weight to 0.2 for sky regions, sharpen building edges by 20% |
Tile | 0.3-0.6 | 0.4-0.9 | 256x256 Blocks, 30% Repeat Rate | Texture Generation | Randomize variations for natural feel, enable seamless tiling for brick walls |
2. Classic Scene Configuration Templates
2.1 Architectural Visualization Design
Control Type | Weight | Stage Range | Preprocessing Parameters | Adjustment Tips |
---|---|---|---|---|
Canny | 1.0 | 0.0-0.4 | Threshold 100/200 | Enable Invert for glass walls |
Depth | 0.8 | 0.2-0.7 | MiDaS Large Model | Enhance mid-ground by 20% |
MLSD | 0.6 | 0.5-0.9 | Min Line Length 20px | Increase weight to 0.8 for tilted walls |
2.2 Game Character Design
Control Type | Weight | Stage Range | Preprocessing Parameters | Dynamic Adjustment |
---|---|---|---|---|
OpenPose | 1.0 | 0.0-0.3 | Full Skeleton | Reduce to 0.7 after step 20 |
Lineart | 0.7 | 0.4-1.0 | Anime Mode | +0.1 weight for equipment areas |
Scribble | 0.5 | 0.5-1.0 | SoftEdge Blur 2px | Set color block boundary strength to 0.3 |
2.3 Product Concept Design
Control Type | Weight | Stage Range | Preprocessing Parameters | Material Optimization |
---|---|---|---|---|
HED | 0.9 | 0.0-0.3 | Gaussian Blur σ=1.5 | Enable Specular for metal surfaces |
Normal | 0.7 | 0.2-0.6 | Resolution 2048x2048 | Reduce to 0.5 for plastic materials |
Depth | 0.6 | 0.5-0.9 | Near View Enhancement | Background blur strength 1.2 |
2.4 Medical Visualization
Control Type | Weight | Stage Range | Preprocessing Parameters | Precision Control |
---|---|---|---|---|
Scribble | 0.8 | 0.0-0.5 | Red Annotation Lines | Organ boundary tolerance ±2px |
Depth | 0.7 | 0.4-0.8 | CT Scan Mode | Layer spacing 0.1mm |
Lineart | 0.9 | 0.7-1.0 | Ultra Detail | Blood vessel path precision 1px |
2.5 Film Scene Composition
Control Type | Weight | Stage Range | Preprocessing Parameters | Atmosphere Creation |
---|---|---|---|---|
Seg | 0.9 | 0.0-0.6 | ADEPT Model | Reduce sky region weight to 0.2 |
Shuffle | 0.6 | 0.3-0.8 | Color Temp 5500K | Neon light area weight 0.8 |
Depth | 0.7 | 0.5-1.0 | Dynamic Range Compression | Foreground sharpening 1.5 |
2.6 E-commerce Advertisement Design
Control Type | Weight | Stage Range | Preprocessing Parameters | Commercial Optimization |
---|---|---|---|---|
Canny | 1.2 | 0.0-0.4 | Edge Sharpen +15% | Enhanced reflection mode |
Scribble | 0.7 | 0.3-0.7 | Pantone Library | Brand color tolerance ±5% |
Inpaint | 0.5 | 0.6-1.0 | Feather Radius 15px | Text area protection mask |
3. Expert-Level Adjustment Strategies
3.1 Stage Weight Decay Model
Generation Progress | Control Type | Decay Curve | Formula Example |
---|---|---|---|
0-30% | Structure Control | Constant Strength | strength = 1.0 |
30-70% | Spatial Control | Linear Decay | strength = 1.0 - (step-30)/40*0.5 |
70-100% | Detail Control | Reverse Enhancement | strength = 0.5 + (step-70)/30*0.5 |
3.2 Multi-ControlNet Conflict Resolution
Conflict Type | Visual Manifestation | Resolution Strategy |
---|---|---|
Structure-Space | Object floating/perspective errors | Set stage interval ≥0.15 |
Space-Detail | Material distortion/reflection anomalies | Add area masks to isolate control ranges |
Structure-Detail | Key feature loss | Increase structure control strength by 20% |
4. Common Issues Quick Reference
Q1: Control effect suddenly disappears?
✅ Check if end_percent ends too early (recommended ≥0.8)
✅ Confirm no other ControlNet overlaps in the area
Q2: Generation results show ghosting?
✅ Reduce stage overlap (recommended ≤20%)
✅ Set exclusion masks for conflicting ControlNets
Q3: How to optimize for insufficient VRAM?
✅ Use stepped stage configuration (example: 0.0-0.3 → 0.4-0.6 → 0.7-1.0)
✅ Reduce non-critical ControlNet resolution to 512px
Related Resources
- Model Resources: controlNet Model Resources Download
- Preprocessor Plugin: ComfyUI ControlNet Auxiliary Preprocessors
Apply ControlNet (OLD) Node Description
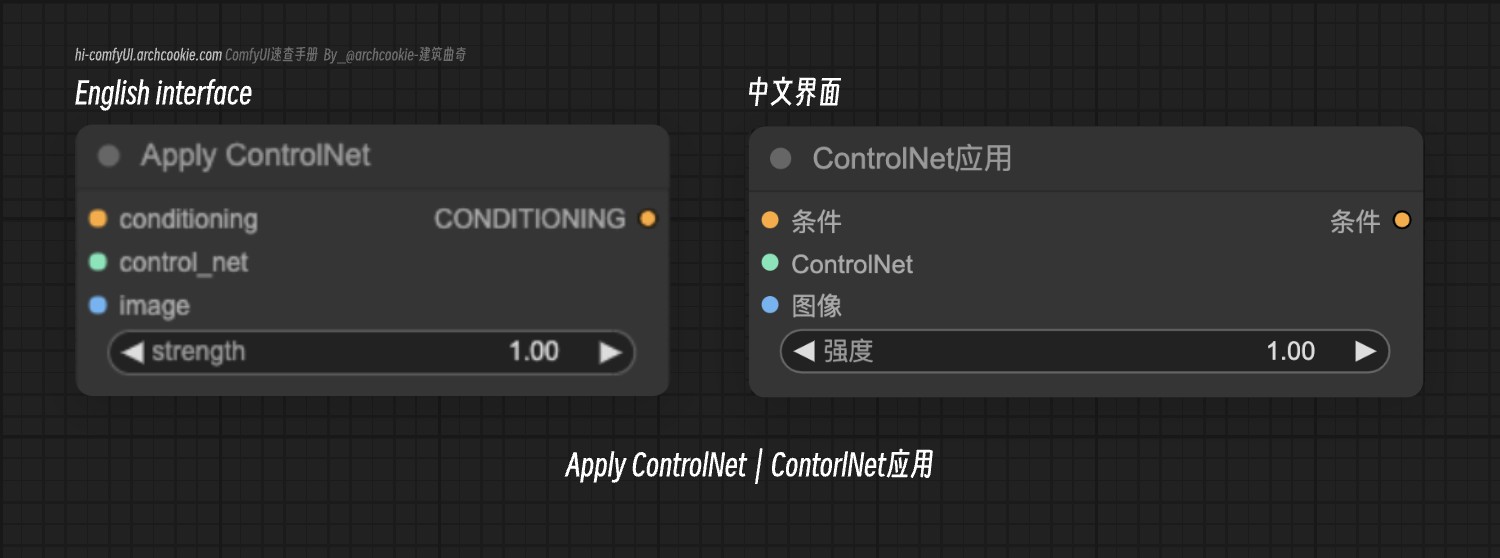
This is an early version of the Apply ControlNet node. The node options have been updated, but for compatibility, if you download workflows using the old version node in ComfyUI, it will display as this node. You can switch to the new Apply ControlNet node.
Apply ControlNet (OLD) Input Types
Parameter | Data Type | Function |
---|---|---|
conditioning | CONDITIONING | Conditioning data from CLIP Text Encoder or other conditioning inputs (such as input from another conditioning node) |
control_net | CONTROL_NET | The controlNet model to apply, typically input from ControlNet Loader |
image | IMAGE | Image for controlNet application, needs to be processed by preprocessor |
strength | FLOAT | Controls the strength of network adjustments, value range 0 |
Apply ControlNet (OLD) Output Types
Parameter | Data Type | Function |
---|---|---|
conditioning | CONDITIONING | Conditioning data processed by ControlNet, can be output to next ControlNet or K Sampler nodes |