Flux.1 Krea Dev, GGUF, Nunchaku Versions ComfyUI Complete Usage Guide Tutorial
Complete usage guide for multiple Flux.1 Krea Dev versions in ComfyUI
Flux.1 Krea Dev is an advanced text-to-image model developed through collaboration between Black Forest Labs (BFL) and Krea. This is currently the best open-source FLUX model weights, specifically designed for text-to-image generation. This model is now natively available in ComfyUI. For more details, refer to the official ComfyUI blog: FLUX.1 Krea dev Lands on ComfyUI on Day-1
Model Features
- Unique Aesthetic Style: Enhanced aesthetics, generated images lack the "AI look"
- Natural Details: Generated images have natural, realistic details
- Exceptional Realism: Provides outstanding realism and image quality
- Fully Compatible Architecture: Completely compatible architecture design with FLUX.1 [dev]
Model License This model is released under the flux-1-dev-non-commercial-license
Flux.1 Krea Dev ComfyUI Original Workflow
Since Flux.1 Krea Dev architecture is compatible with Flux.1 Dev, you can directly use the original Flux.1 Dev workflows in ComfyUI
1. Workflow Files
Download the image or JSON below and drag it into ComfyUI to load the corresponding workflow

This is the official template workflow in ComfyUI, you can load it directly from ComfyUI templates
2. Model Links
Diffusion model
- FP8_scaled version suitable for low VRAM users: flux1-krea-dev_fp8_scaled.safetensors
- Original weights, suitable for users with sufficient VRAM: flux1-krea-dev.safetensors
- The original weights
flux1-dev.safetensorsfile requires agreeing to the black-forest-labs/FLUX.1-Krea-dev terms before browser download.
- The original weights
If you have used Flux-related workflows before, the following models are the same and don't need to be downloaded again
Text encoders
- clip_l.safetensors
- t5xxl_fp16.safetensors or t5xxl_fp8_e4m3fn.safetensors For Low VRAM
VAE
File save locations:
ComfyUI/
├── models/
│   ├── diffusion_models/
│   │   └── flux1-krea-dev_fp8_scaled.safetensors or flux1-krea-dev.safetensors
│   ├── text_encoders/
│   │   ├── clip_l.safetensors
│   │   └── t5xxl_fp16.safetensors or t5xxl_fp8_e4m3fn.safetensors
│   ├── vae/
│   │   └── ae.safetensors
3. Step-by-step Check to Run Workflow
Please refer to the image below to ensure all model files are loaded properly
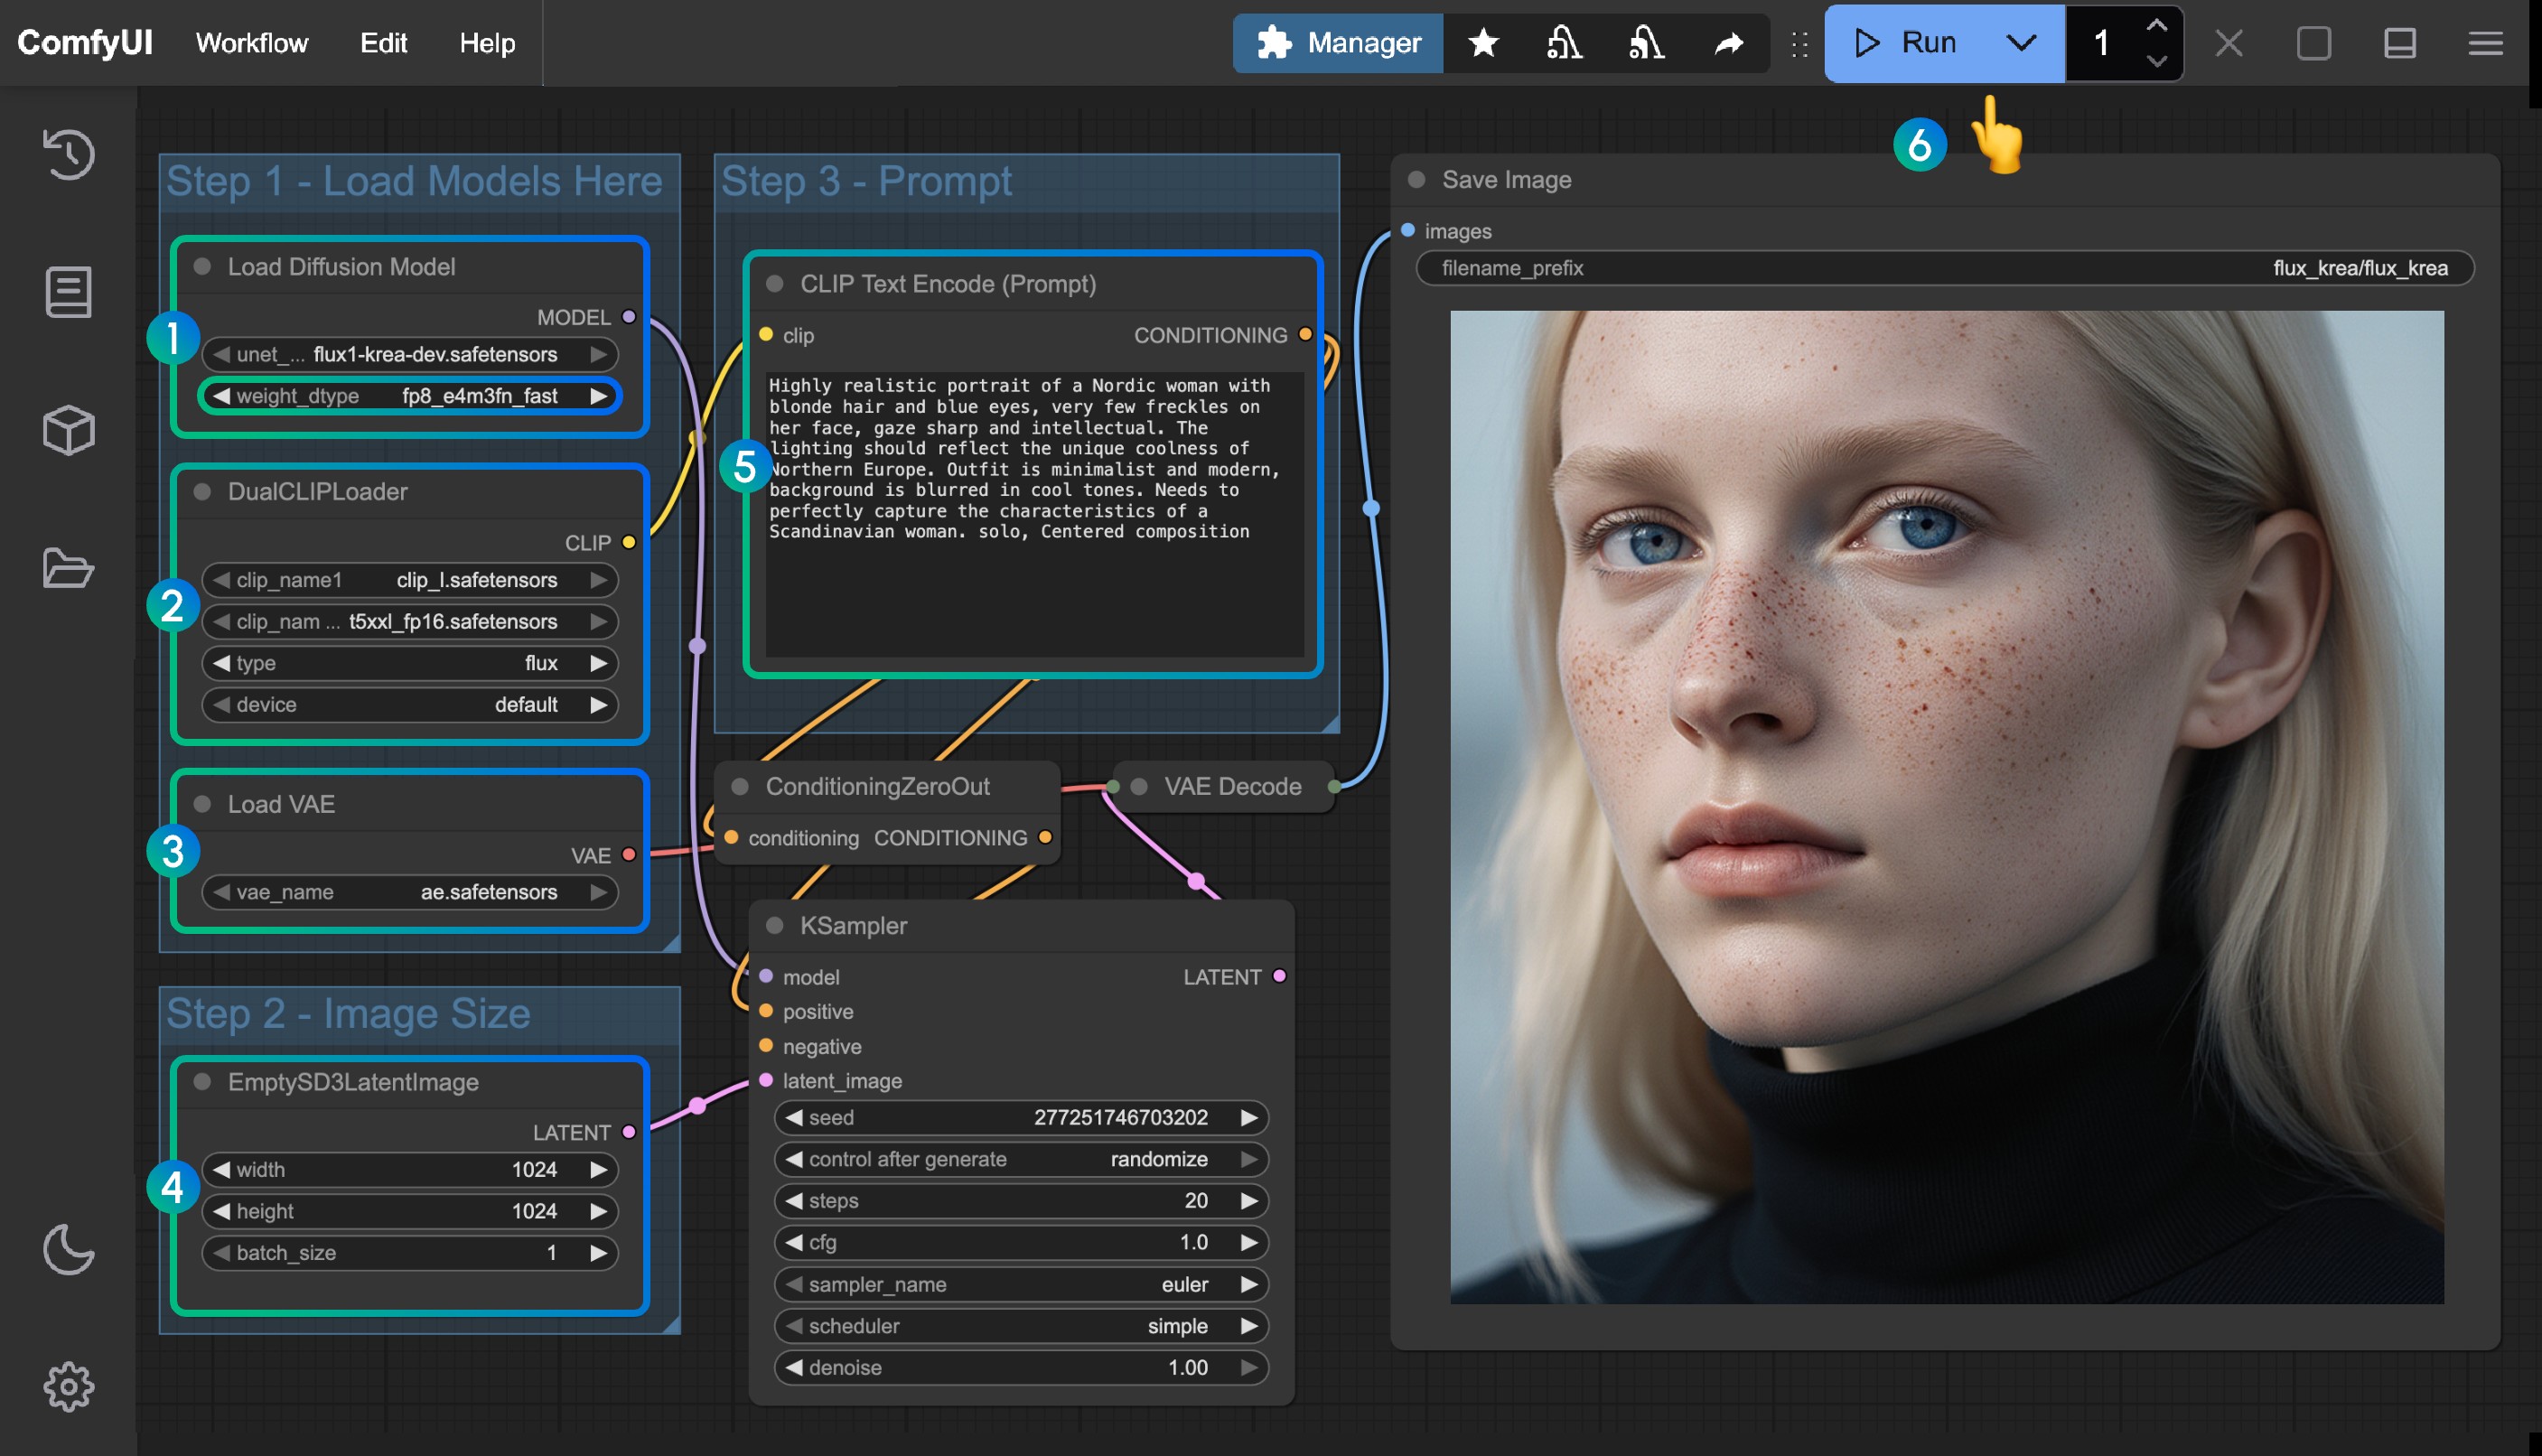
- Ensure the
Load Diffusion Modelnode has loadedflux1-krea-dev_fp8_scaled.safetensorsorflux1-krea-dev.safetensorsflux1-krea-dev_fp8_scaled.safetensorsrecommended for low VRAM usersflux1-krea-dev.safetensorsif you have sufficient VRAM like 24GB, you can try this version for better quality
- Ensure the following models are loaded in the
DualCLIPLoadernode:- clip_name1: t5xxl_fp16.safetensors or t5xxl_fp8_e4m3fn.safetensors
- clip_name2: clip_l.safetensors
- Ensure
ae.safetensorsis loaded in theLoad VAEnode - Click the
Queuebutton, or use the shortcutCtrl(cmd) + Enterto run the workflow
Flux.1 Krea Dev GGUF Version ComfyUI Workflow
Custom node: ComfyUI-GGUF Please refer to the Custom Node Installation Guide section to learn how to install custom nodes
1. Workflow Template
This workflow template can be found in the ComfyUI-Wiki-Workflows plugin. Please update the corresponding plugin to get the latest workflow, or download the latest workflow directly from below
2. Model Download
Since other models are the same as the Fp8 and full versions, you only need to download the GGUF model. Visit QuantStack/FLUX.1-Krea-dev-GGUF to download a version of the model
If you're not familiar with the corresponding formats, you can judge directly by model file size - usually larger model files require more VRAM
Save to the ComfyUI/models folder
This tutorial uses flux1-krea-dev-Q4_0.gguf
Corresponding model save location
ComfyUI/
├── models/
│   ├── unet/
│   │   └── flux1-krea-dev-Q4_0.gguf
│   ├── text_encoders/
│   │   ├── clip_l.safetensors
│   │   └── t5xxl_fp8_e4m3fn.safetensors
│   ├── vae/
│   │   └── ae.safetensors
VRAM Usage Reference
- Model: flux1-krea-dev-Q4_0.gguf
- GPU: 4090 24GB
- Size: 1024*1024
- VRAM 53%
- 1st Gen: 40s
- 2nd Gen: 17~20s
3. Step-by-step Check to Run Workflow
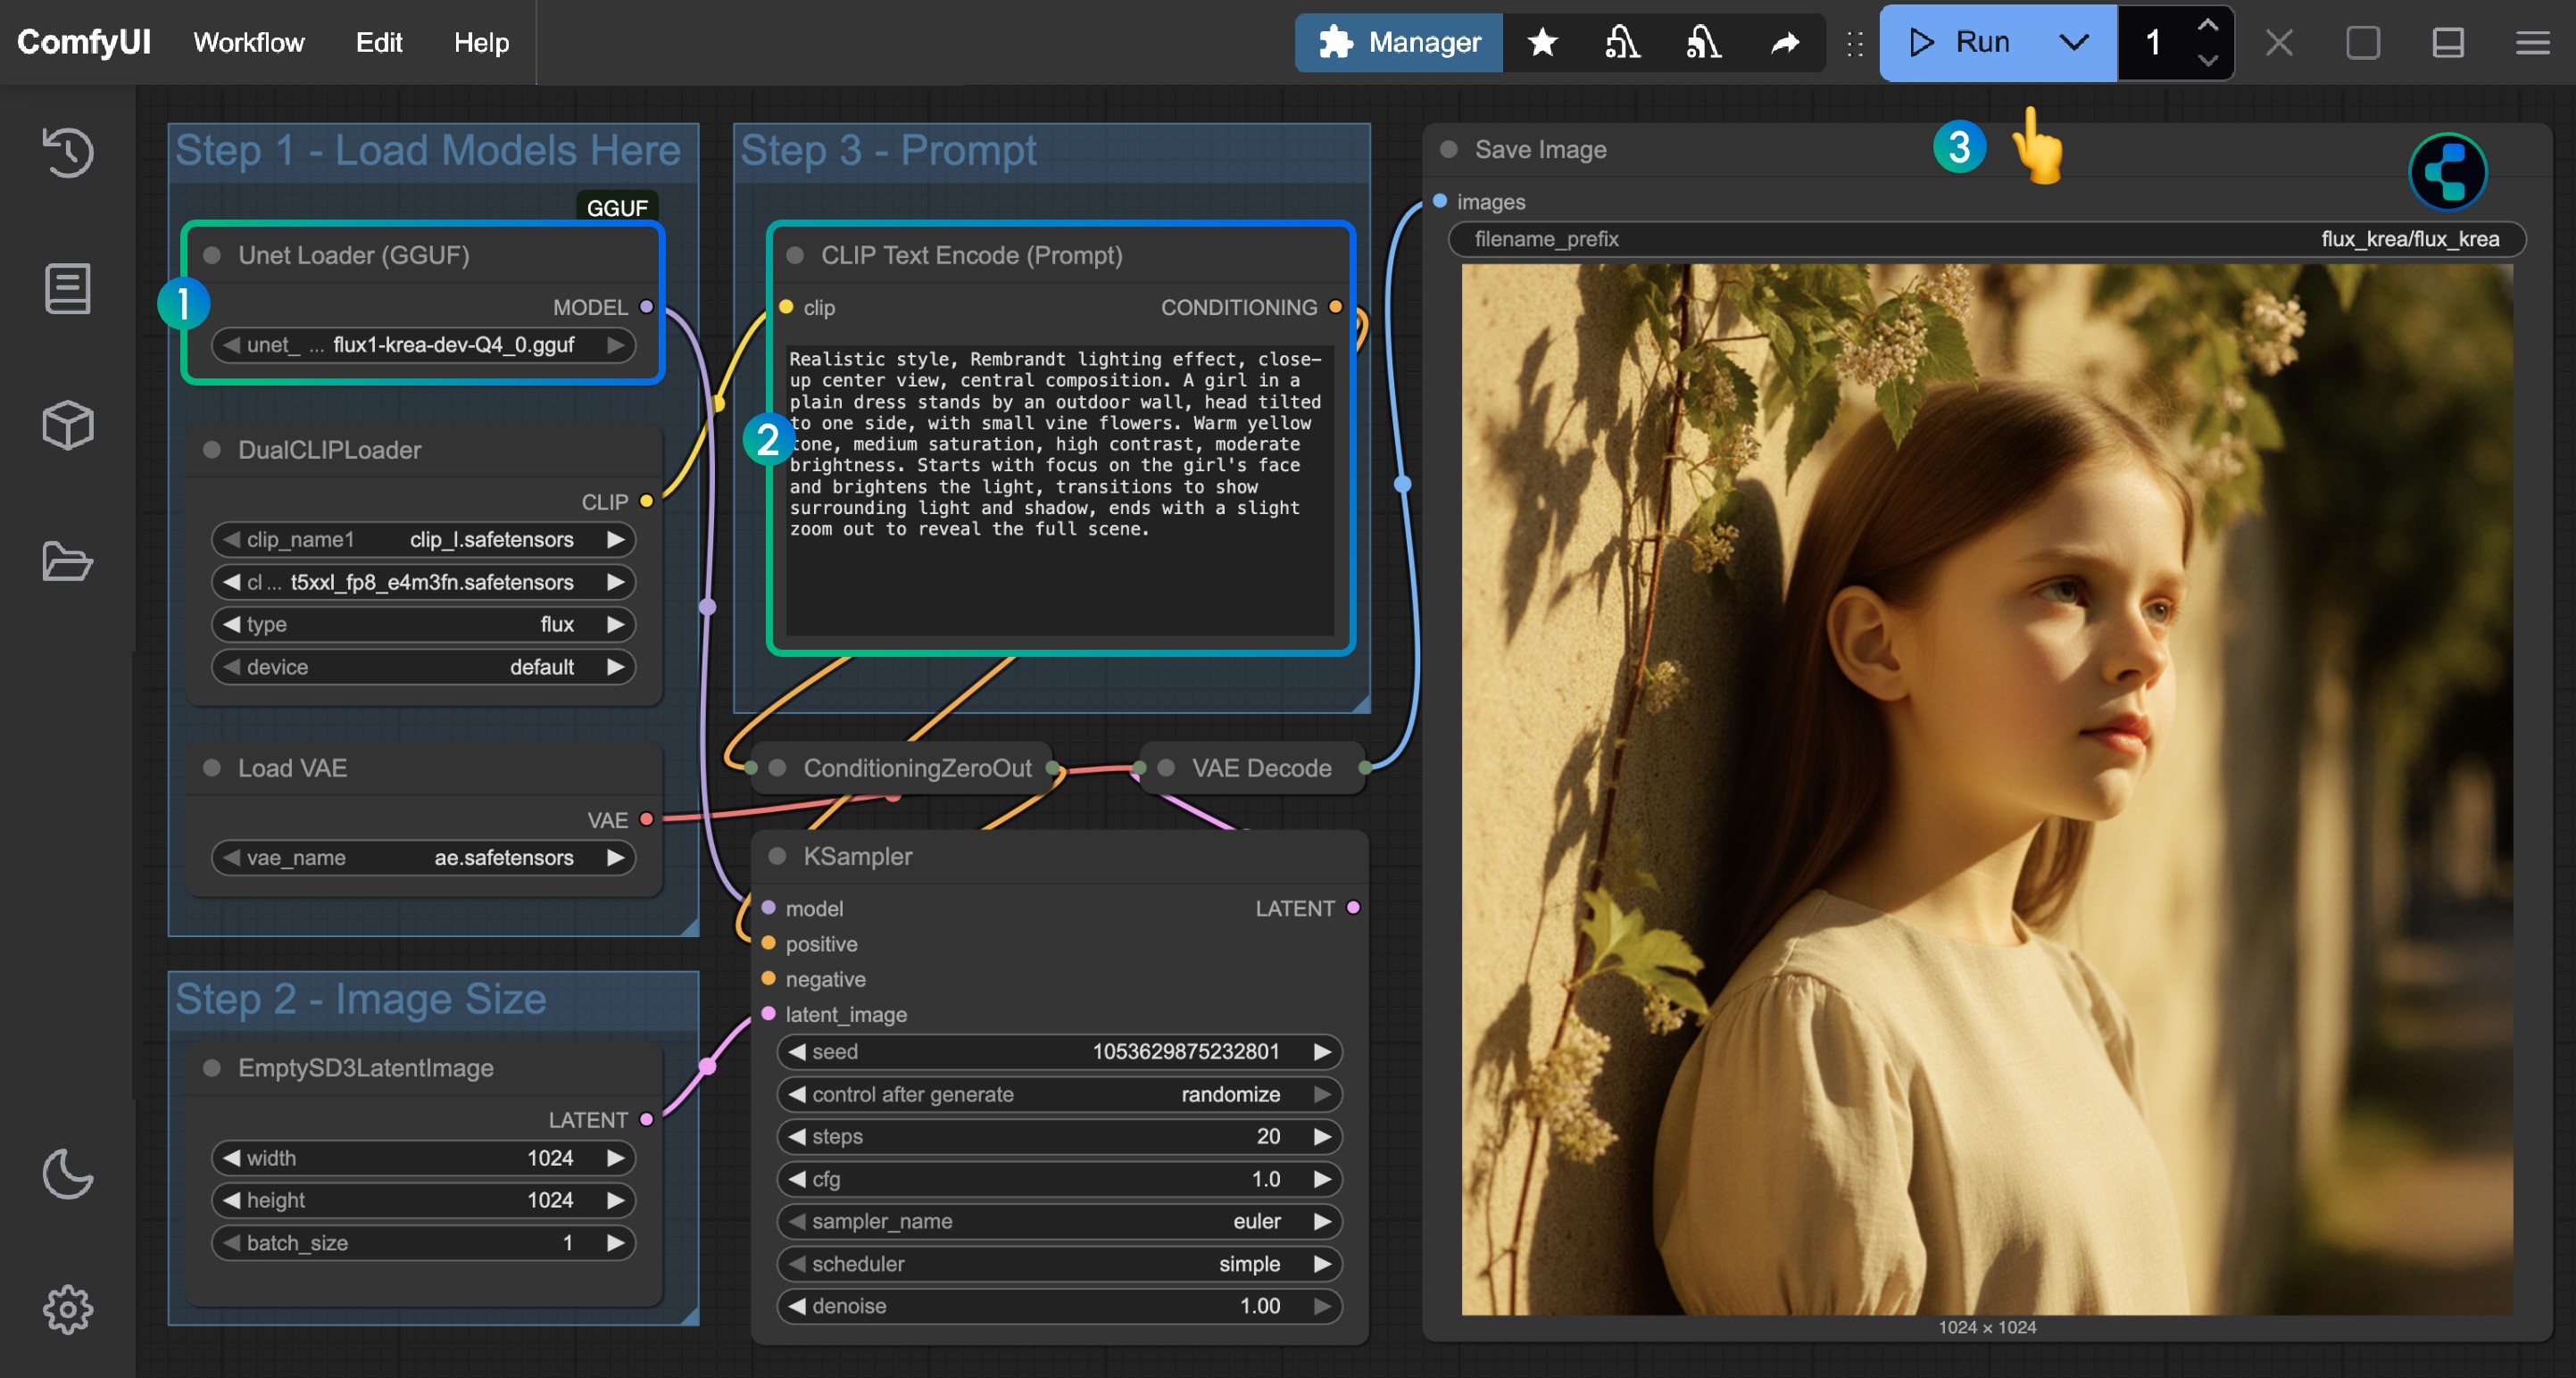
- Ensure the
Unet Loader (GGUF)node has loadedflux1-krea-dev-Q4_0.gguf - Enter prompts (in English) in
CLIP Text Encode(Prompt) - Click the
Queuebutton, or use the shortcutCtrl(cmd) + Enterto run the workflow
Other model loading is the same as the full version workflow
Flux.1 Krea Dev Nunchaku Version ComfyUI Workflow
Please install and update the custom node: ComfyUI-nunchaku Please refer to the Custom Node Installation Guide section to learn how to install custom nodes
1. Workflow Template (Nunchaku)
This workflow template can be found in the ComfyUI-Wiki-Workflows plugin. Please update the corresponding plugin to get the latest workflow, or download the latest workflow directly from below
2. Model Download (Nunchaku)
Since other models are the same as the Fp8 and full versions, you only need to download the Nunchaku-specific model
Nunchaku uses models divided into two versions
- Blackwell (50 series) GPUs: svdq-fp4_r32-flux.1-krea-dev.safetensors
- Other GPUs: svdq-int4_r32-flux.1-krea-dev.safetensors
Choose the model version based on your graphics card and save to the ComfyUI/models/diffusion_models folder
This tutorial uses svdq-int4_r32-flux.1-krea-dev.safetensors
Corresponding model save location
ComfyUI/
├── models/
│   ├── diffusion_models/
│   │   ├── svdq-fp4_r32-flux.1-krea-dev.safetensors  #  Blackwell(50 series)
│   │   └── svdq-int4_r32-flux.1-krea-dev.safetensors # Others
│   ├── text_encoders/
│   │   ├── clip_l.safetensors
│   │   └── t5xxl_fp8_e4m3fn.safetensors
│   ├── vae/
│   │   └── ae.safetensors
VRAM Usage Reference
- Model: svdq-int4_r32-flux.1-krea-dev.safetensors
- GPU: 4090 24GB
- Size: 1024*1024
- VRAM 53%
- 1st Gen: 46s
- 2nd Gen: 5s
3. Step-by-step Check to Run Workflow (Nunchaku)
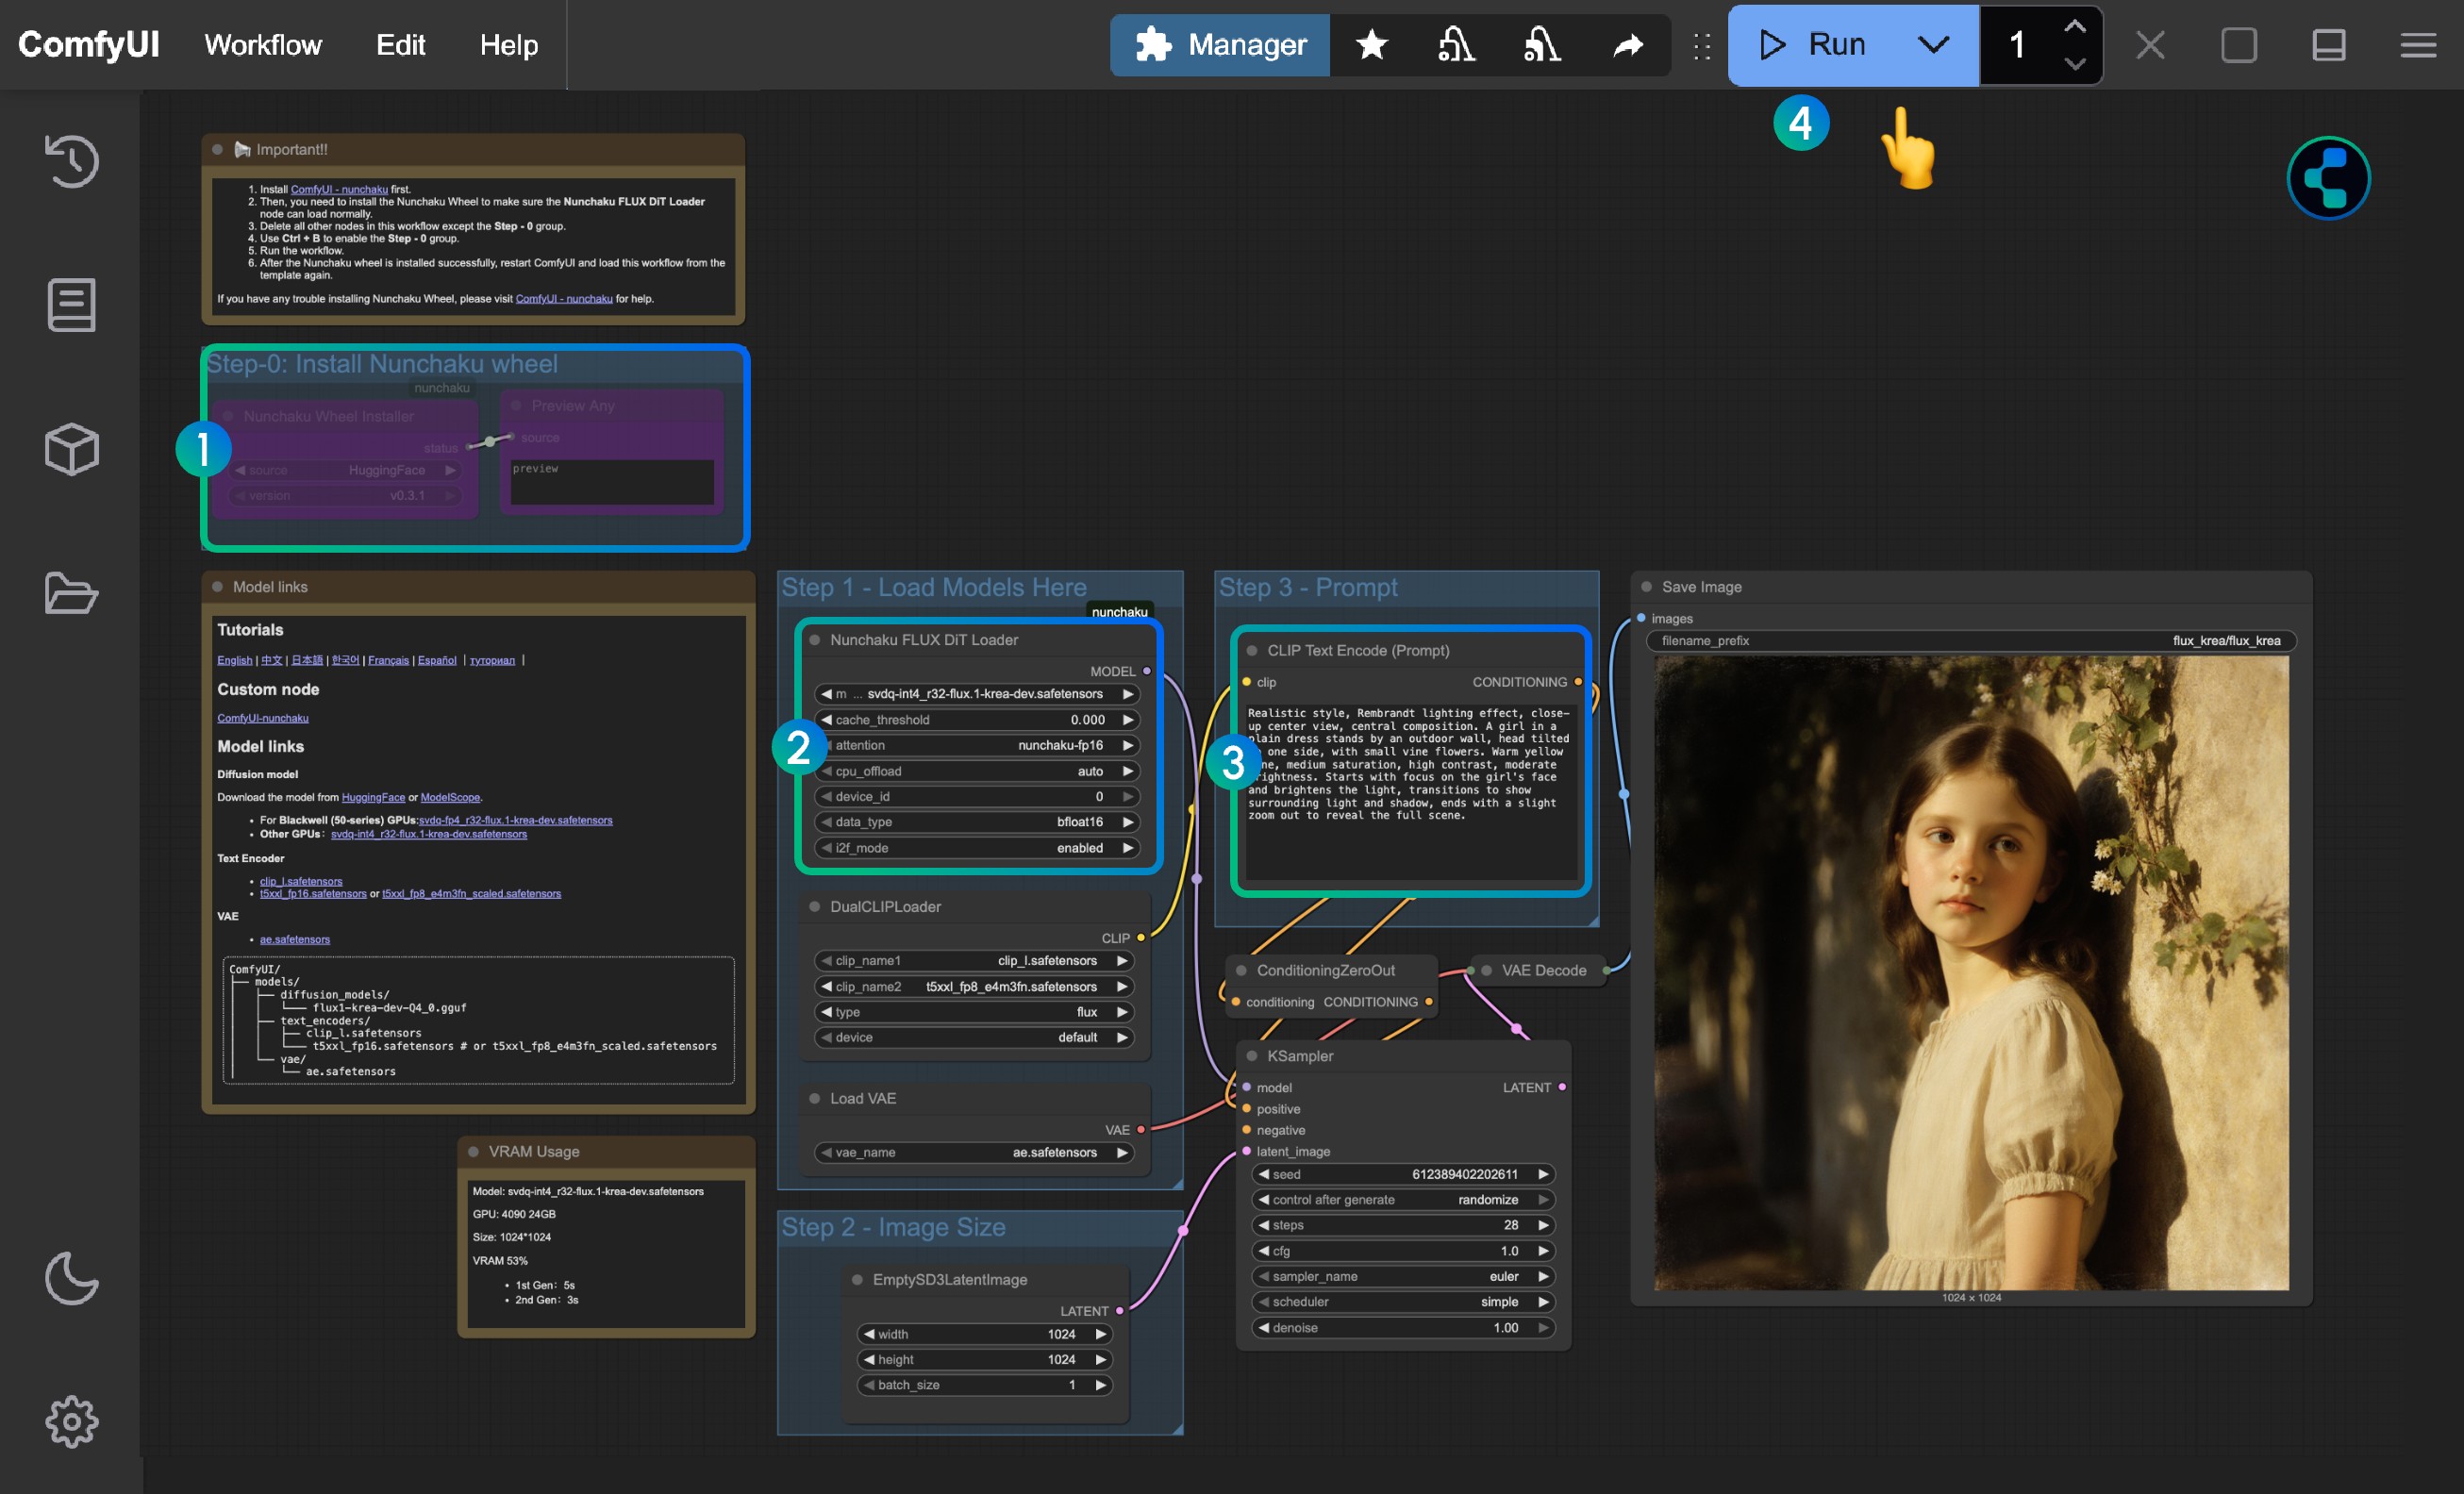
- If you find missing nodes after loading the workflow, this is because you haven't installed Nunchaku's Wheel. You can disable all other nodes and run only the nodes in the Step-0 group to install the wheel
- Ensure the corresponding model is loaded in the
Nunchaku Flux DiT Loadernode- Note the different versions for 50 series graphics cards and other graphics cards
- Click the
Queuebutton, or use the shortcutCtrl(cmd) + Enterto run the workflow
Other model loading is the same as the full version workflow
Flux.1 Krea Personal Usage Experience
-
From current usage, I feel there's a significant improvement in aesthetics and realism compared to Flux.1 Dev
-
For character representation, there's no excessive highlighting or oily appearance, showing very good realism
-
Poor generalization, often producing similar results
-
Poor performance in aerial city views with large-scale architectural details
If you're interested in comparing Flux.1 Dev and Flux.1 Krea Dev, you can visit my Twitter for related comparison outputs: https://x.com/ComfyUIWiki/status/1951261586200600808
All outputs I shared include original ComfyUI workflows