Qwen-Image ComfyUI Native, GGUF, and Nunchaku Workflow Complete Usage Guide
Qwen-Image is a 20B parameter MMDiT (Multimodal Diffusion Transformer) model open-sourced under the Apache 2.0 license.
Qwen-Image is an image generation foundation model developed by Alibaba's Tongyi Lab, featuring a 20B parameter MMDiT (Multimodal Diffusion Transformer) architecture, and is open-sourced under the Apache 2.0 license. The model demonstrates unique technical advantages in the field of image generation, particularly excelling in text rendering and image editing.
Core Features:
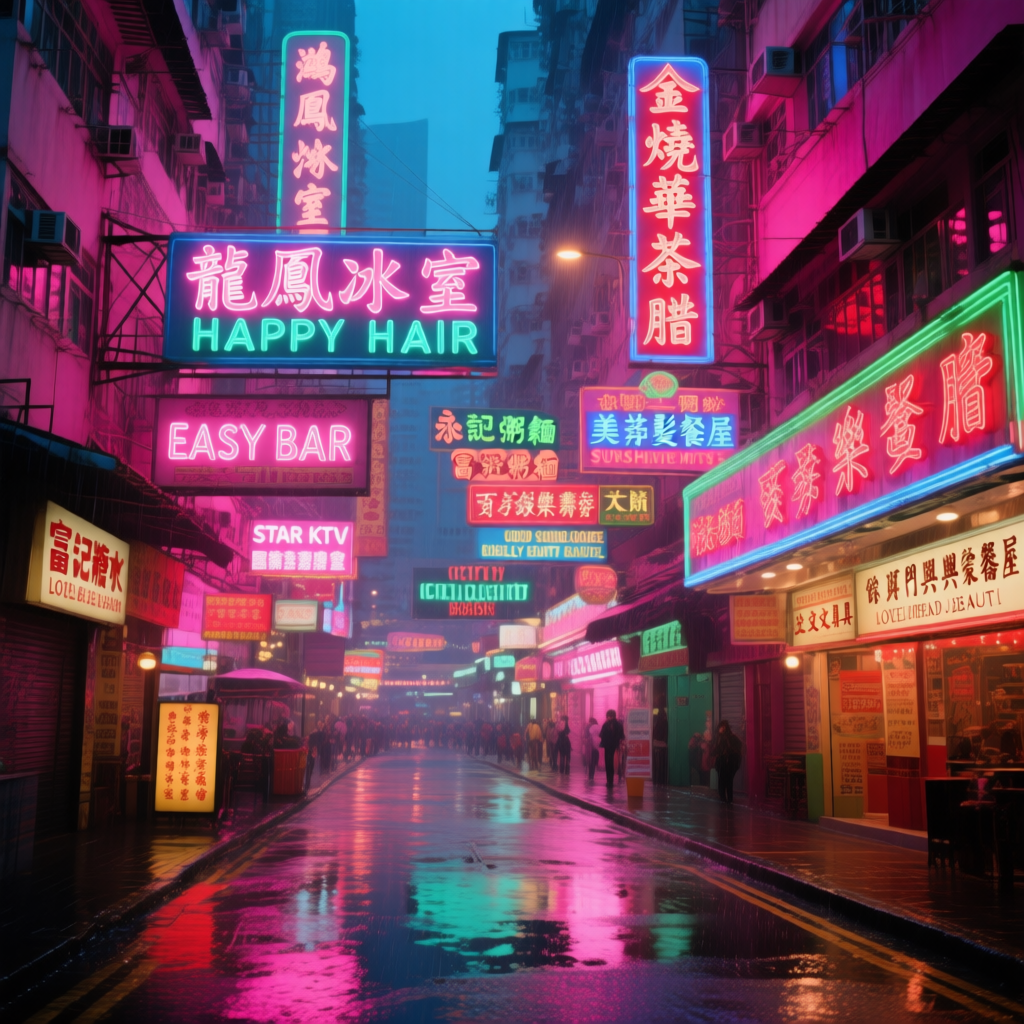
- Multilingual Text Rendering Capability: The model can accurately generate images containing English, Chinese, Korean, Japanese, and multiple other languages, with clear and readable text that harmonizes with the image style
- Rich Artistic Style Support: From realistic styles to artistic creations, from anime styles to modern design, the model can flexibly switch between different visual styles based on prompts
- Precise Image Editing Functionality: Supports local modifications, style transformations, and content additions to existing images while maintaining overall visual consistency
Related Resources:
Qwen-Image ComfyUI Native Workflow Guide
Three different models are used in the workflow attached to this document:
- Original Qwen-Image model fp8_e4m3fn
- 8-step accelerated version: Original Qwen-Image model fp8_e4m3fn using lightx2v 8-step LoRA
- Distilled version: Qwen-Image distilled model fp8_e4m3fn
VRAM Usage Reference GPU: RTX4090D 24GB
| Model Used | VRAM Usage | First Generation | Second Generation |
|---|---|---|---|
| fp8_e4m3fn | 86% | ≈ 94s | ≈ 71s |
| fp8_e4m3fn using lightx2v 8-step LoRA | 86% | ≈ 55s | ≈ 34s |
| Distilled version fp8_e4m3fn | 86% | ≈ 69s | ≈ 36s |
1. Workflow File
After updating ComfyUI, you can find the workflow file from the templates, or drag the workflow below into ComfyUI to load it
<a className="prose" target='_blank' href="https://raw.githubusercontent.com/Comfy-Org/workflow_templates/refs/heads/main/templates/image_qwen_image.json" style={{ display: 'inline-block', backgroundColor: '#0078D6', color: '#ffffff', padding: '10px 20px', borderRadius: '8px', borderColor: "transparent", textDecoration: 'none', fontWeight: 'bold'}}> <p className="prose" style={{ margin: 0, fontSize: "0.8rem" }}>Download Official JSON Format Workflow
Distilled Version
2. Model Download
Versions you can find in the ComfyOrg repository
- Qwen-Image_bf16 (40.9 GB)
- Qwen-Image_fp8 (20.4 GB)
- Distilled version (non-official, only 15 steps)
All models can be found on Huggingface or ModelScope
Diffusion model
Qwen_image_distill
LoRA
Text encoder
VAE
Model storage location
📂 ComfyUI/
├── 📂 models/
│   ├── 📂 diffusion_models/
│   │   ├── qwen_image_fp8_e4m3fn.safetensors
│   │   └── qwen_image_distill_full_fp8_e4m3fn.safetensors ## Distilled version
│   ├── 📂 loras/
│   │   └── Qwen-Image-Lightning-8steps-V1.0.safetensors   ## 8-step acceleration LoRA model
│   ├── 📂 vae/
│   │   └── qwen_image_vae.safetensors
│   └── 📂 text_encoders/
│       └── qwen_2.5_vl_7b_fp8_scaled.safetensors
3. Complete the Workflow Step by Step
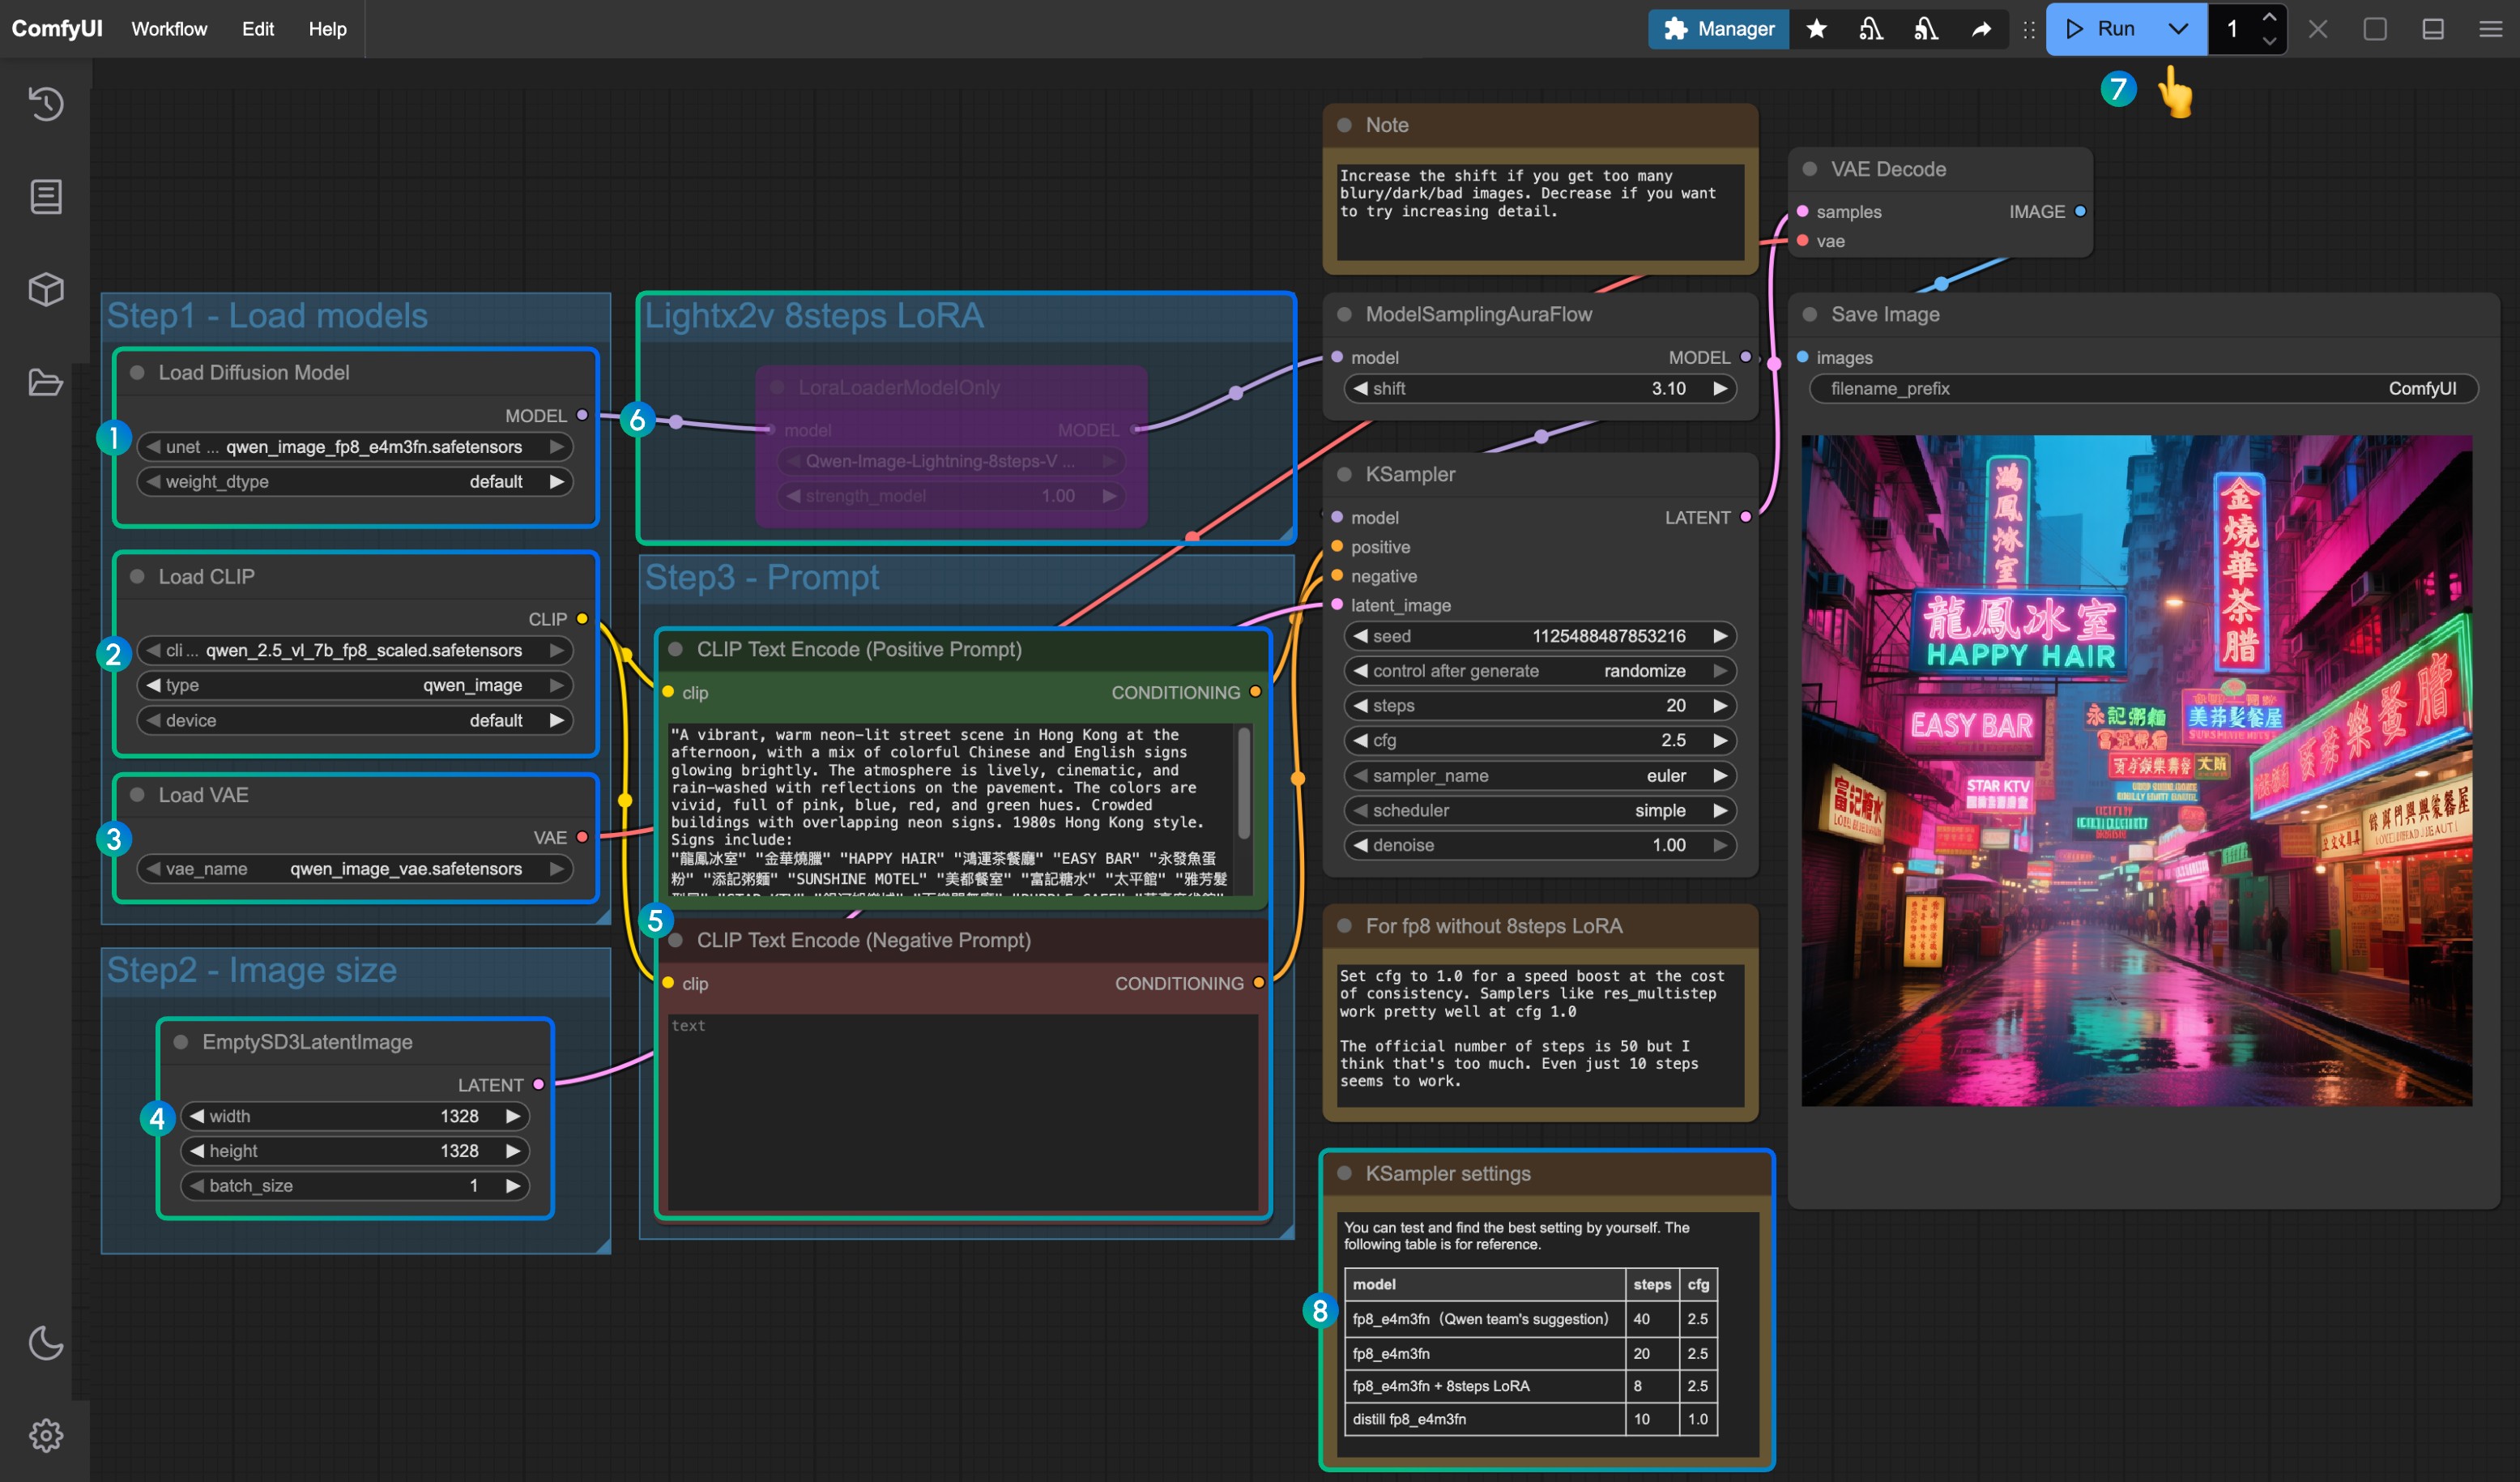
- Ensure the
Load Diffusion Modelnode loadsqwen_image_fp8_e4m3fn.safetensors - Ensure the
Load CLIPnode loadsqwen_2.5_vl_7b_fp8_scaled.safetensors - Ensure the
Load VAEnode loadsqwen_image_vae.safetensors - Ensure the image dimensions are set in the
EmptySD3LatentImagenode - Set the prompts in the
CLIP Text Encodernode; currently tested to support at least: English, Chinese, Korean, Japanese, Italian, etc. - To enable the lightx2v 8-step acceleration LoRA, select it and use
Ctrl + Bto enable the node, and modify the Ksampler settings according to the parameters at position8 - Click the
Queuebutton, or use the shortcutCtrl(cmd) + Enterto run the workflow - Parameter settings for KSampler corresponding to different versions of models and workflows
Qwen-Image GGUF Version ComfyUI Workflow
The GGUF version is more friendly for users with low VRAM, and in certain weight configurations, you only need about 8GB of VRAM to run Qwen-Image
VRAM Usage Reference:
| Workflow | VRAM Usage | First Generation | Subsequent Generation |
|---|---|---|---|
| qwen-image-Q4_K_S.gguf | 56% | ≈ 135s | ≈ 77s |
| With 8steps LoRA | 56% | ≈ 100s | ≈ 45s |
Model address: Qwen-Image-gguf
1. Update or Install Custom Nodes
Using the GGUF version requires you to install or update the ComfyUI-GGUF plugin
Please refer to How to Install ComfyUI Custom Nodes, or search and install through Manager
2. Workflow Download
3. Model Download
The GGUF version uses only the diffusion model differently from others
Please visit https://huggingface.co/city96/Qwen-Image-gguf to download any weight; typically, larger file sizes mean better quality but also require more VRAM. In this tutorial, I will use the following version:
📂 ComfyUI/
├── 📂 models/
│   ├── 📂 diffusion_models/
│   │   └── qwen-image-Q4_K_S.gguf # Or any other version you choose
3. Complete the GGUF Workflow Step by Step
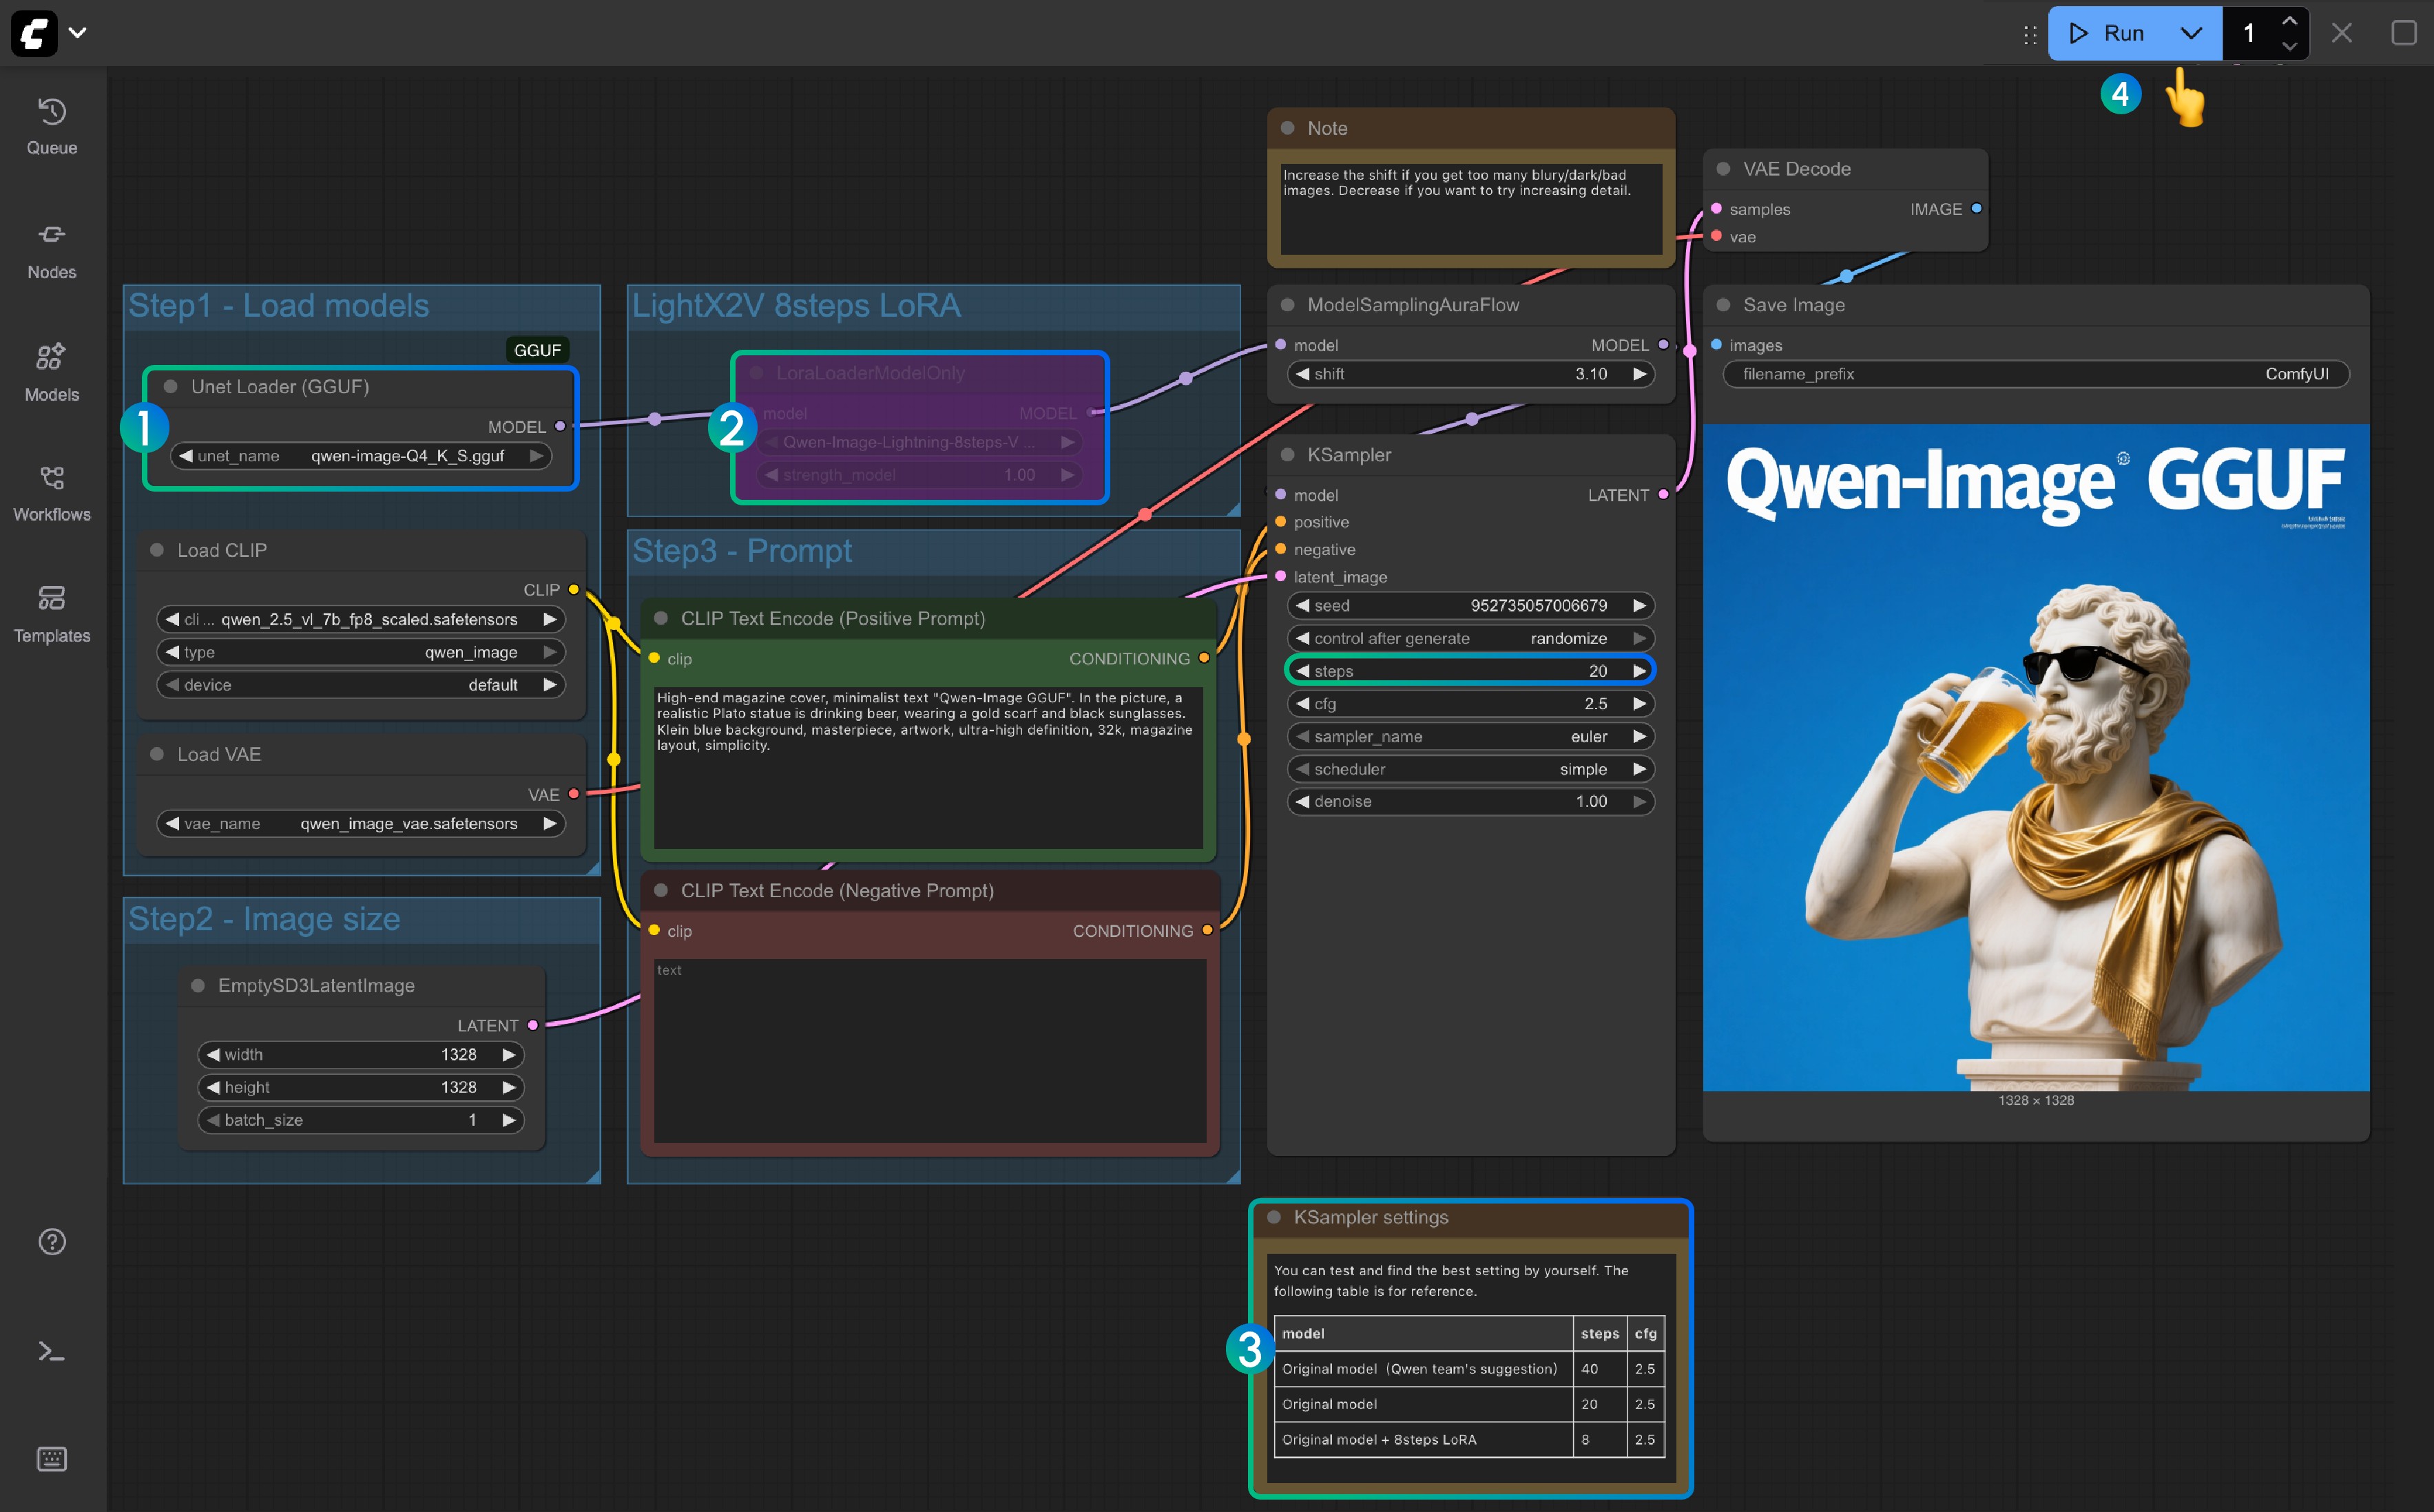
- Ensure the
Unet Loader(GGUF)node loadsqwen-image-Q4_K_S.ggufor any other version you downloaded- Ensure ComfyUI-GGUF is installed and updated
- For
LightX2V 8Steps LoRA, it is not enabled by default; you can select it and use Ctrl+B to enable the node - If the 8-step LoRA is not enabled, the default steps are 20; if you enable the 8-step LoRA, please set it to 8
- Here is the reference for setting the corresponding steps
- Click the
Queuebutton, or use the shortcutCtrl(cmd) + Enterto run the workflow
Qwen-Image Nunchaku Version Workflow
Model address: nunchaku-qwen-image Custom node address: https://github.com/nunchaku-tech/ComfyUI-nunchaku
Qwen Image ControlNet
Qwen Image ControlNet DiffSynth-ControlNets Model Patches Workflow
This model is actually not a controlnet, but a Model patch that supports three different control modes: canny, depth, and inpaint.
Original model address: DiffSynth-Studio/Qwen-Image ControlNet Comfy Org rehost address: Qwen-Image-DiffSynth-ControlNets/model_patches
1. Workflow and Input Images
Download the image below and drag it into ComfyUI to load the corresponding workflow

Download the image below as input:
2. Model Links
Other models are consistent with the Qwen-Image basic workflow. You only need to download the following models and save them to the ComfyUI/models/model_patches folder:
- qwen_image_canny_diffsynth_controlnet.safetensors
- qwen_image_depth_diffsynth_controlnet.safetensors
- qwen_image_inpaint_diffsynth_controlnet.safetensors
3. Workflow Usage Instructions
Currently, diffsynth has three patch models: Canny, Depth, and Inpaint models.
If you are using ControlNet-related workflows for the first time, you need to understand that images used for control need to be preprocessed into supported image formats before they can be used and recognized by the model.
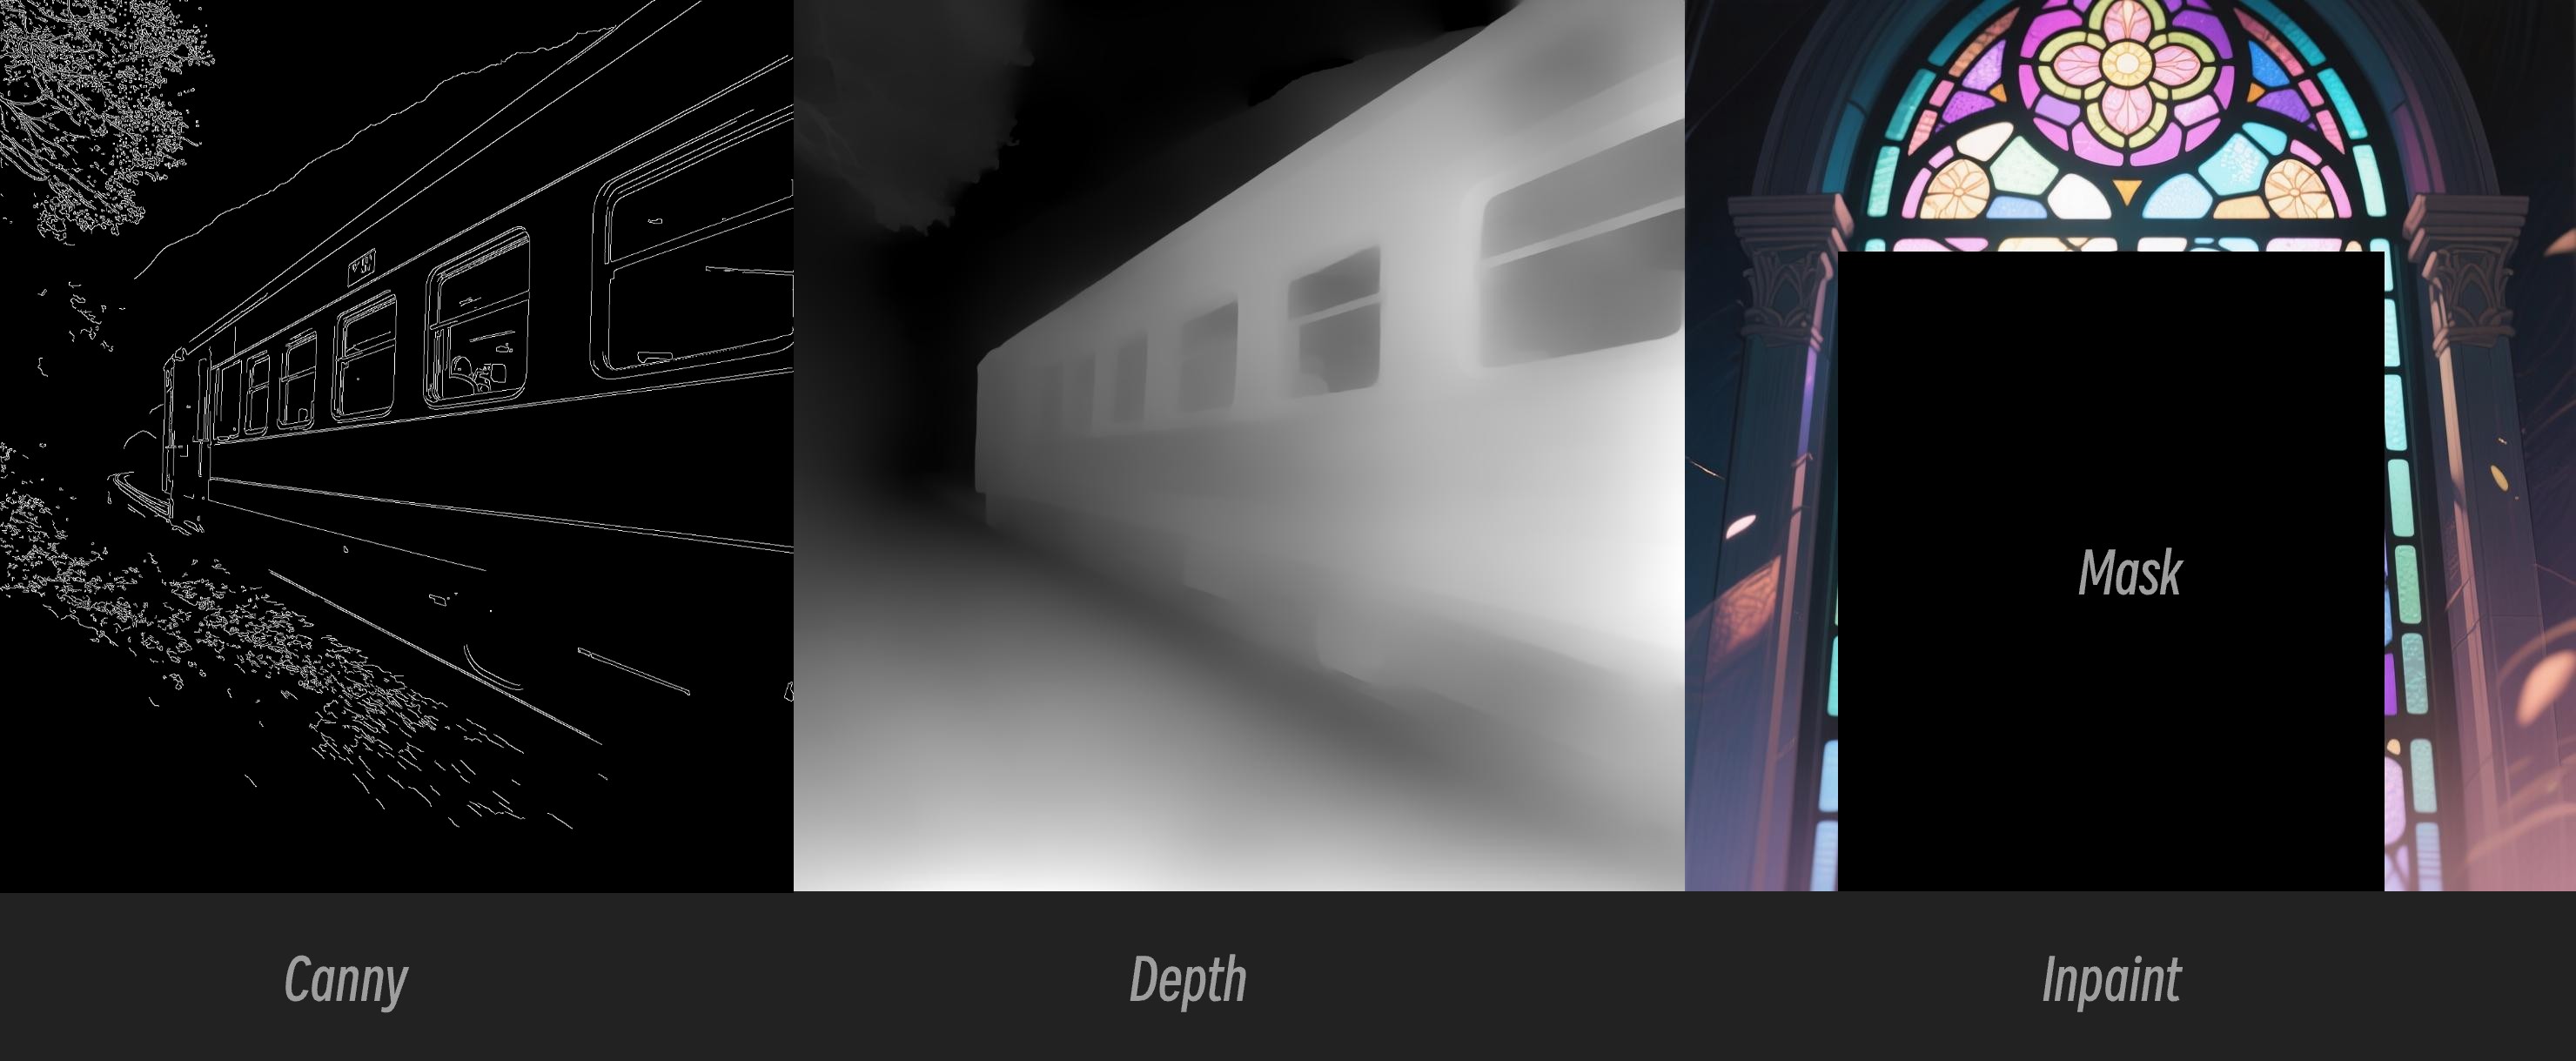
- Canny: Processed canny, line art outlines
- Depth: Preprocessed depth map, showing spatial relationships
- Inpaint: Requires using a Mask to mark areas that need to be redrawn
Since this patch model is divided into three different models, you need to select the correct preprocessing type when inputting to ensure proper image preprocessing.
Canny Model ControlNet Usage Instructions
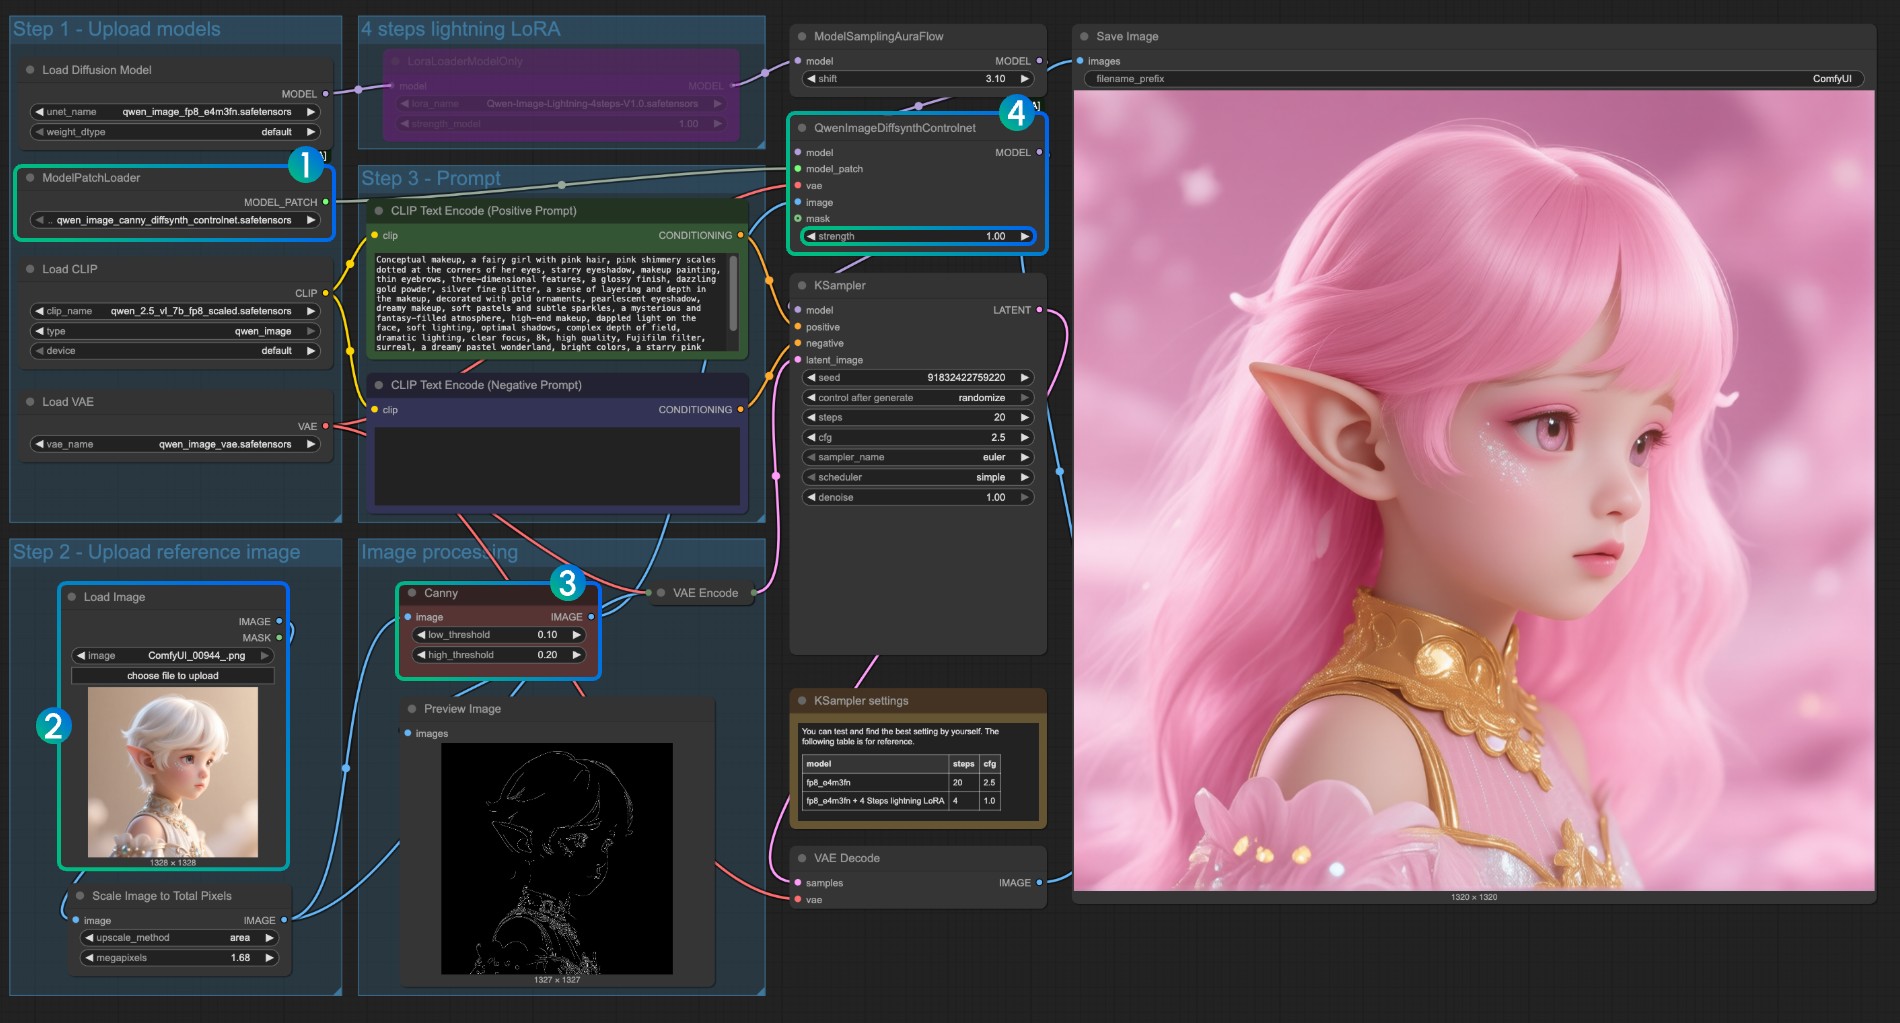
- Ensure that
qwen_image_canny_diffsynth_controlnet.safetensorsis loaded - Upload input image for subsequent processing
- The Canny node is a native preprocessing node that will preprocess the input image according to your set parameters to control generation
- If needed, you can modify the
strengthparameter of theQwenImageDiffsynthControlnetnode to control the strength of line art control - Click the
Runbutton, or use the shortcutCtrl(cmd) + Enterto run the workflow
For using qwen_image_depth_diffsynth_controlnet.safetensors, you need to preprocess the image into a depth map, replacing the
image processingpart. For this usage, please refer to the InstantX processing method in this document. Other parts are similar to using the Canny model.
Inpaint Model ControlNet Usage Instructions
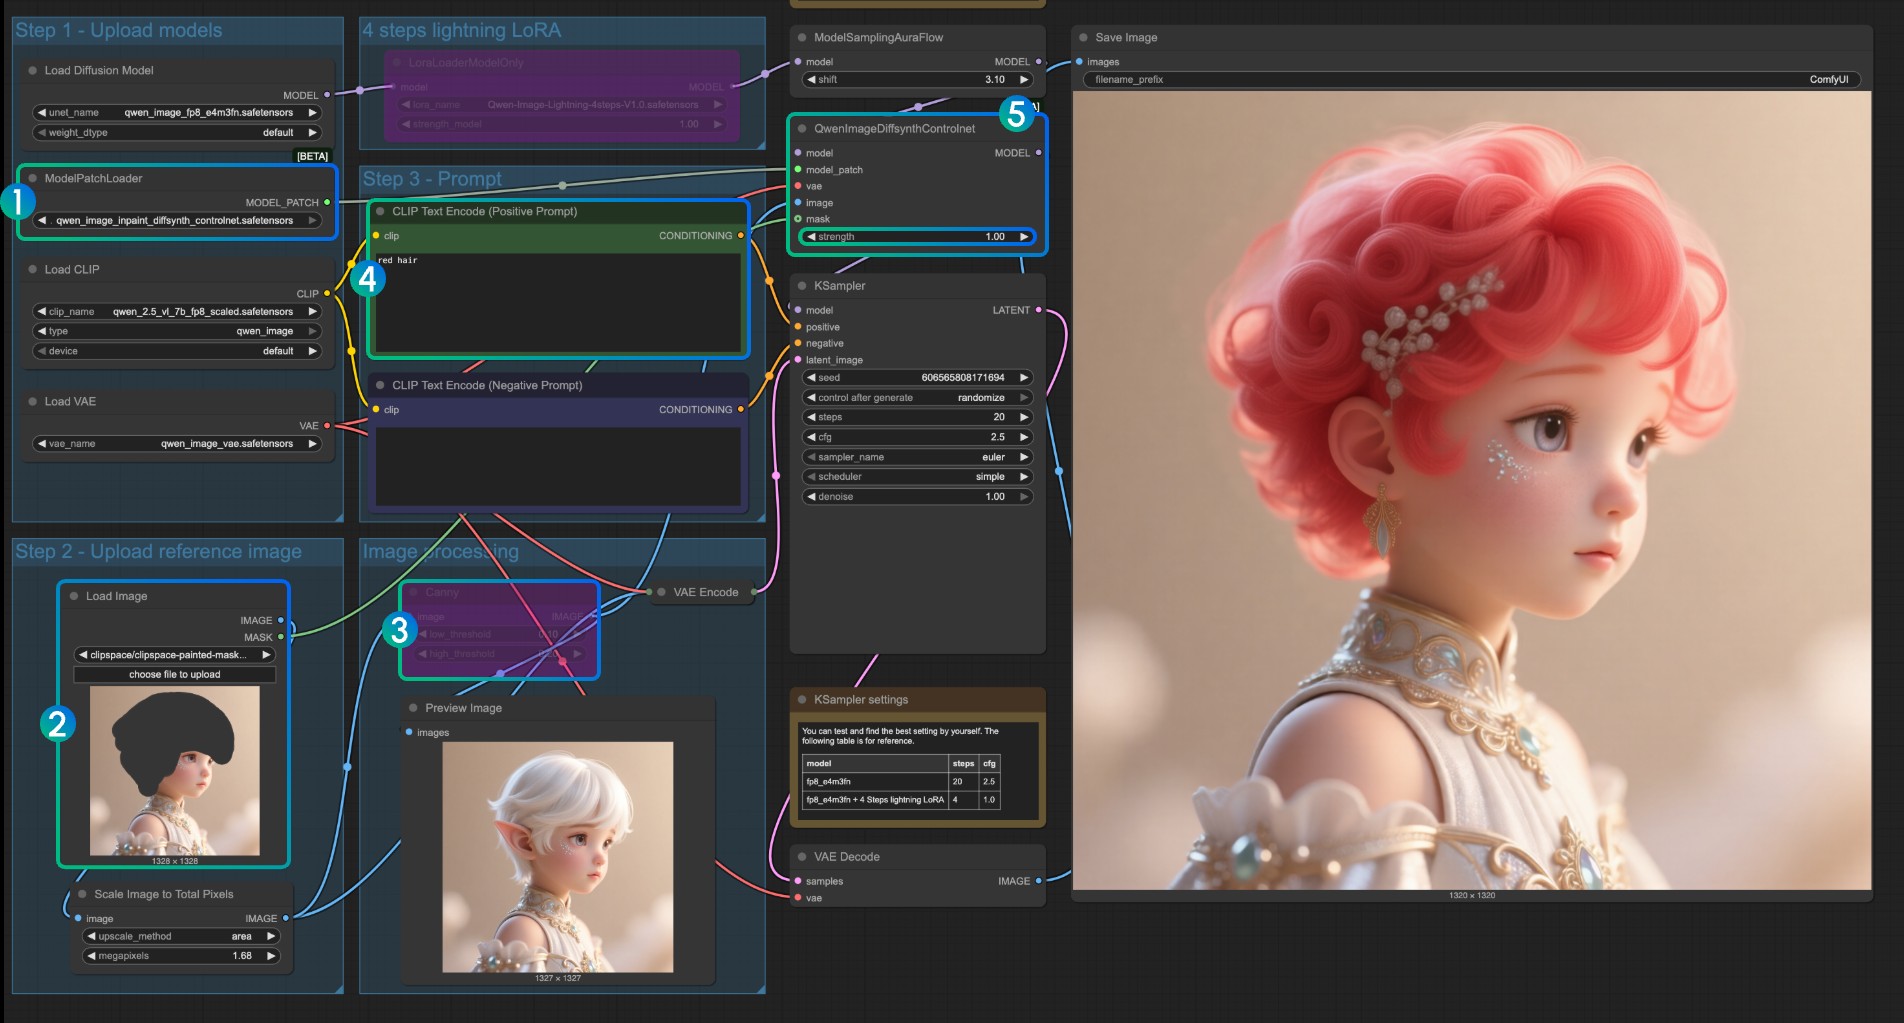
For the Inpaint model, it requires using the Mask Editor to draw a mask and use it as an input control condition.
- Ensure that
ModelPatchLoaderloads theqwen_image_inpaint_diffsynth_controlnet.safetensorsmodel - Upload an image and use the Mask Editor to draw a mask. You need to connect the
maskoutput of the correspondingLoad Imagenode to themaskinput ofQwenImageDiffsynthControlnetto ensure the corresponding mask is loaded - Use the
Ctrl-Bshortcut to set the original Canny in the workflow to bypass mode, so that the corresponding Canny node processing does not take effect - In the
CLIP Text Encoder, input the style you want to change the masked part to - If needed, you can modify the
strengthparameter of theQwenImageDiffsynthControlnetnode to control the corresponding control strength - Click the
Runbutton, or use the shortcutCtrl(cmd) + Enterto run the workflow
Qwen Image Union ControlNet LoRA Workflow
Original model address: DiffSynth-Studio/Qwen-Image-In-Context-Control-Union Comfy Org rehost address: qwen_image_union_diffsynth_lora.safetensors: Image structure control LoRA supporting canny, depth, pose, lineart, softedge, normal, openpose
1. Workflow and Input Images
Download the image below and drag it into ComfyUI to load the workflow

Download the image below as input:
2. Model Links
Download the following model. Since this is a LoRA model, it needs to be saved to the ComfyUI/models/loras/ folder:
- qwen_image_union_diffsynth_lora.safetensors: Image structure control LoRA supporting canny, depth, pose, lineart, softedge, normal, openpose
3. Workflow Instructions
This model is a unified control LoRA that supports canny, depth, pose, lineart, softedge, normal, openpose, and other controls. Since many native image preprocessing nodes are not fully supported, you may need something like comfyui_controlnet_aux to complete other image preprocessing.
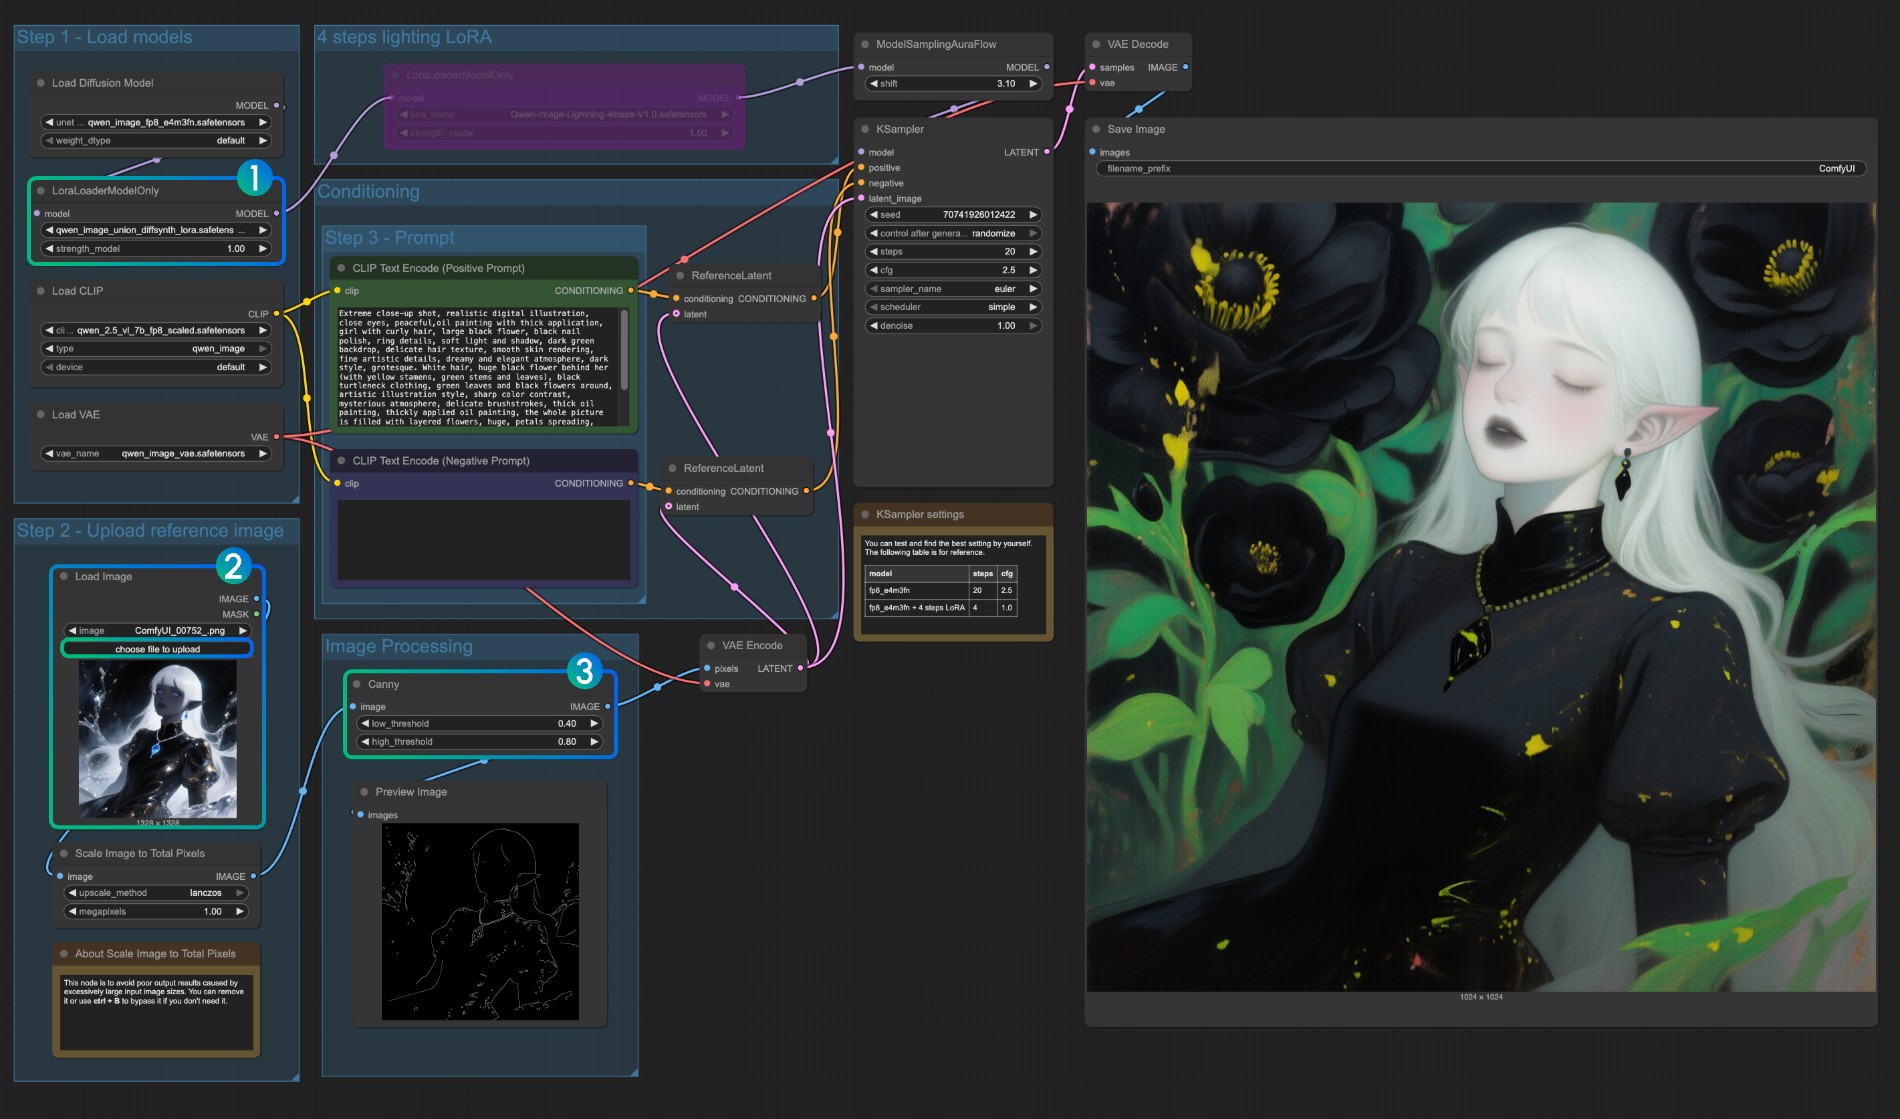
- Ensure that
LoraLoaderModelOnlycorrectly loads theqwen_image_union_diffsynth_lora.safetensorsmodel - Upload input image
- If needed, you can adjust the parameters of the
Cannynode. Since different input images require different parameter settings to obtain better image preprocessing results, you can try adjusting the corresponding parameter values to obtain more/fewer details - Click the
Runbutton, or use the shortcutCtrl(cmd) + Enterto run the workflow
For other types of control, you also need to replace the image processing part.
Comments
Sign in with GitHub to join the discussion.