Run ComfyUI on Google Colab
ComfyUI can not only be installed locally but can also be run on cloud platforms. This article will introduce how to run ComfyUI on Google Colab, which is a convenient cloud-based method.
Features and Advantages of Google Colab
Google Colab (Colaboratory) is a free cloud-based Jupyter notebook environment provided by Google. It has the following features and advantages:
-
Free to use: Google Colab provides free GPU and TPU resources, allowing users to run deep learning models without local hardware.
-
Pre-installed environment: Colab comes pre-installed with many common machine learning and data science libraries, such as TensorFlow, PyTorch, OpenCV, etc., eliminating the hassle of environment configuration.
-
Collaboration features: It’s easy to share and collaboratively edit notebooks with others, making it ideal for team projects and teaching.
-
Integration with Google Drive: You can directly load data from and save results to Google Drive, facilitating data management.
-
Online execution: You only need a browser to run code, without being limited by device or operating system.
-
Persistent storage: Although the runtime environment is temporary, you can save code and data to Google Drive for persistent storage.
-
Community support: There are numerous example notebooks and community support available, allowing for quick learning and problem-solving.
For ComfyUI users, using Google Colab to run ComfyUI can avoid the complexity of local installation while leveraging powerful cloud computing resources. It’s particularly suitable for users without high-performance GPUs or newcomers who want to quickly try out ComfyUI.
If you’re just trying out ComfyUI, Google provides a certain amount of free usage. If you’re a long-term user, it’s recommended to subscribe to Colab Pro or Pro+. Registration and subscription link: https://colab.research.google.com/signup
Running ComfyUI on Google Colab
Google Colab is a free cloud-based Jupyter notebook environment, very suitable for running ComfyUI, although it has some usage time limitations. ComfyUI officially provides corresponding scripts, which you can find in comfyui_colab.ipynb
The .ipynb file is a Jupyter Notebook file format. Using this file, you can run and create a virtual environment for running various types of applications on Google Colab.
Editing and Modifying .ipynb (Optional)
This part is optional. If you don’t need additional models and installation of extra plugins, this section might be lengthy. You can skip to the next part to start directly with the official default configuration. You can refer back to this section later if you need to modify the configuration yourself.
In the default configuration, the script provided by the official source downloads fewer models and files. If you need to use some additional models, you can edit the comfyui_colab.ipynb file. It’s recommended to download and install VSCode to edit the .ipynb file.
The official code mainly provides the following steps:
-
Environment Setup Set up the working environment and options, including whether to use Google Drive storage and whether to update ComfyUI. This part ensures that the required dependencies and files are correctly configured.
-
Downloading Models and Checkpoints Responsible for downloading required models and checkpoints from external sources for subsequent use. Users can choose to download specific models as needed.
-
Running ComfyUI This part is divided into three sub-sections, providing different ways to access ComfyUI:
-
3.1 Using Cloudflared Creates a tunnel through Cloudflared, allowing external users to access the running ComfyUI.
-
3.2 Using Localtunnel Uses Localtunnel to generate an externally accessible link to access ComfyUI.
-
3.3 Using Colab IFrame Displays the ComfyUI interface through an iframe in the Colab notebook, convenient for users to operate in the same environment.
-
For the first step of environment configuration, we generally run it by default
-
The second step requires downloading additional models and files, and provides downloads for commonly used models. In this step, we need to add and adjust modifications as needed
-
The third step is about how to run ComfyUI after installation and setup is complete. We choose one of these methods as needed
Modifying Model Files in Step Two as Needed
Open the code for editing in VSCode as shown below
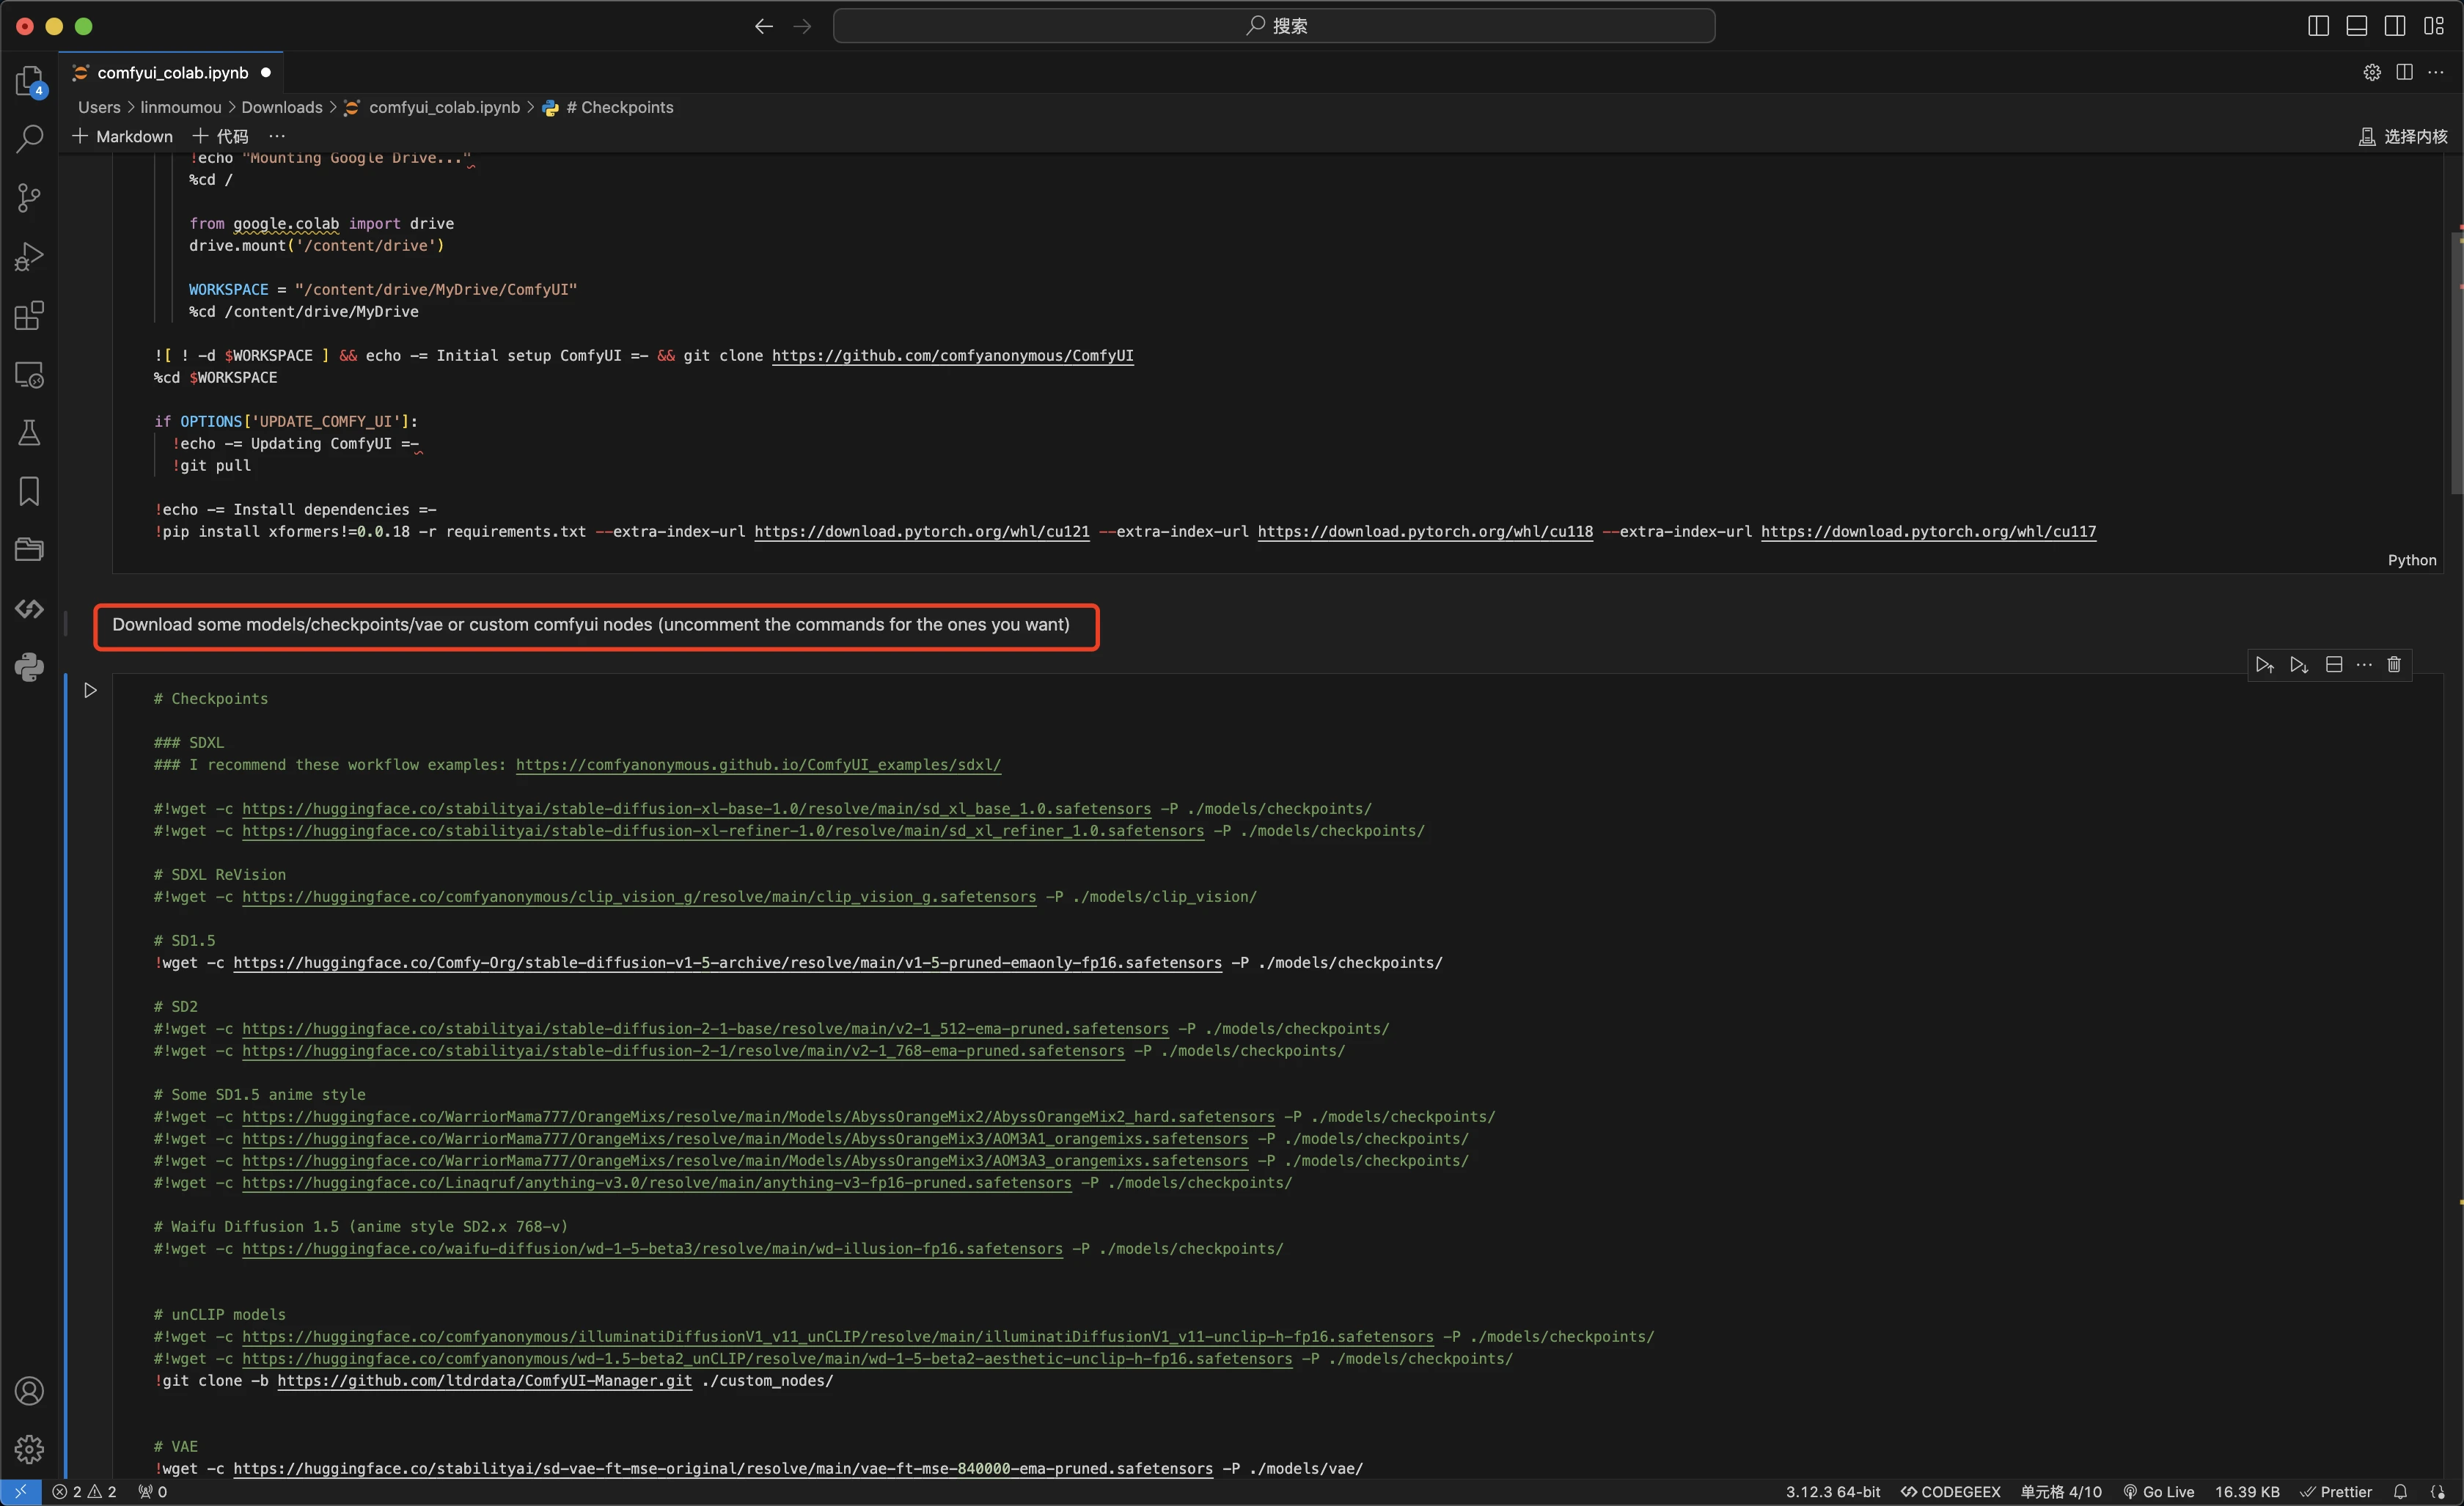
As shown in the image below, we can notice that the official source has written a hint here
Original text: Download some models/checkpoints/vae or custom comfyui nodes (uncomment the commands for the ones you want) Chinese: 下载一些模型/检查点/vae或自定义comfyui节点(取消注释您想要的命令) You can see that different parts have corresponding models annotated, such as the Checkpoints models in the section below
- For the first step of environment configuration, we generally run it by default
- The second step requires downloading additional models and files, and provides downloads for commonly used models. In this step, we need to add and adjust modifications as needed
- The third step is about how to run ComfyUI after installation and setup is complete. We choose one of these methods as needed
Modifying Model Files in Step Two as Needed
Open the code for editing in VSCode as shown below

As shown in the image below, we can notice that the official source has written a hint here
Download some models/checkpoints/vae or custom comfyui nodes (uncomment the commands for the ones you want)
You can see that different parts have corresponding models annotated, such as the Checkpoints models in the section below

# Checkpoints

### SDXL
### I recommend these workflow examples: https://comfyanonymous.github.io/ComfyUI_examples/sdxl/

#!wget -c https://huggingface.co/stabilityai/stable-diffusion-xl-base-1.0/resolve/main/sd_xl_base_1.0.safetensors -P ./models/checkpoints/
#!wget -c https://huggingface.co/stabilityai/stable-diffusion-xl-refiner-1.0/resolve/main/sd_xl_refiner_1.0.safetensors -P ./models/checkpoints/

# SDXL ReVision
#!wget -c https://huggingface.co/comfyanonymous/clip_vision_g/resolve/main/clip_vision_g.safetensors -P ./models/clip_vision/

# SD1.5
!wget -c https://huggingface.co/Comfy-Org/stable-diffusion-v1-5-archive/resolve/main/v1-5-pruned-emaonly-fp16.safetensors -P ./models/checkpoints/

# SD2
#!wget -c https://huggingface.co/stabilityai/stable-diffusion-2-1-base/resolve/main/v2-1_512-ema-pruned.safetensors -P ./models/checkpoints/
#!wget -c https://huggingface.co/stabilityai/stable-diffusion-2-1/resolve/main/v2-1_768-ema-pruned.safetensors -P ./models/checkpoints/
If you want to download additional models, simply remove the # before the corresponding #!wget to uncomment it. This will download the corresponding model to the specified path during actual execution. For example, if we want to download the SDXL model, we would uncomment the corresponding lines like this:
# SD1.5
!wget -c https://huggingface.co/Comfy-Org/stable-diffusion-v1-5-archive/resolve/main/v1-5-pruned-emaonly-fp16.safetensors -P ./models/checkpoints/
If you want to download additional models, simply remove the # before the corresponding #!wget to uncomment it. This will download the corresponding model to the specified path during actual execution. For example, if we want to download the SDXL model, we would uncomment the corresponding lines like this:
!wget -c https://huggingface.co/stabilityai/stable-diffusion-xl-base-1.0/resolve/main/sd_xl_base_1.0.safetensors -P ./models/checkpoints/
!wget -c https://huggingface.co/stabilityai/stable-diffusion-xl-refiner-1.0/resolve/main/sd_xl_refiner_1.0.safetensors -P ./models/checkpoints/
If you want to add custom models, you can add the corresponding code in the source section
!wget -c file_address -P .model_pathJust like downloading sd_xl_refiner_1.0.safetensors to the ./models/checkpoints/ folder as shown below
"!wget -c https://huggingface.co/stabilityai/stable-diffusion-xl-refiner-1.0/resolve/main/sd_xl_refiner_1.0.safetensors -P ./models/checkpoints/\n",If you’re not familiar with which folder to put it in specifically, please refer to the ComfyUI File Structure section for instructions
Adding Scripts to Download Custom Plugins as Needed
The official example provides the following code example for installing custom plugins
#!cd custom_nodes && git clone https://github.com/Fannovel16/comfy_controlnet_preprocessors; cd comfy_controlnet_preprocessors && python install.pyThis code is divided into several steps
-
!cd custom_nodesEnter the custom_nodes folder, which is the installation folder for ComfyUI plugins -
git clone https://github.com/Fannovel16/comfy_controlnet_preprocessors;Use git to clone the corresponding code to this folder, it will create a comfy_controlnet_preprocessors folder under custom_nodes to store the plugin code -
cd comfy_controlnet_preprocessorsEnter the newly cloned plugin folder -
python install.pyUse Python to run the script to install plugin dependencies. You need to check how the corresponding plugin installs dependencies. Some plugins may not provide an install.py file but only a requirements.txt file, in which case the last command needs to be modified topip install -r requirements.txt
For example, if you need to install the plugin ComfyUI-Manager, you need to construct a command similar to the following
!cd custom_nodes && git clone https://github.com/ltdrdata/ComfyUI-Manager; cd pip install -r requirements.txtThis can achieve the purpose of installing the ComfyUI-Manager plugin individually and installing related dependencies
After editing, save the corresponding .ipynb file for subsequent processes
Here are the steps for using the official version of the .ipynb configuration:
1. Preparation
-
First, you need a Google account. If you don’t have one yet, please go to Google’s official website to register one.
-
After logging into your Google account, visit Google Colab.
-
Prepare (optional) your modified .ipynb file
2. Open the ComfyUI Colab Notebook
Colab can change the language option in the Help menu
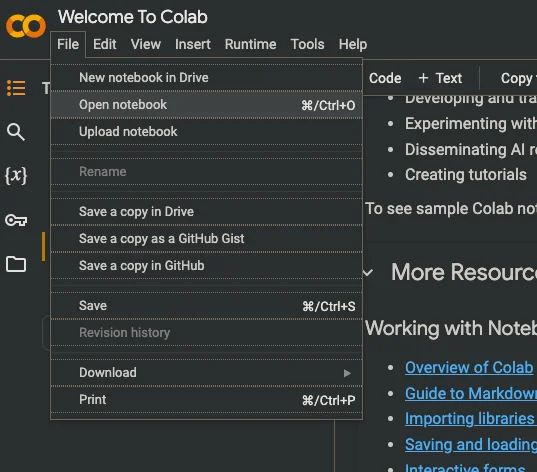
- On the Colab page, click “File” > “Open Notebook” in the top menu bar.
-
In the pop-up window, select the “GitHub” tab, or if it’s a file you’ve edited, select “Upload”
-
Enter the following URL in the search box:
https://github.com/comfyanonymous/ComfyUI/blob/master/notebooks/comfyui_colab.ipynb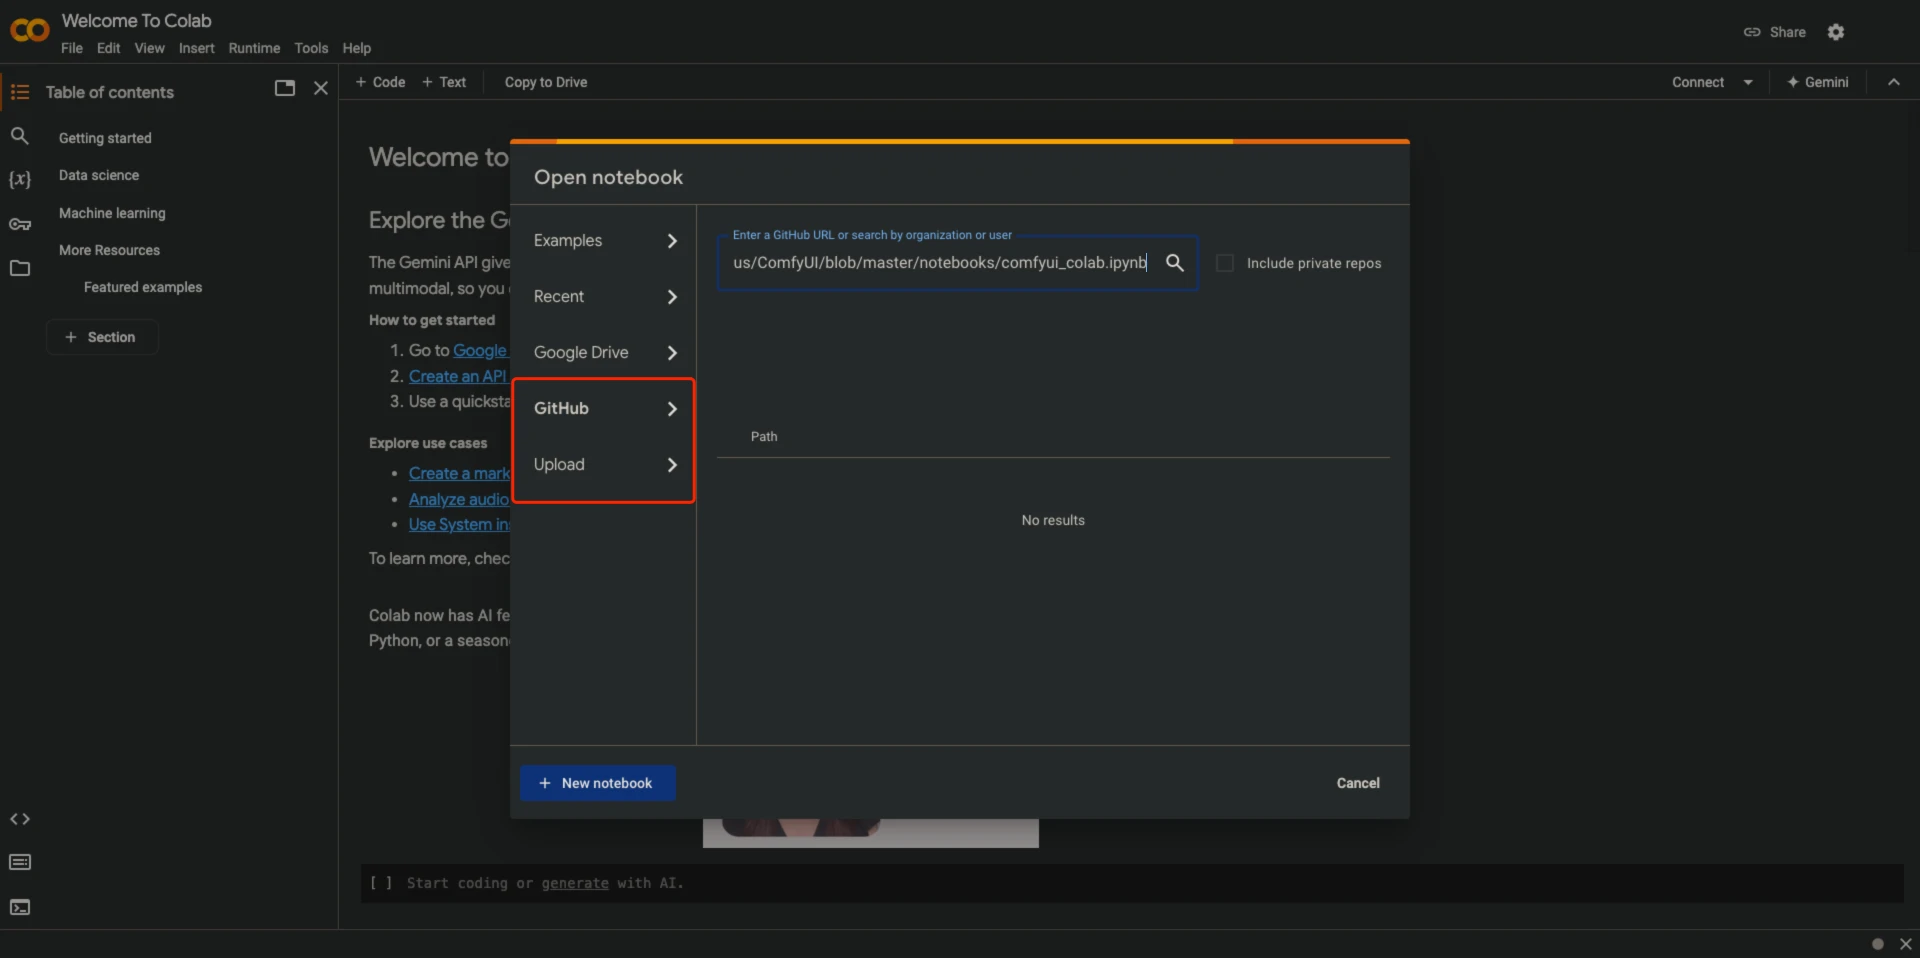
- Click on the
comfyui_colab.ipynbfile in the search results.
3. Run the Notebook to Complete the Runtime Environment and Model File Plugin Installation
-
After the notebook opens, you will see a series of code cells.
-
Starting from the top, click the play button to the left of each code cell, or use the shortcut Shift+Enter to run the code.
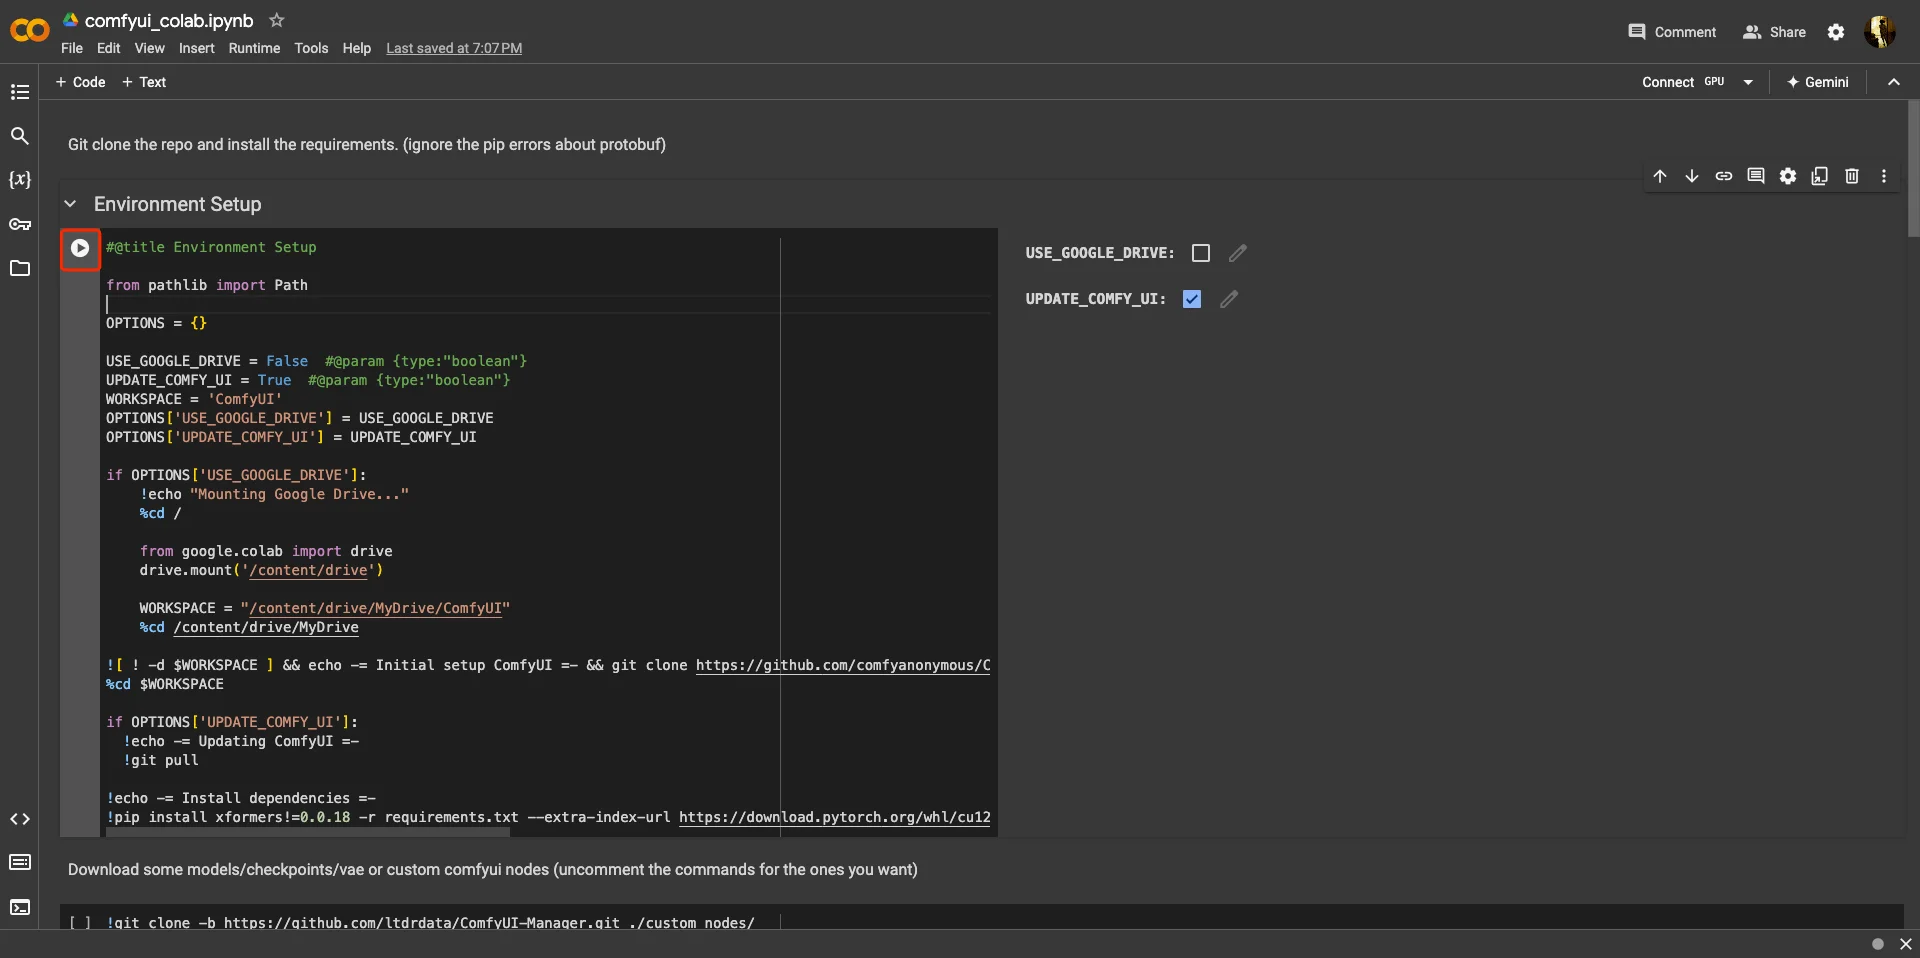
You need to wait for the corresponding code to finish running and display “done” before running the next code cell. First run the first two code cells to install the corresponding environment and dependencies, the subsequent code cells are for selecting the running method
4. Choose How to Run ComfyUI
In the provided configuration file, three running methods are provided. You only need to choose one of them to run
- Run ComfyUI with cloudflared (recommended)
- Run ComfyUI with localtunnel
- Run ComfyUI with colab iframe (when the second running method is not available)
1. Run ComfyUI with cloudflared After running, you will see
ComfyUI finished loading, trying to launch cloudflared (if it gets stuck here cloudflared is having issues)

This is the URL to access ComfyUI: https://xxxxxx.trycloudflare.com
Click the last URL to access ComfyUI
2. Run ComfyUI with localtunnel After running, you will see something like
ComfyUI finished loading, trying to launch localtunnel (if it gets stuck here localtunnel is having issues)

The password/enpoint ip for localtunnel is: 34.125.230.29
your url is: https://xxxx.loca.lt
Click the last url, then fill in the Tunnel Password on the opened page with the password above, for example, in my case it’s 34.125.230.29, this way you can run it
3. Run ComfyUI with colab iframe
This running method doesn’t require opening a URL. After running, it will display the operation interface below the code block
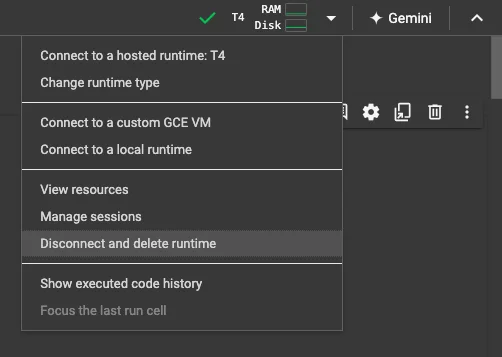
Remember to stop the corresponding running instance promptly after use, otherwise it will deduct running time
How to Use the Created Notebook File Later?
The notebook file you’ve used will be automatically saved to your Google Drive. You can open the corresponding notebook file at any time, then click the “Run” button in the upper right corner to run it again
- After logging into your Google account https://drive.google.com/drive/my-drive
- Click on the Colab Notebooks folder
- Find the .ipynb file you ran before, and it will enter colab
Notes
- The free version of Google Colab has a usage time limit, usually a few hours. If you need to use it for a long time, consider upgrading to the paid version.
- After each use, remember to save your work and close the Colab notebook to release resources.
- Since it’s running in the cloud, uploading and downloading files may be slightly slower than running locally.
Running ComfyUI on Other Online Platforms
Besides Google Colab, there are some other online platforms that provide a running environment for ComfyUI:
- ComfyUI Web | English site: https://huggingface.co/spaces/kadirnar/ComfyUI-Demo