ComfyUI FLUX.1 Kontext (Dev, Pro, Max) Complete Guide: Native Workflows, API Calls & Prompt Optimization
All workflows mentioned in this article can be found in our custom node ComfyUI-Wiki-Workflows. After installation, you can find the corresponding templates in the template section. Please copy the custom node name and search in ComfyUI Manager.
ComfyUI-Wiki-WorkflowsFLUX.1 Kontext is a generative model suite designed for text and image-driven editing. Unlike traditional text-to-image (T2I) models, Kontext supports context-based image processing, capable of understanding both image and text content to achieve more precise image editing capabilities.
FLUX.1 Kontext Model Features
- Continuous Image Editing: Maintains consistency across multiple editing steps
- Precise Object Modification: Accurately modifies specific objects in images
- Character Consistency Editing: Maintains character features across multiple editing steps
- Style Preservation and Transfer: Can both maintain original style and perform style transfer
- Image Text Editing: Directly edits text content in images
- Composition Control: Precise control over image composition, camera angles, and poses
- Fast Inference: Efficient image generation and editing speed
Pro, Max and Dev Version Comparison
- Pro and Max versions continue to deliver the highest capabilities of Black Forest Labs models, available only through API calls
- Dev version is the open-source version for community learning and research, now open-sourced. Related code and model weights can be found on the official website.
The Dev version is not for commercial use, but you can purchase a Dev version License for commercial use. Please refer to Black Forest Labs official website to purchase commercial licenses.
Compared to Pro and Max versions, the Dev version requires more time to craft prompts and won’t achieve good results with simple prompts like Pro and Max versions.
Under some prompts, the Dev version may not edit the image at all, requiring prompt adjustment and modification.
Tutorial Content Overview
In this tutorial, we will cover the following content:
- Basic Flux.1 Kontext Dev native workflows (fb16, fp8_scaled, gguf)
- Flux.1 Kontext Dev accelerated inference (Nunchaku, TeaCache)
- Multi-round image editing implementation
- Multiple image reference methods
- Flux.1 Kontext Dev image input marking suggestions
- Flux.1 Kontext API node workflows (Pro, Max)
- Flux.1 Kontext prompt usage guide
Please update ComfyUI before starting to ensure your ComfyUI has Flux Kontext Dev related support.
Flux.1 Kontext Dev Related Models
Since this tutorial involves multiple different model versions, we’ll provide a brief introduction to the models and weights here. Flux.1 Kontext Dev models, except for Diffusion models, use the same models (Text Encoder, VAE) as the original Flux series. If you’ve used related workflows before, you only need to download Flux.1 Kontext Dev related models.
Different Versions of Kontext Models
Here I’ve collected three different versions of models. You can choose one to download as needed. The Original version and Fp8 version have the same usage and storage location in ComfyUI, while the GGUF version needs to be saved to the ComfyUI/models/Unet/ directory and loaded using ComfyUI-GGUF’s Unet Loader (GGUF) node.
Flux.1 Kontext Dev Original Model Weights and Community Versions
- Black Forest Labs Original Version: flux1-kontext-dev.safetensors
- ComfyOrg FP8 Version: flux1-dev-kontext_fp8_scaled.safetensors
- Community GGUF Version: FLUX.1-Kontext-dev-GGUF
- Nunchaku Accelerated Inference Version: nunchaku-flux.1-kontext-dev
Flux.1 Kontext Dev Different Model Versions Effect and VRAM Requirements Comparison
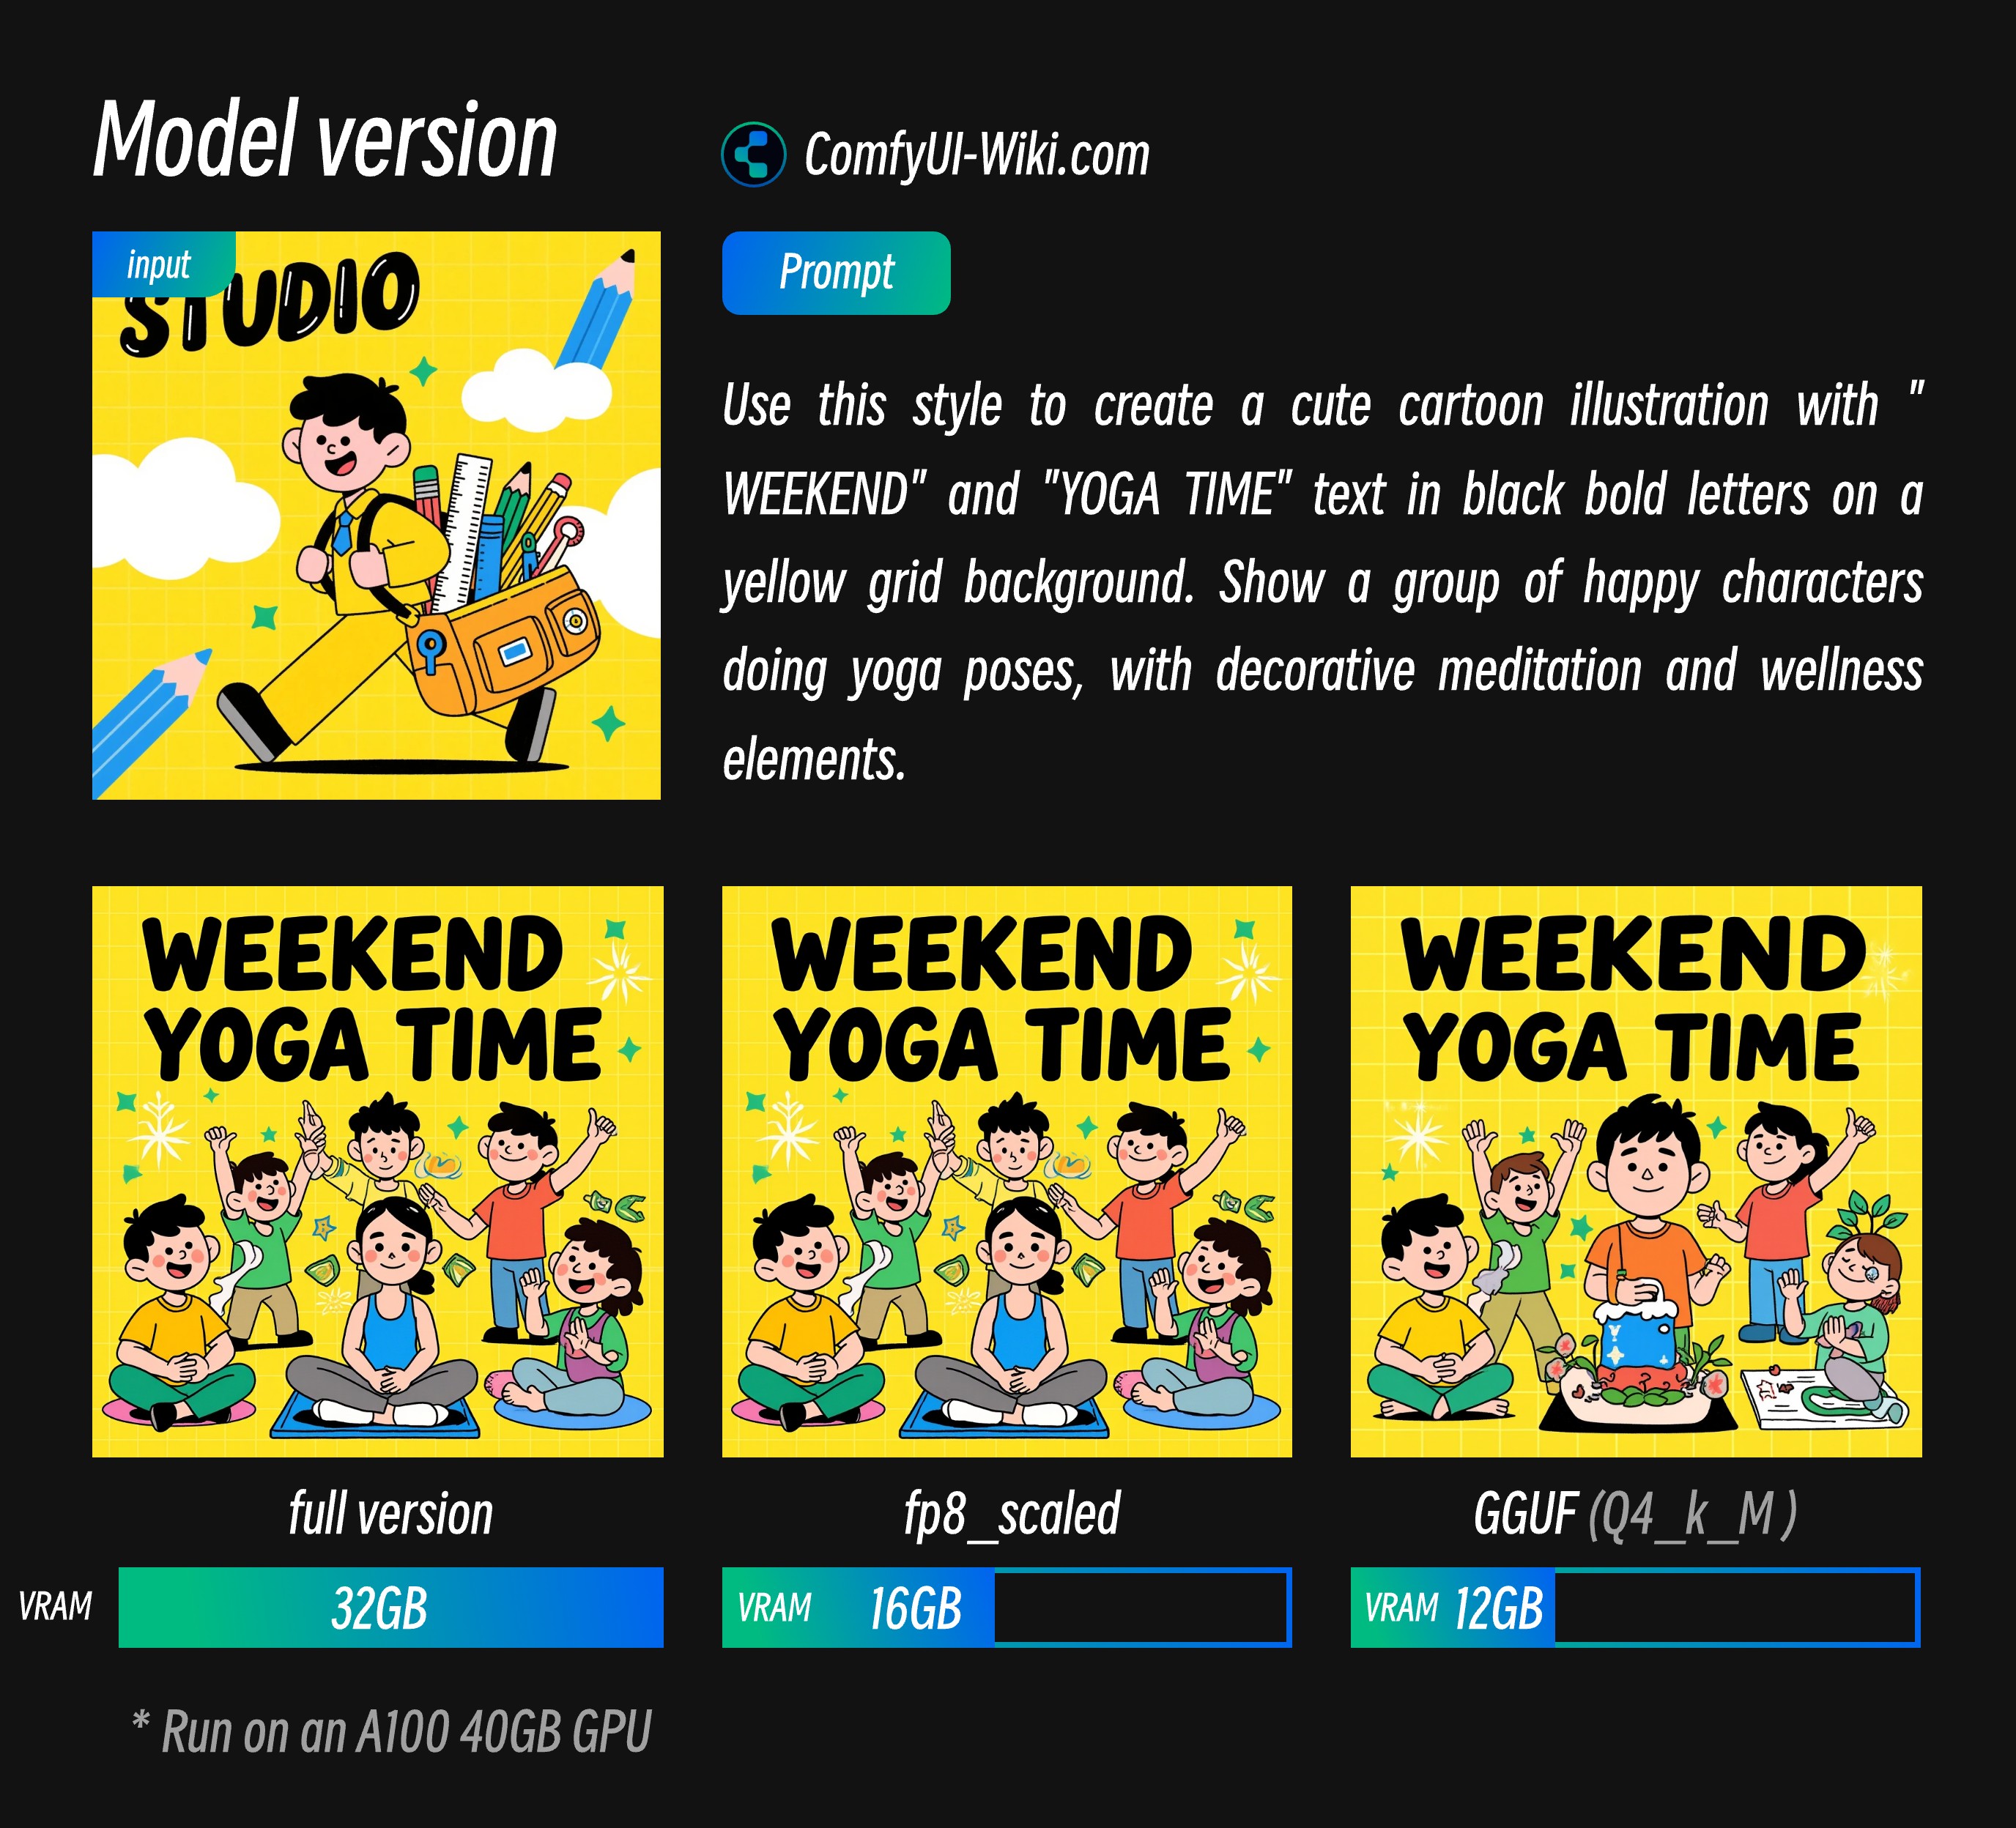
From the results above, I provide reference data for different VRAM usage. These output results are consistent except for model versions. The corresponding VRAM data is for A100 40GB, so the ratio will be higher. Currently, the full version can also run on 4090, but the generation time is slower.
- You can see that fp8_scaled has minimal loss
- GGUF version I tested has some quality loss but correspondingly lower VRAM requirements.
Text Encoder
VAE
Model Storage Locations
📂 ComfyUI/
├── 📂 models/
│   ├── 📂 diffusion_models/
│   │   └── flux1-dev-kontext_fp8_scaled.safetensors or flux1-kontext-dev.safetensors
│   ├── 📂 unet/
│   │   └── such as flux1-kontext-dev-Q4_K_M.gguf, # Only download if you need GGUF version
│   ├── 📂 vae/
│   │   └── ae.safetensors
│   └── 📂 text_encoders/
│       ├── clip_l.safetensors
│       └── t5xxl_fp16.safetensors or t5xxl_fp8_e4m3fn_scaled.safetensors
ComfyUI Flux.1 Kontext Dev Native Basic Workflow
For the basic workflow, since I’ve already created corresponding templates in ComfyUI templates, please find the Flux.1 Kontext Dev related templates in ComfyUI.
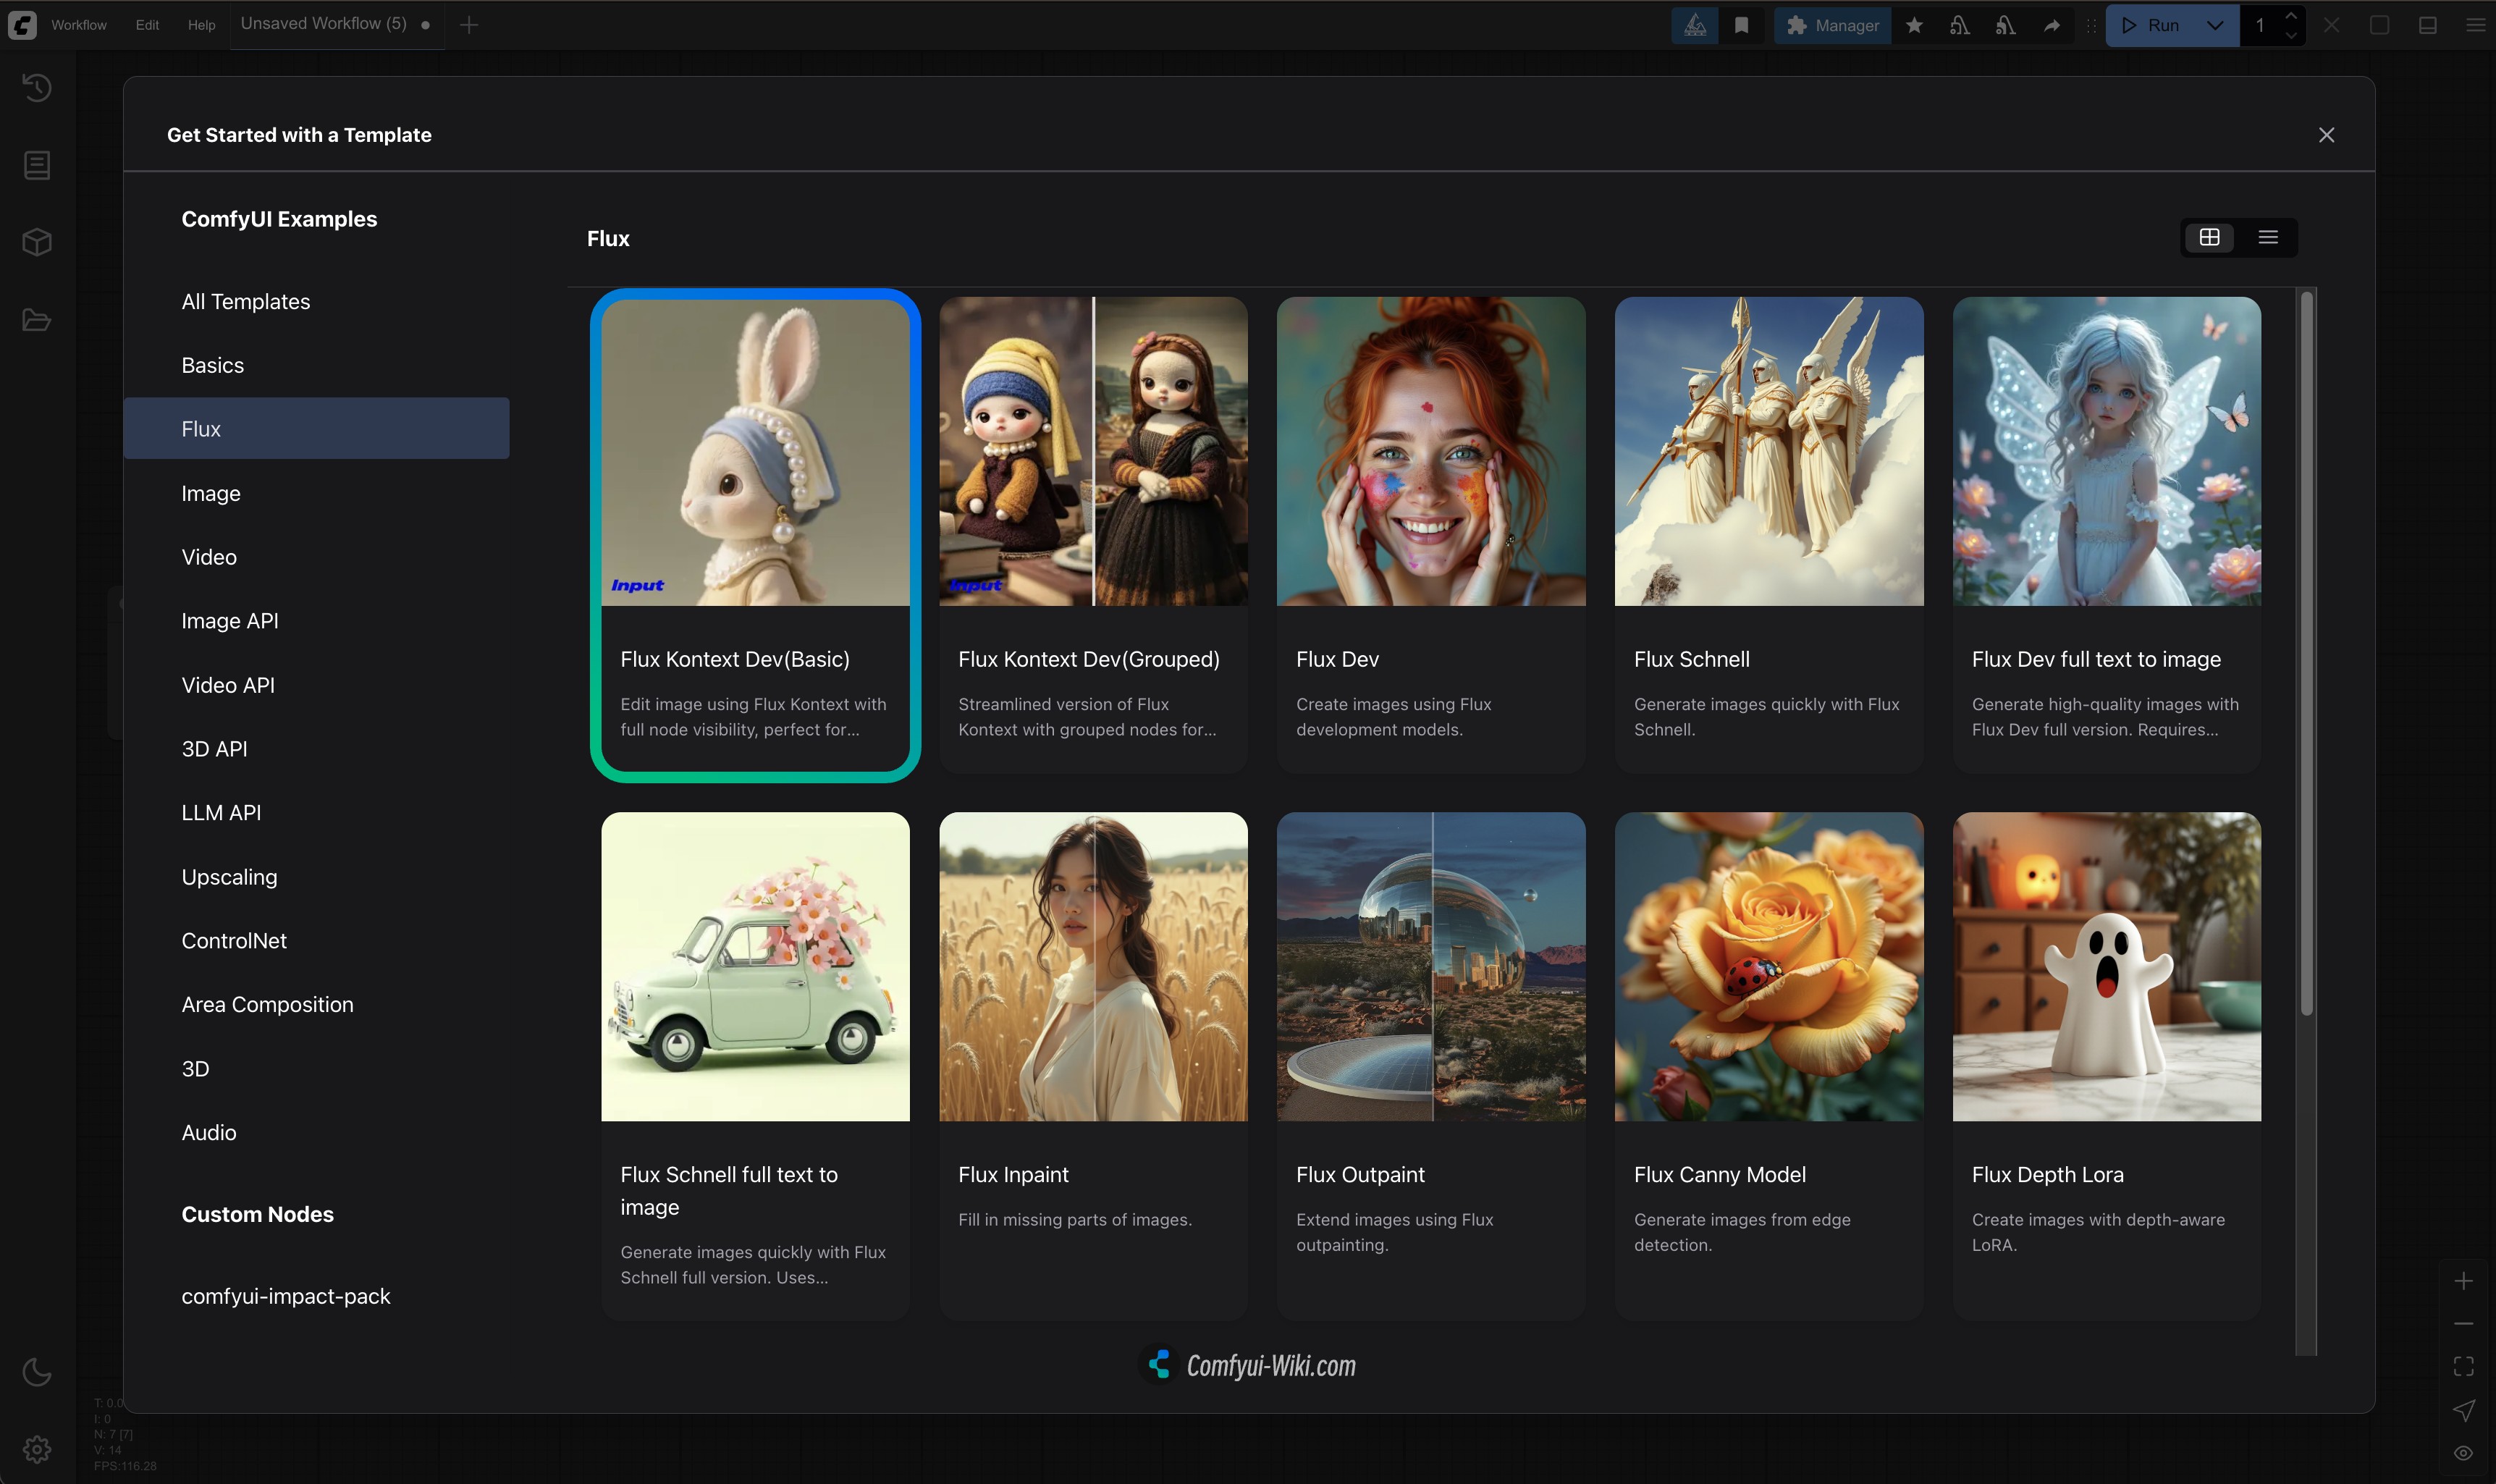
If you don’t find the related templates, you may not have updated the related dependencies correctly. Please refer to How to Update ComfyUI documentation I wrote in the ComfyUI official documentation to ensure related dependencies are updated.
1. Workflow and Sample Material Download
Download the file below and drag it into ComfyUI to load the corresponding workflow

Input Image

2. Complete Workflow Steps
 You can refer to the numbers in the image to complete the workflow:
- Load
flux1-dev-kontext_fp8_scaled.safetensorsmodel in theLoad Diffusion Modelnode - Ensure in the
DualCLIP Loadnode:clip_l.safetensorsandt5xxl_fp16.safetensorsort5xxl_fp8_e4m3fn_scaled.safetensorsare loaded - Ensure
ae.safetensorsmodel is loaded in theLoad VAEnode - Load the provided input image in the
Load Image(from output)node - Modify the prompt in the
CLIP Text Encodenode, only English is supported - Click the
Queuebutton or use the shortcutCtrl(cmd) + Enterto run the workflow
FLUX.1 Kontext Dev GGUF Version Workflow
Using GGUF models requires the Unet Loader (GGUF) node from ComfyUI-GGUF. Please first install the corresponding plugin using ComfyUI-Manager, or refer to How to Install Custom Nodes to learn how to install custom nodes.
The related workflow is quite simple - just use the workflow from Flux.1 Kontext Dev Basic Workflow and replace the Load Diffusion Model node with the Unet Loader (GGUF) node.
Workflow File Download

Step Instructions
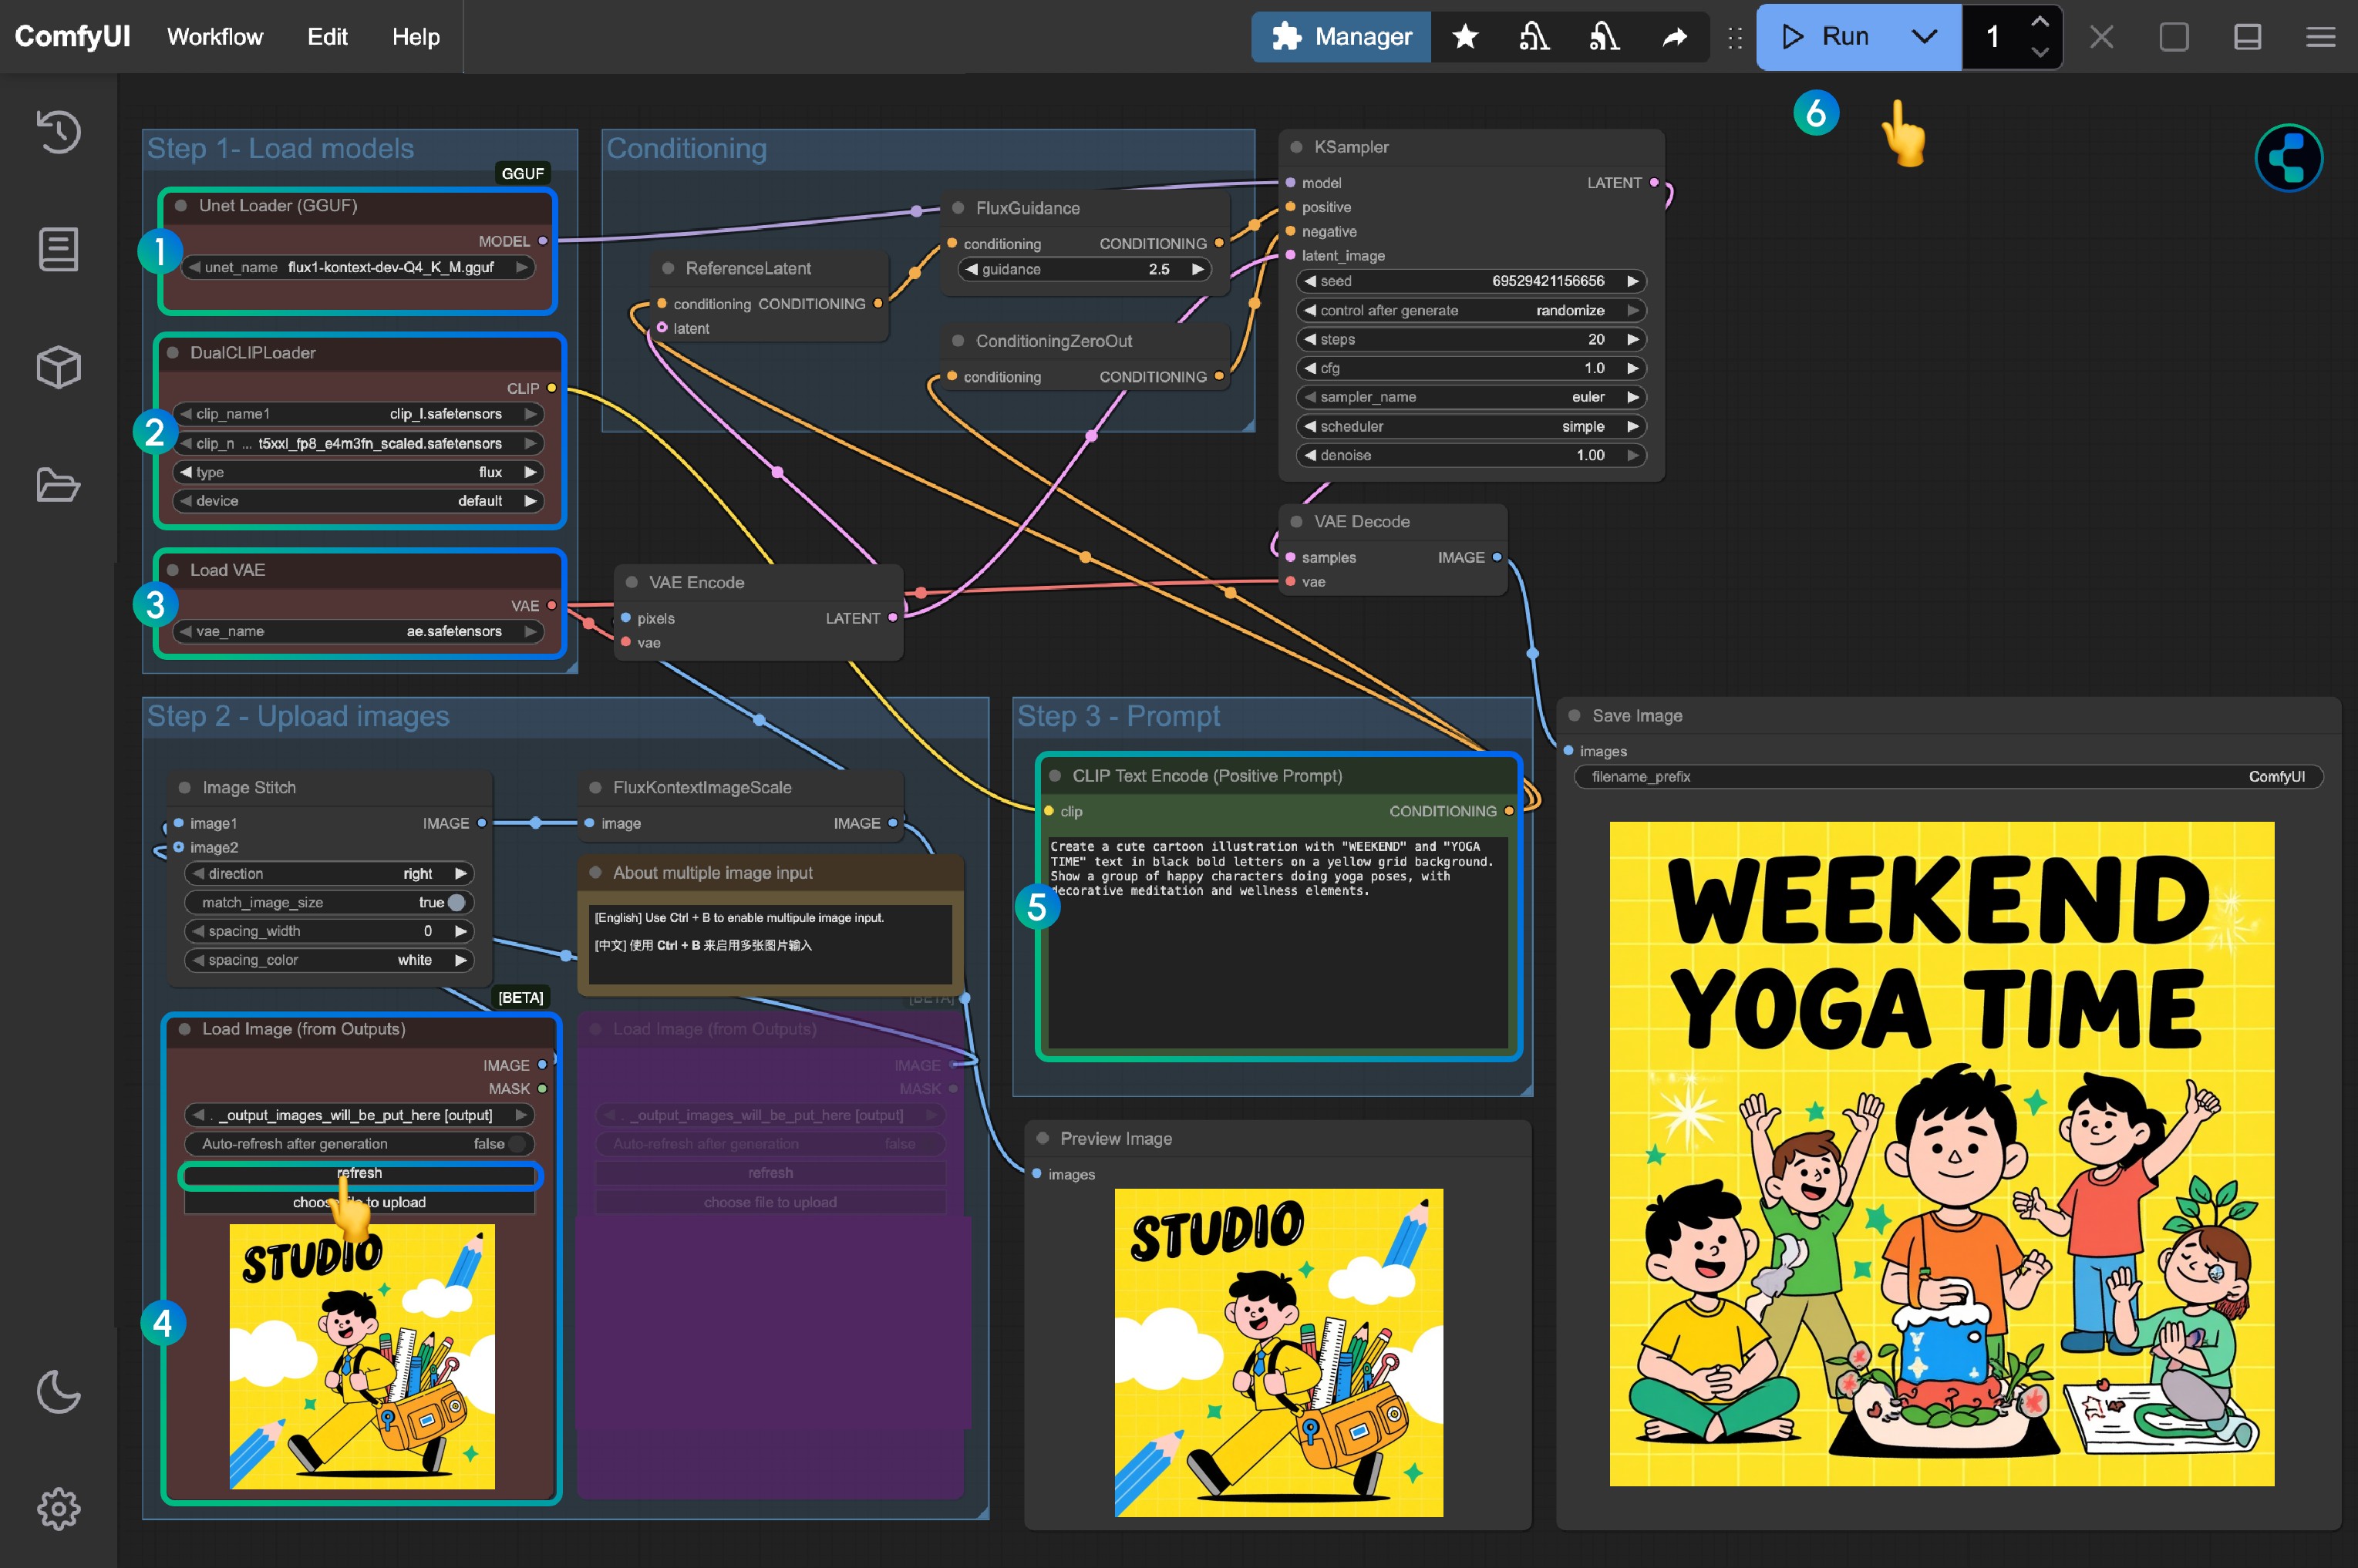
- Load
flux1-kontext-dev-Q4_K_M.gguf(or other versions) in theUnet Loader (GGUF)node - Ensure in the
DualCLIP Loadnode:clip_l.safetensorsandt5xxl_fp16.safetensorsort5xxl_fp8_e4m3fn_scaled.safetensorsare loaded - Ensure
ae.safetensorsmodel is loaded in theLoad VAEnode - Load the provided input image in the
Load Image(from output)node - Modify the prompt in the
CLIP Text Encodenode, only English is supported - Click the
Queuebutton or use the shortcutCtrl(cmd) + Enterto run the workflow
Flux.1 Kontext Dev Accelerated Inference Version
This section will involve two versions of Flux.1 Kontext Dev acceleration, Nunchaku and TeaCache, two versions
- Nunchaku requires a corresponding model
- TeaCache can be used with the original workflow and GGUF workflow
Flux.1 Kontext Dev Nunchaku Accelerated Inference Version
Nunchaku Accelerated Inference Version is provided by MIT-HAN-LAB, this version requires a corresponding model to use, currently there are two versions of models:
- Blackwell Architecture 50 Series GPU Special Version: svdq-fp4_r32-flux.1-kontext-dev.safetensors
- Other GPUs: svdq-int4_r32-flux.1-kontext-dev.safetensors
The corresponding model also needs to be installed and downloaded to the ComfyUI/models/diffusion_models/ directory.
You can refer to this video to complete the corresponding workflow tutorial:
The workflow is loaded from my custom node ComfyUI-Wiki-Workflows, which is a custom node with only workflows and no dependencies.
1. Custom Node Installation
Plugin address: ComfyUI-nunchaku
Using Nunchaku models requires using Nunchaku nodes and installing the corresponding wheel. Please refer to the How to Install Custom Nodes section for more information.
- After the initial installation, since the corresponding wheel is not installed, there will still be a few nodes missing, so you need to install the wheel
- Use the “Nunchaku Wheel Installer” node to install the wheel, and restart ComfyUI after installation
2. Workflow File Download
Download the image below as the input image

3. Complete Workflow Steps
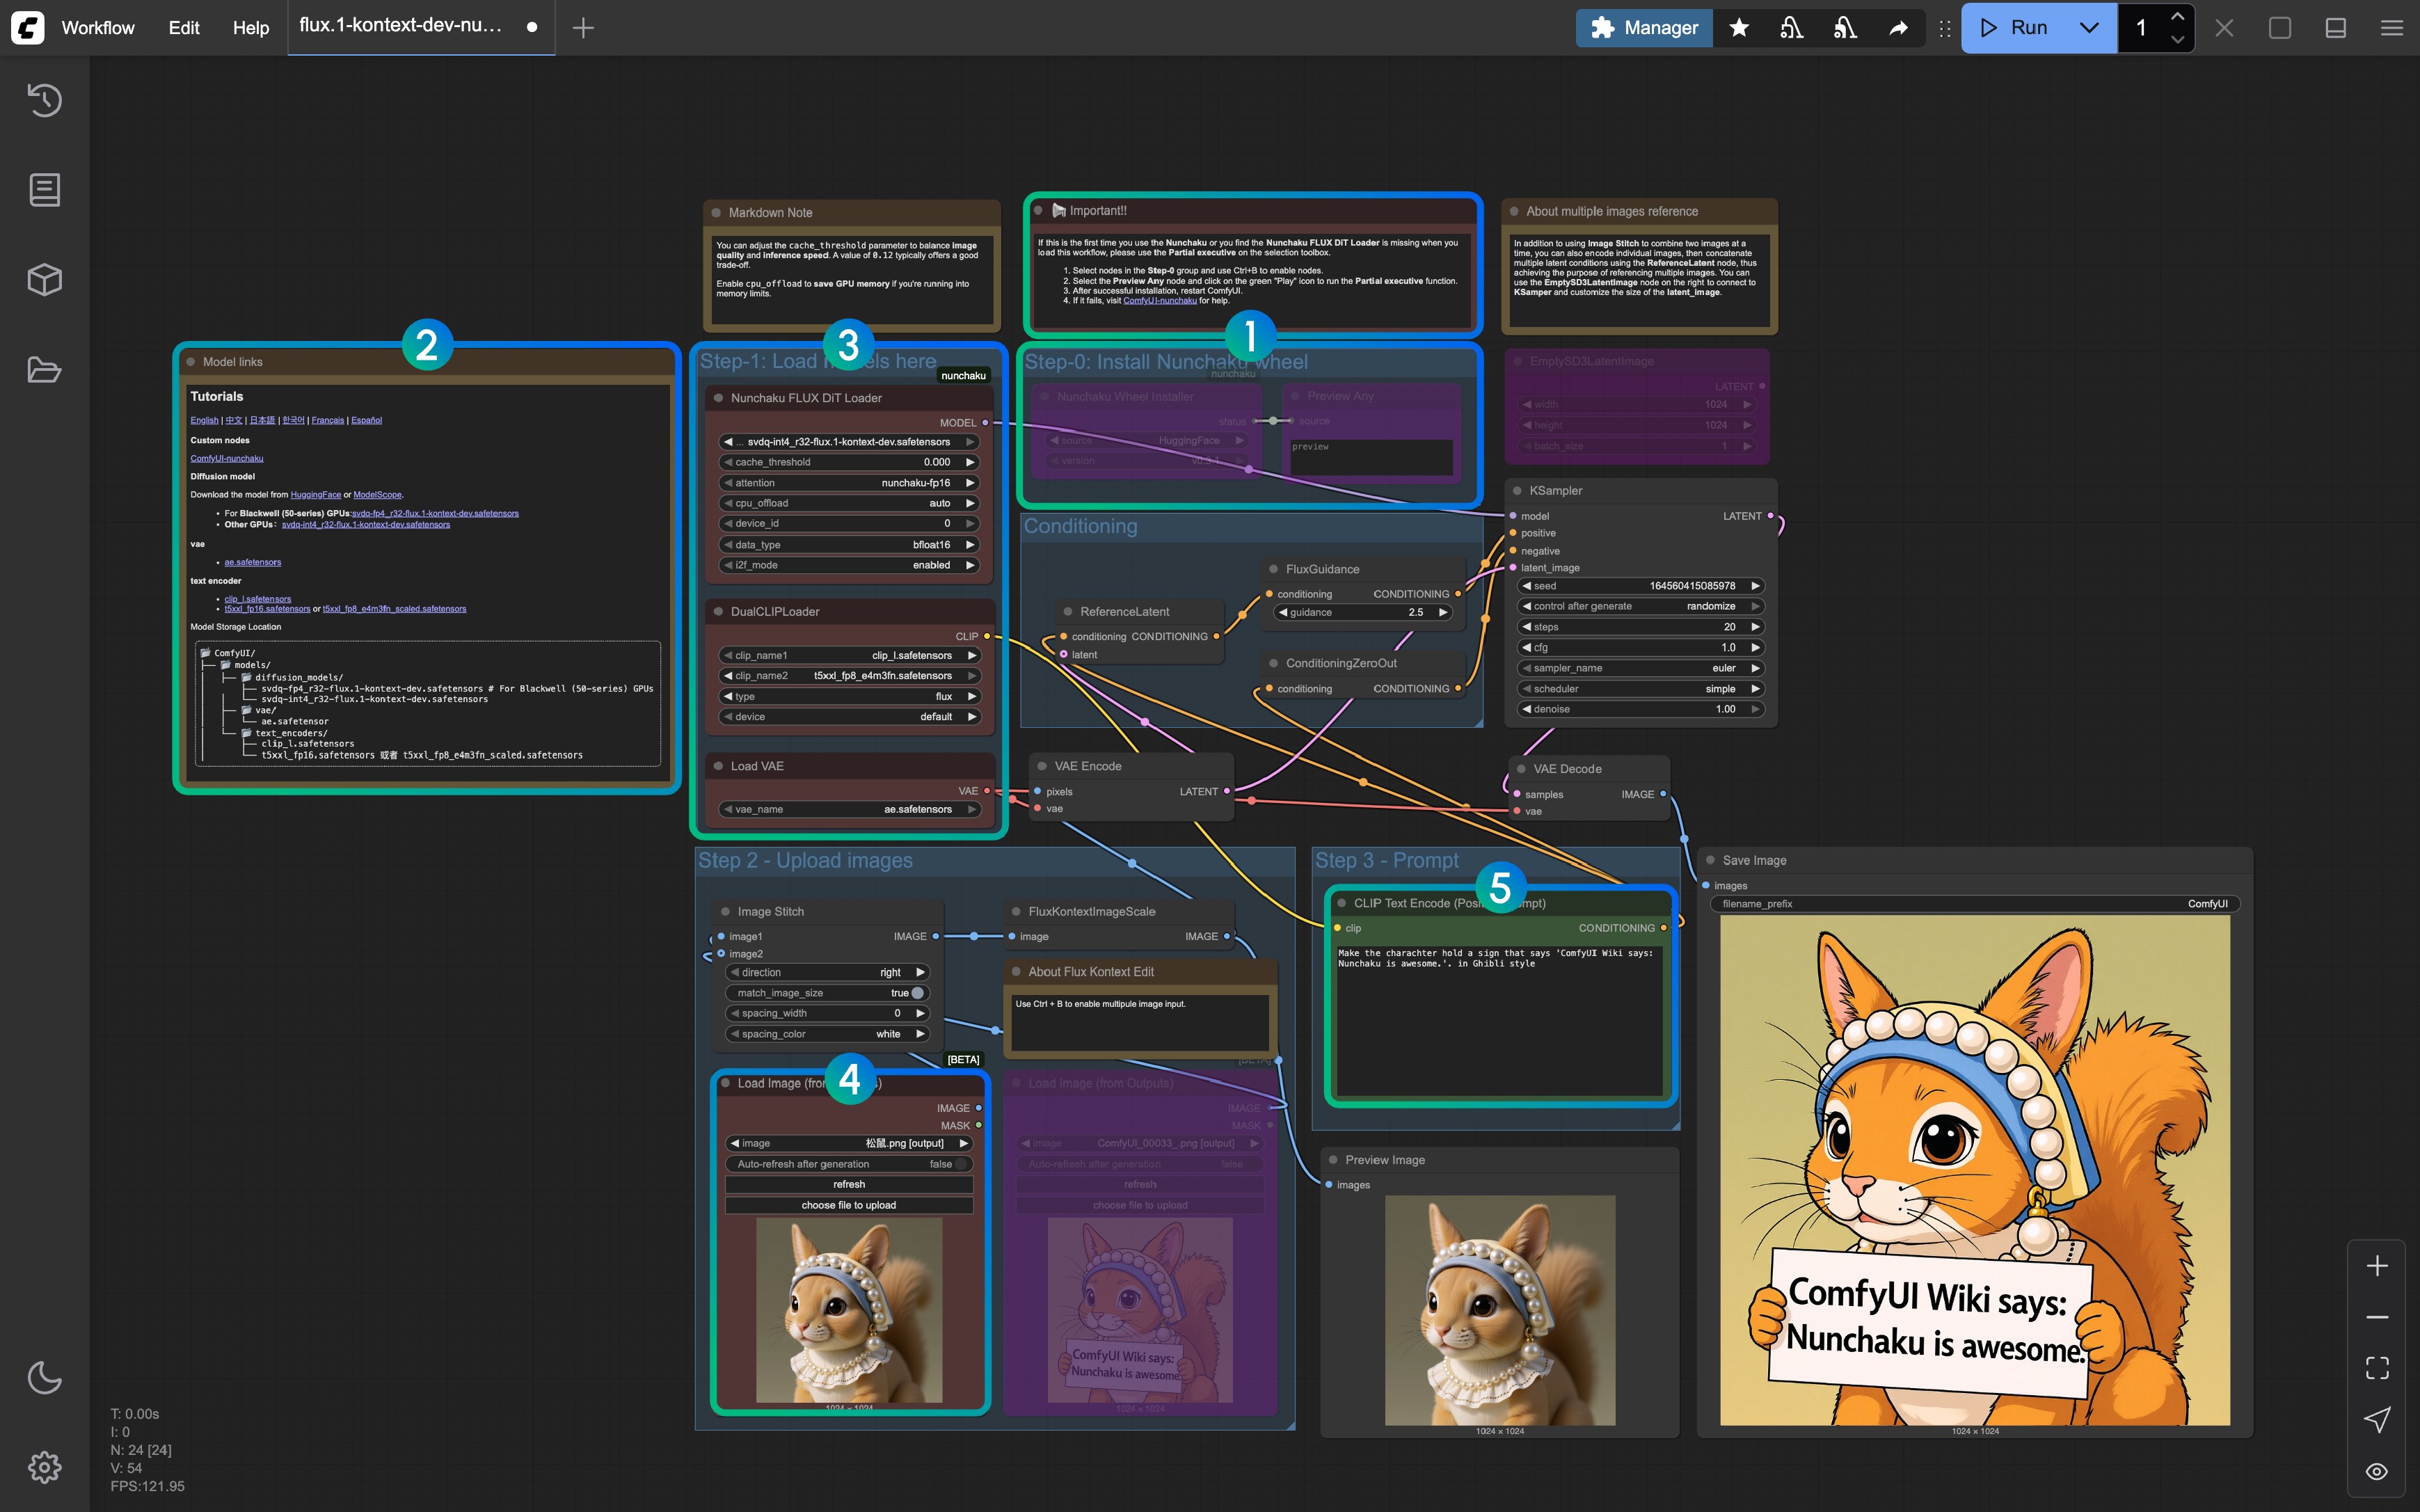
- Refer to the notes, delete nodes other than Step-0 when running for the first time, then run the workflow to install the Nunchaku wheel, and then restart ComfyUI to load the workflow again
- The corresponding model links and custom node links are provided in the corresponding Markdown node
- Ensure all models are loaded correctly (distinguish between Blackwell architecture GPUs and other GPUs)
- Load the provided input image in the
Load Image(from output)node - Modify the prompt in the
CLIP Text Encodenode, only English is supported - Click the
Queuebutton or use the shortcutCtrl(cmd) + Enterto run the workflow
If you have any issues with Nunchaku, please refer to ComfyUI-nunchaku for more help.
Flux.1 Kontext Dev TeaCache Accelerated Version
This version requires installing the ComfyUI-Teaache plugin. You can use ComfyUI Manager’s missing node installation feature after loading the workflow.
1. Workflow File
Use the same image as input
2. Complete Workflow Steps
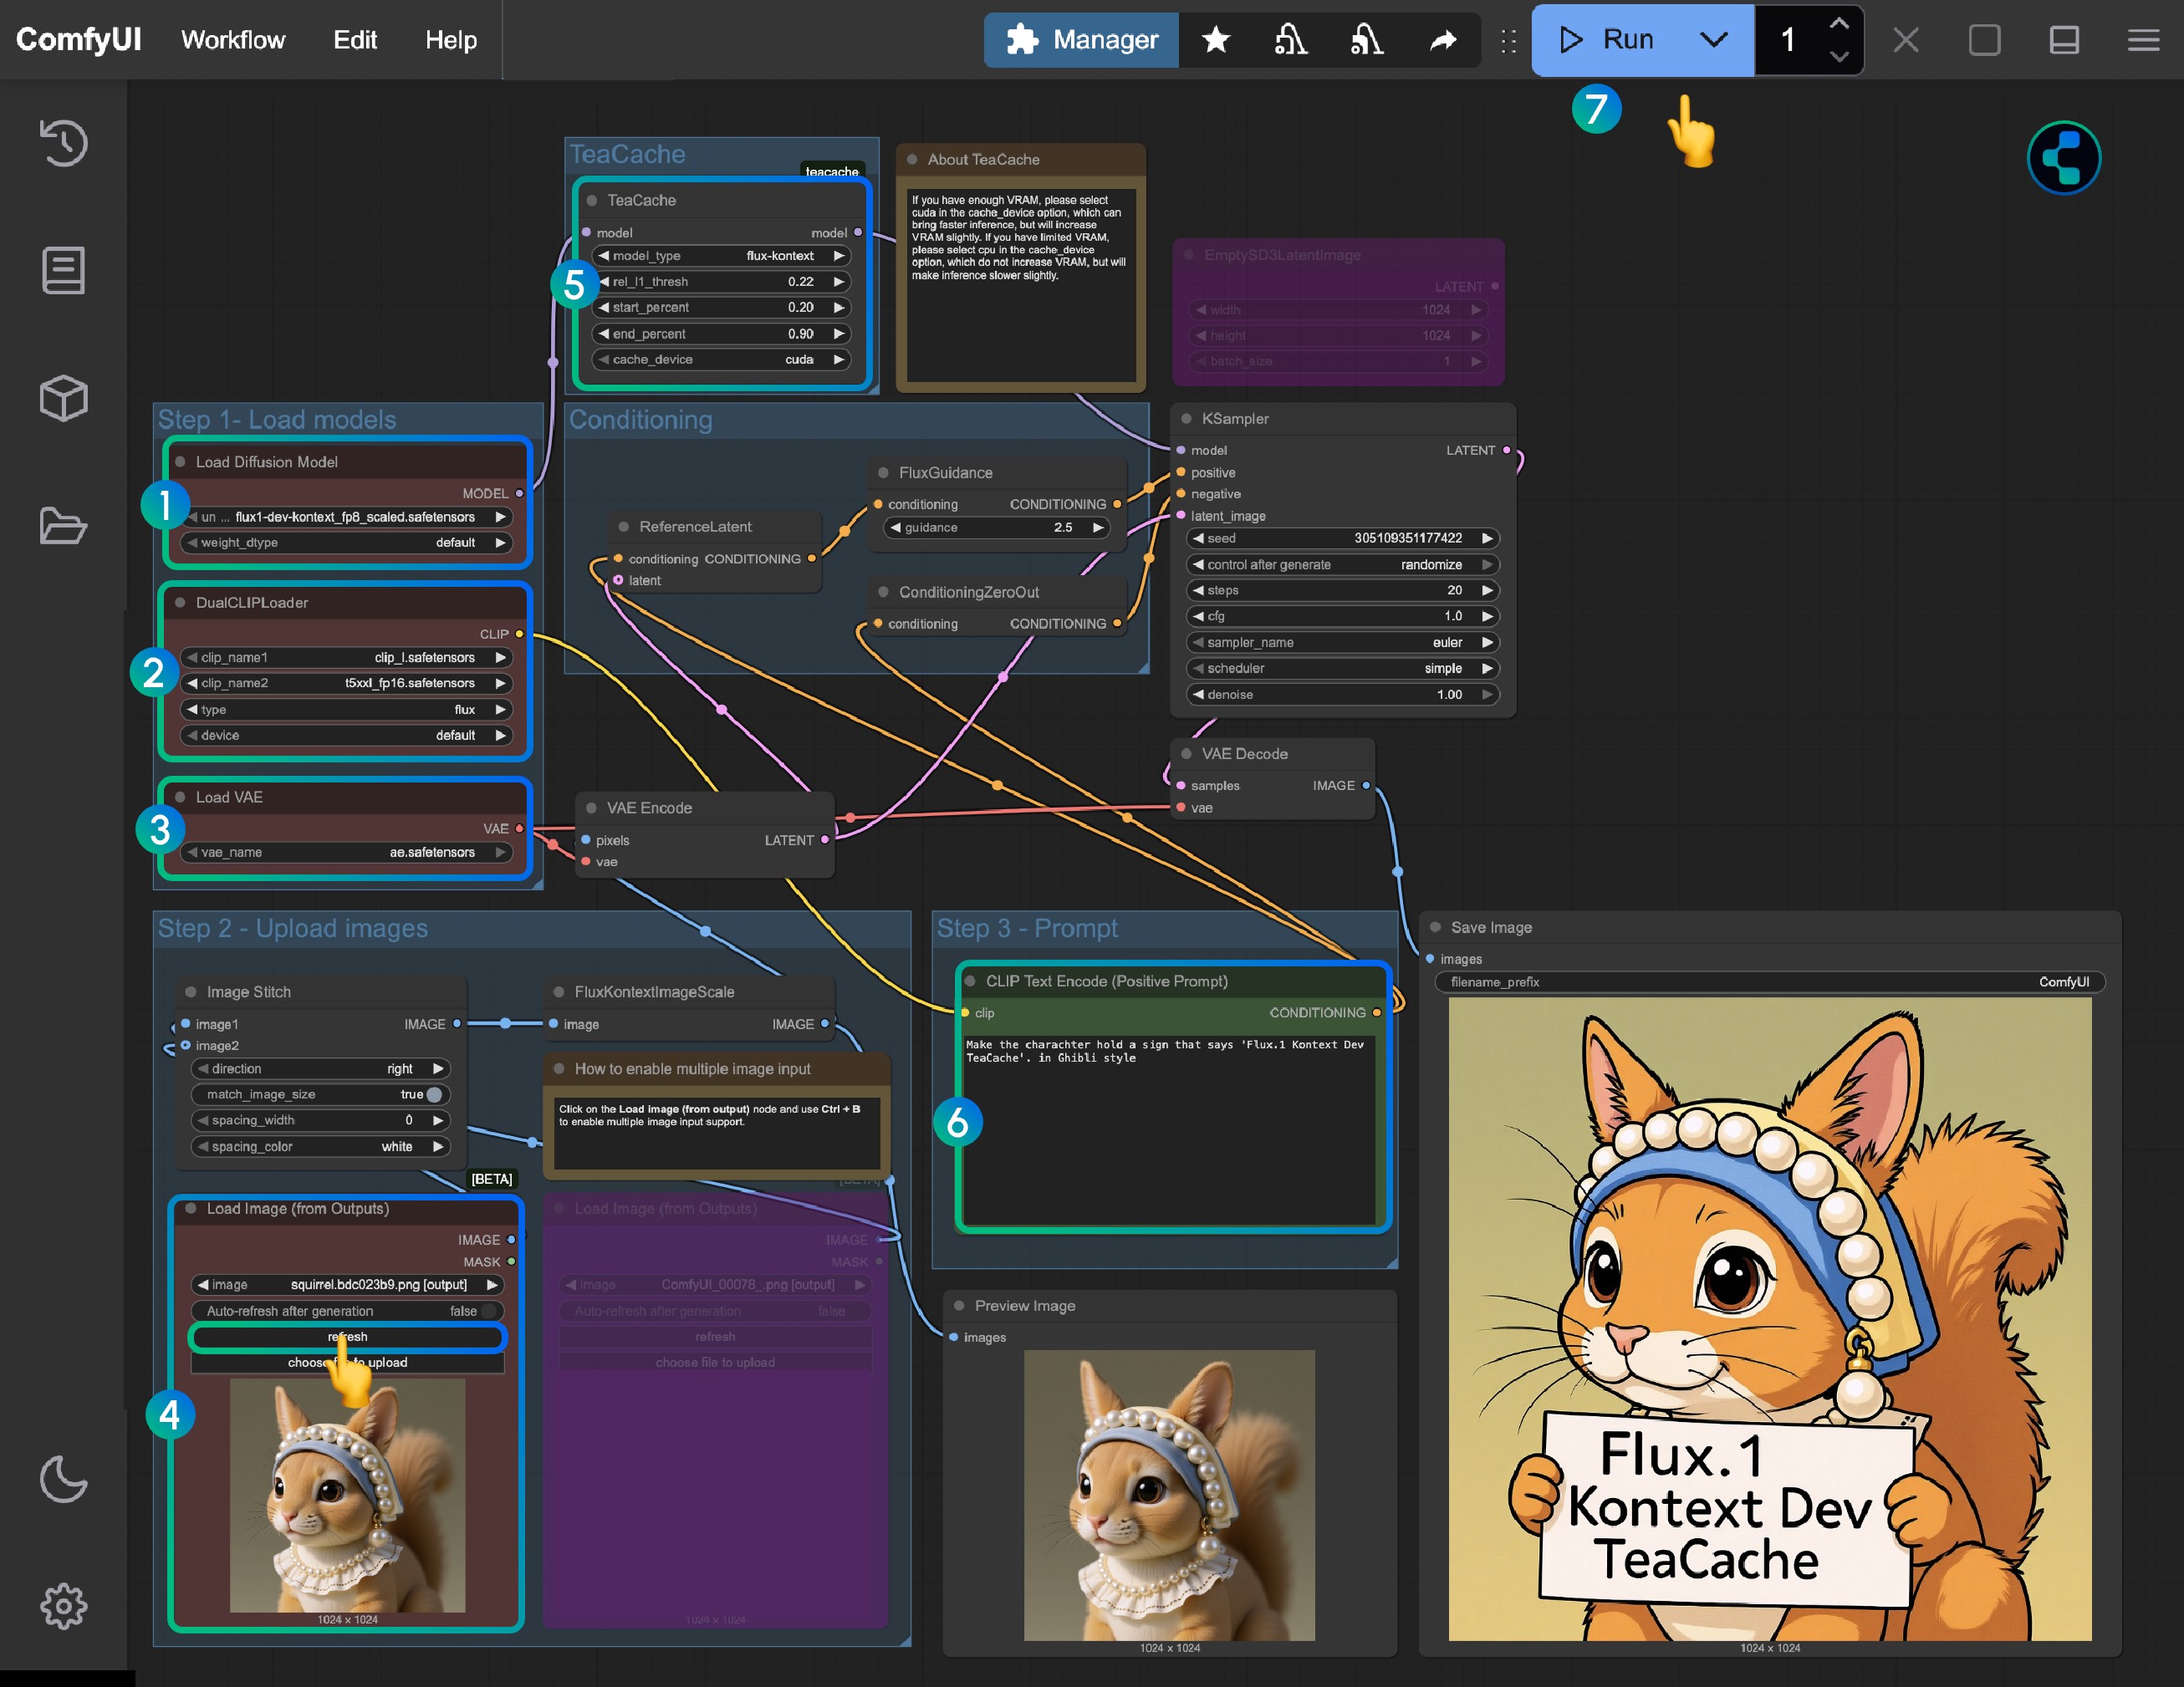
- Load the
flux1-dev-kontext_fp8_scaled.safetensorsmodel in theLoad Diffusion Modelnode - In the
DualCLIP Loadnode, ensure:clip_l.safetensorsandt5xxl_fp16.safetensorsort5xxl_fp8_e4m3fn_scaled.safetensorsare loaded - In the
Load VAEnode, ensure theae.safetensorsmodel is loaded - Load the provided input image in the
Load Image(from output)node - The
TeaCachenode has default settings applied, you don’t need to adjust them. If this node is missing, use ComfyUI-Manager to install ComfyUI-Teaache - Modify the prompt in the
CLIP Text Encodenode, only English is supported - Click the
Queuebutton or use the shortcutCtrl(cmd) + Enterto run the workflow
Flux.1 Kontext Dev Multi-Round Image Editing Implementation
1. Using Load Image(from output) Node
For multi-round editing, a potential issue with the Load Image(from output) node has been fixed in this Flux.1 Kontext Dev release support. In the basic workflow, you can directly use the Load Image(from output) node to load the previous round’s output image.
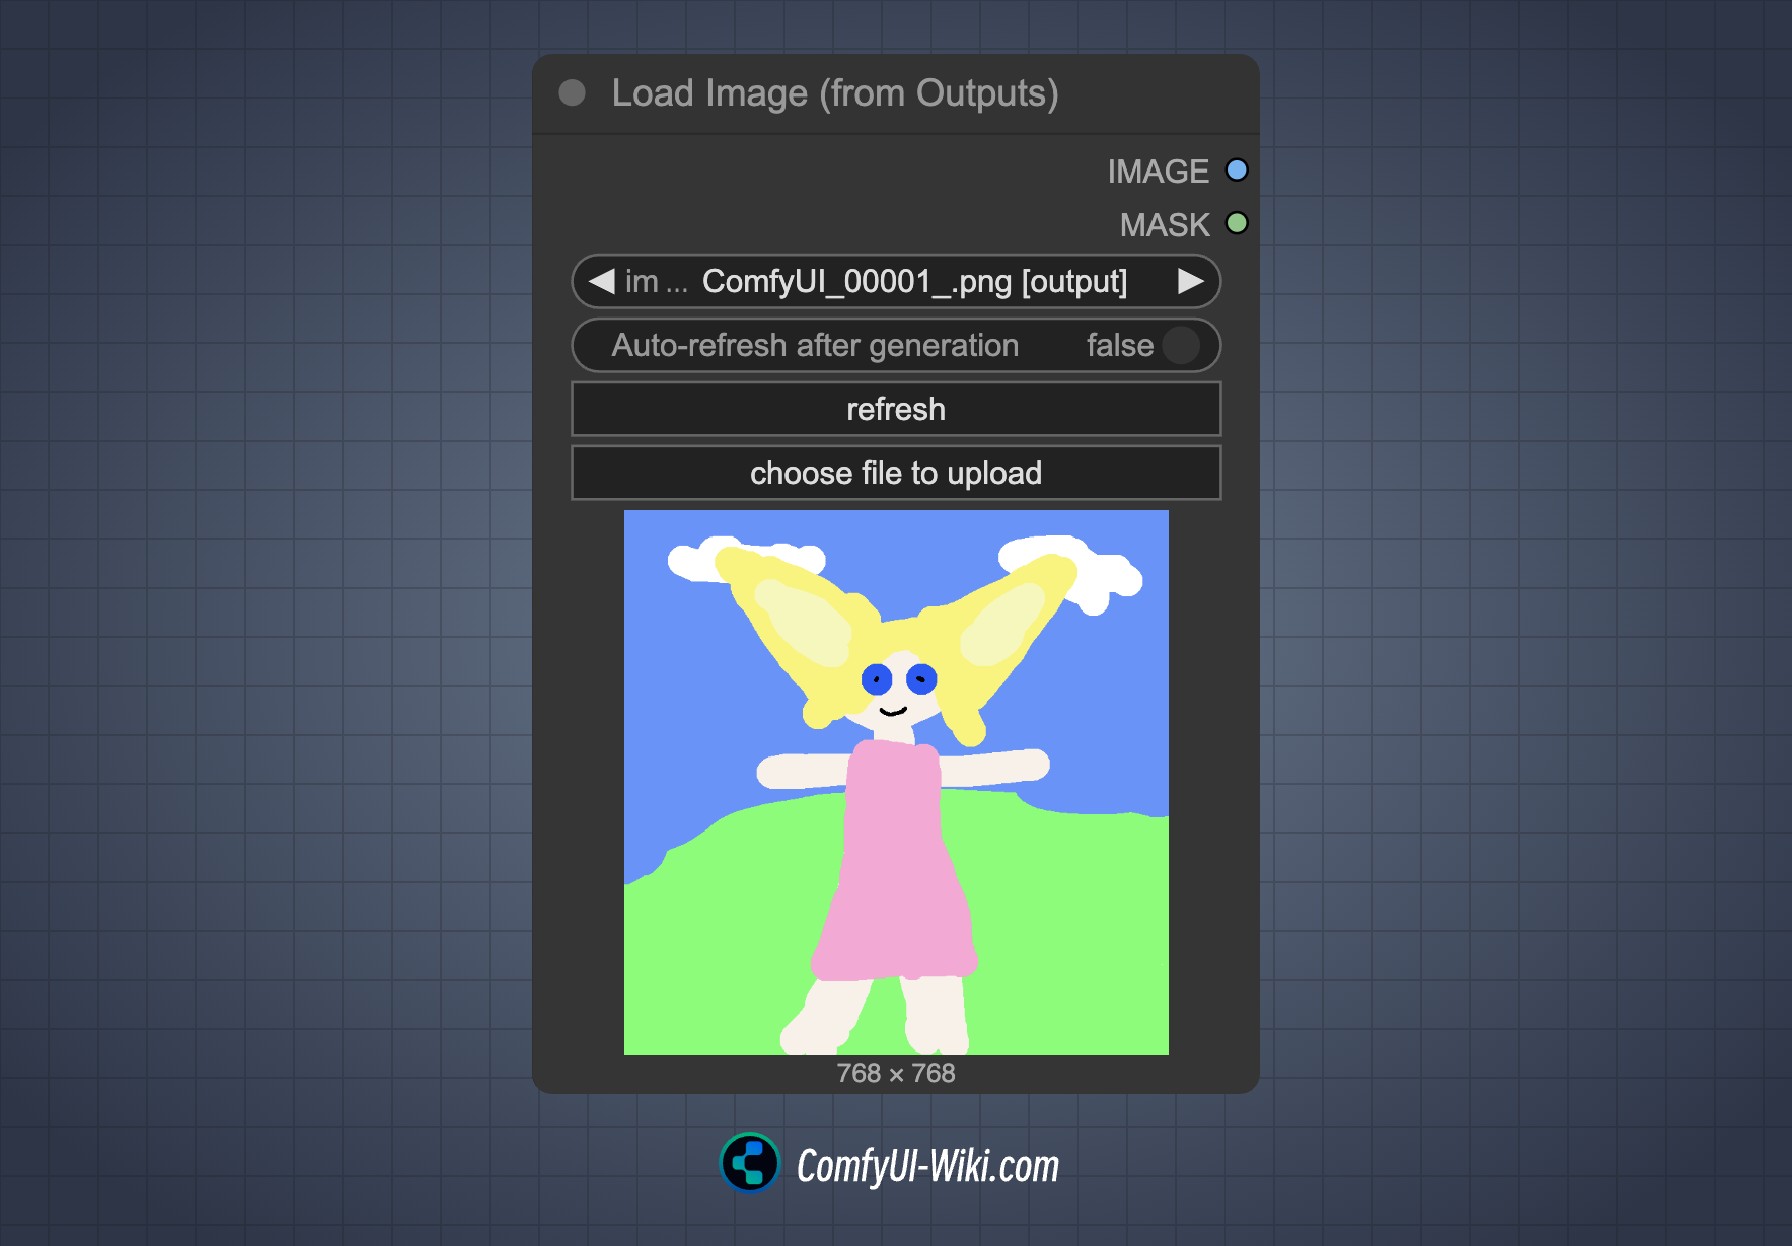
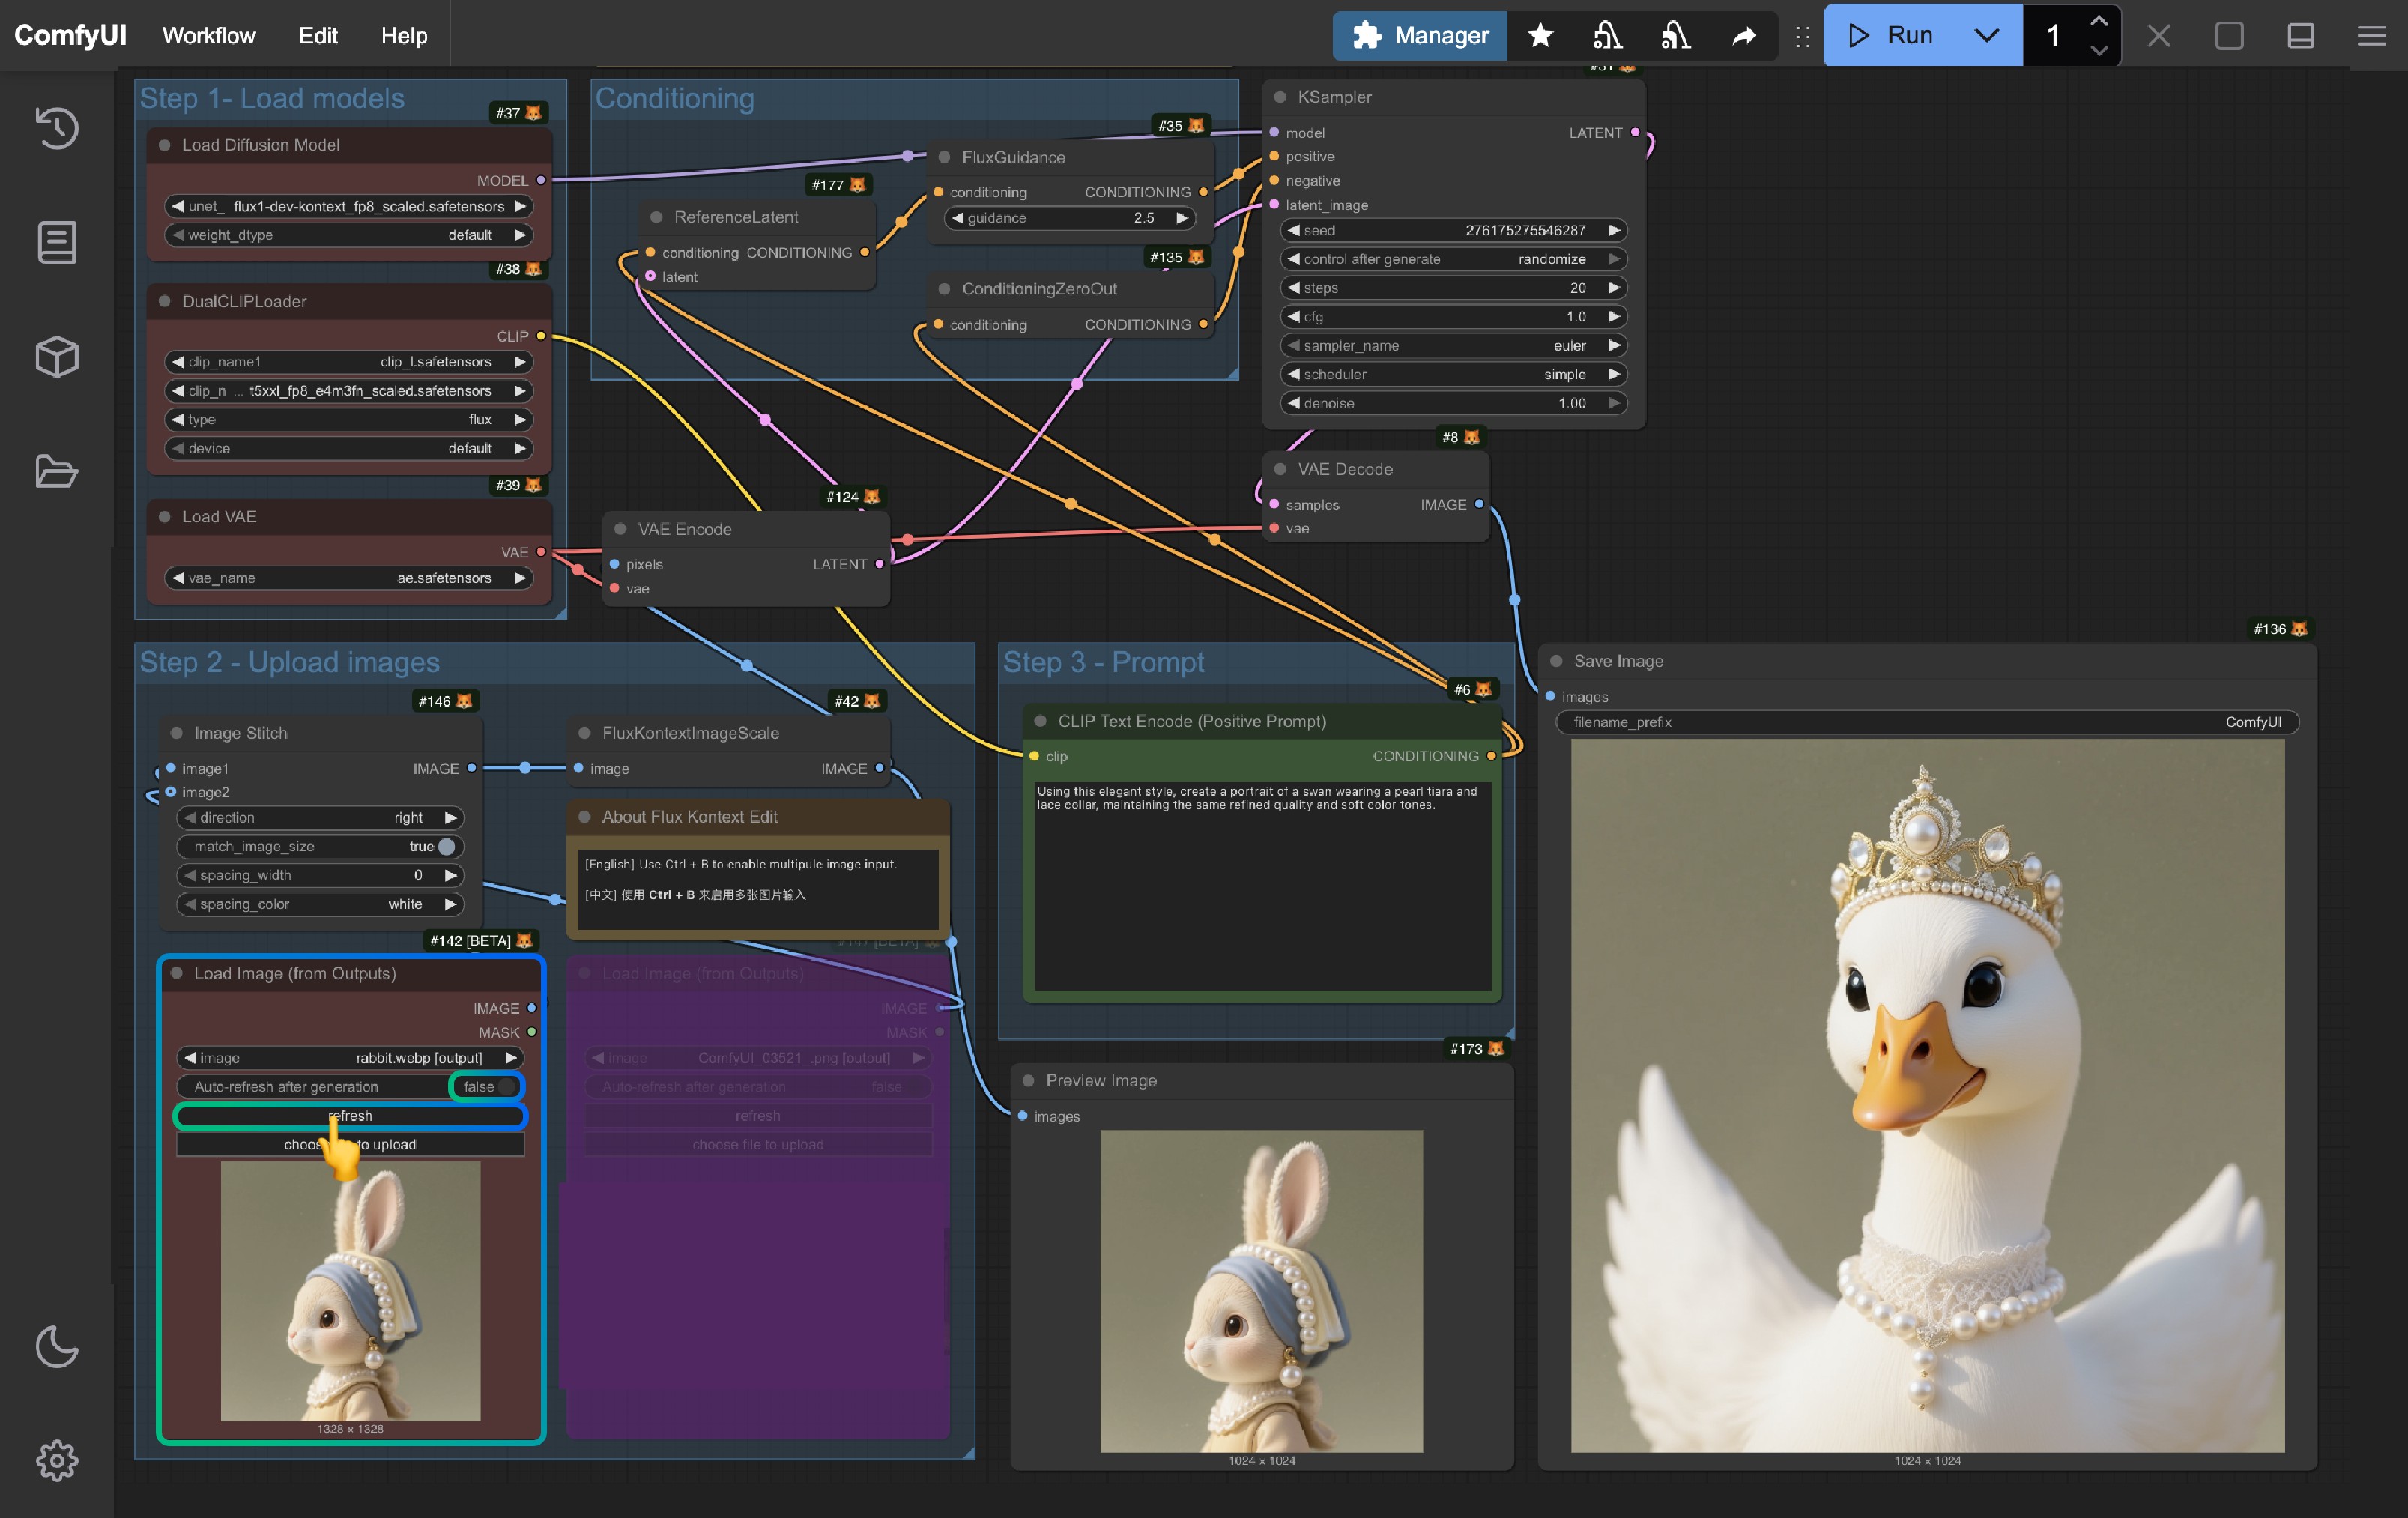
When you want to edit the current workflow results, click the refresh button to get the latest output image and then re-run the workflow.
2. Using Group Nodes
Group nodes are a new feature added for Flux.1 Kontext Dev version. A quick Edit button has been added to the selection toolbox for adding group nodes. Please refer to this video for specific usage:
You can start from the Load Image node and use the corresponding selection toolbox feature to add new group nodes:
- Since each group node’s seed is fixed, only the last group node will run
- When you’re not satisfied with results, you can change the seed and re-run the workflow
- You can create branches to explore different branches and editing effects
Multiple Image Input Reference
For multiple image input, there are currently two implementation methods in ComfyUI:
- Stitch multiple images into one image using the Image Stitch node
- Encode different images separately to latent space, then chain multiple ReferenceLatent node conditions
Here’s a comparison of the two methods:
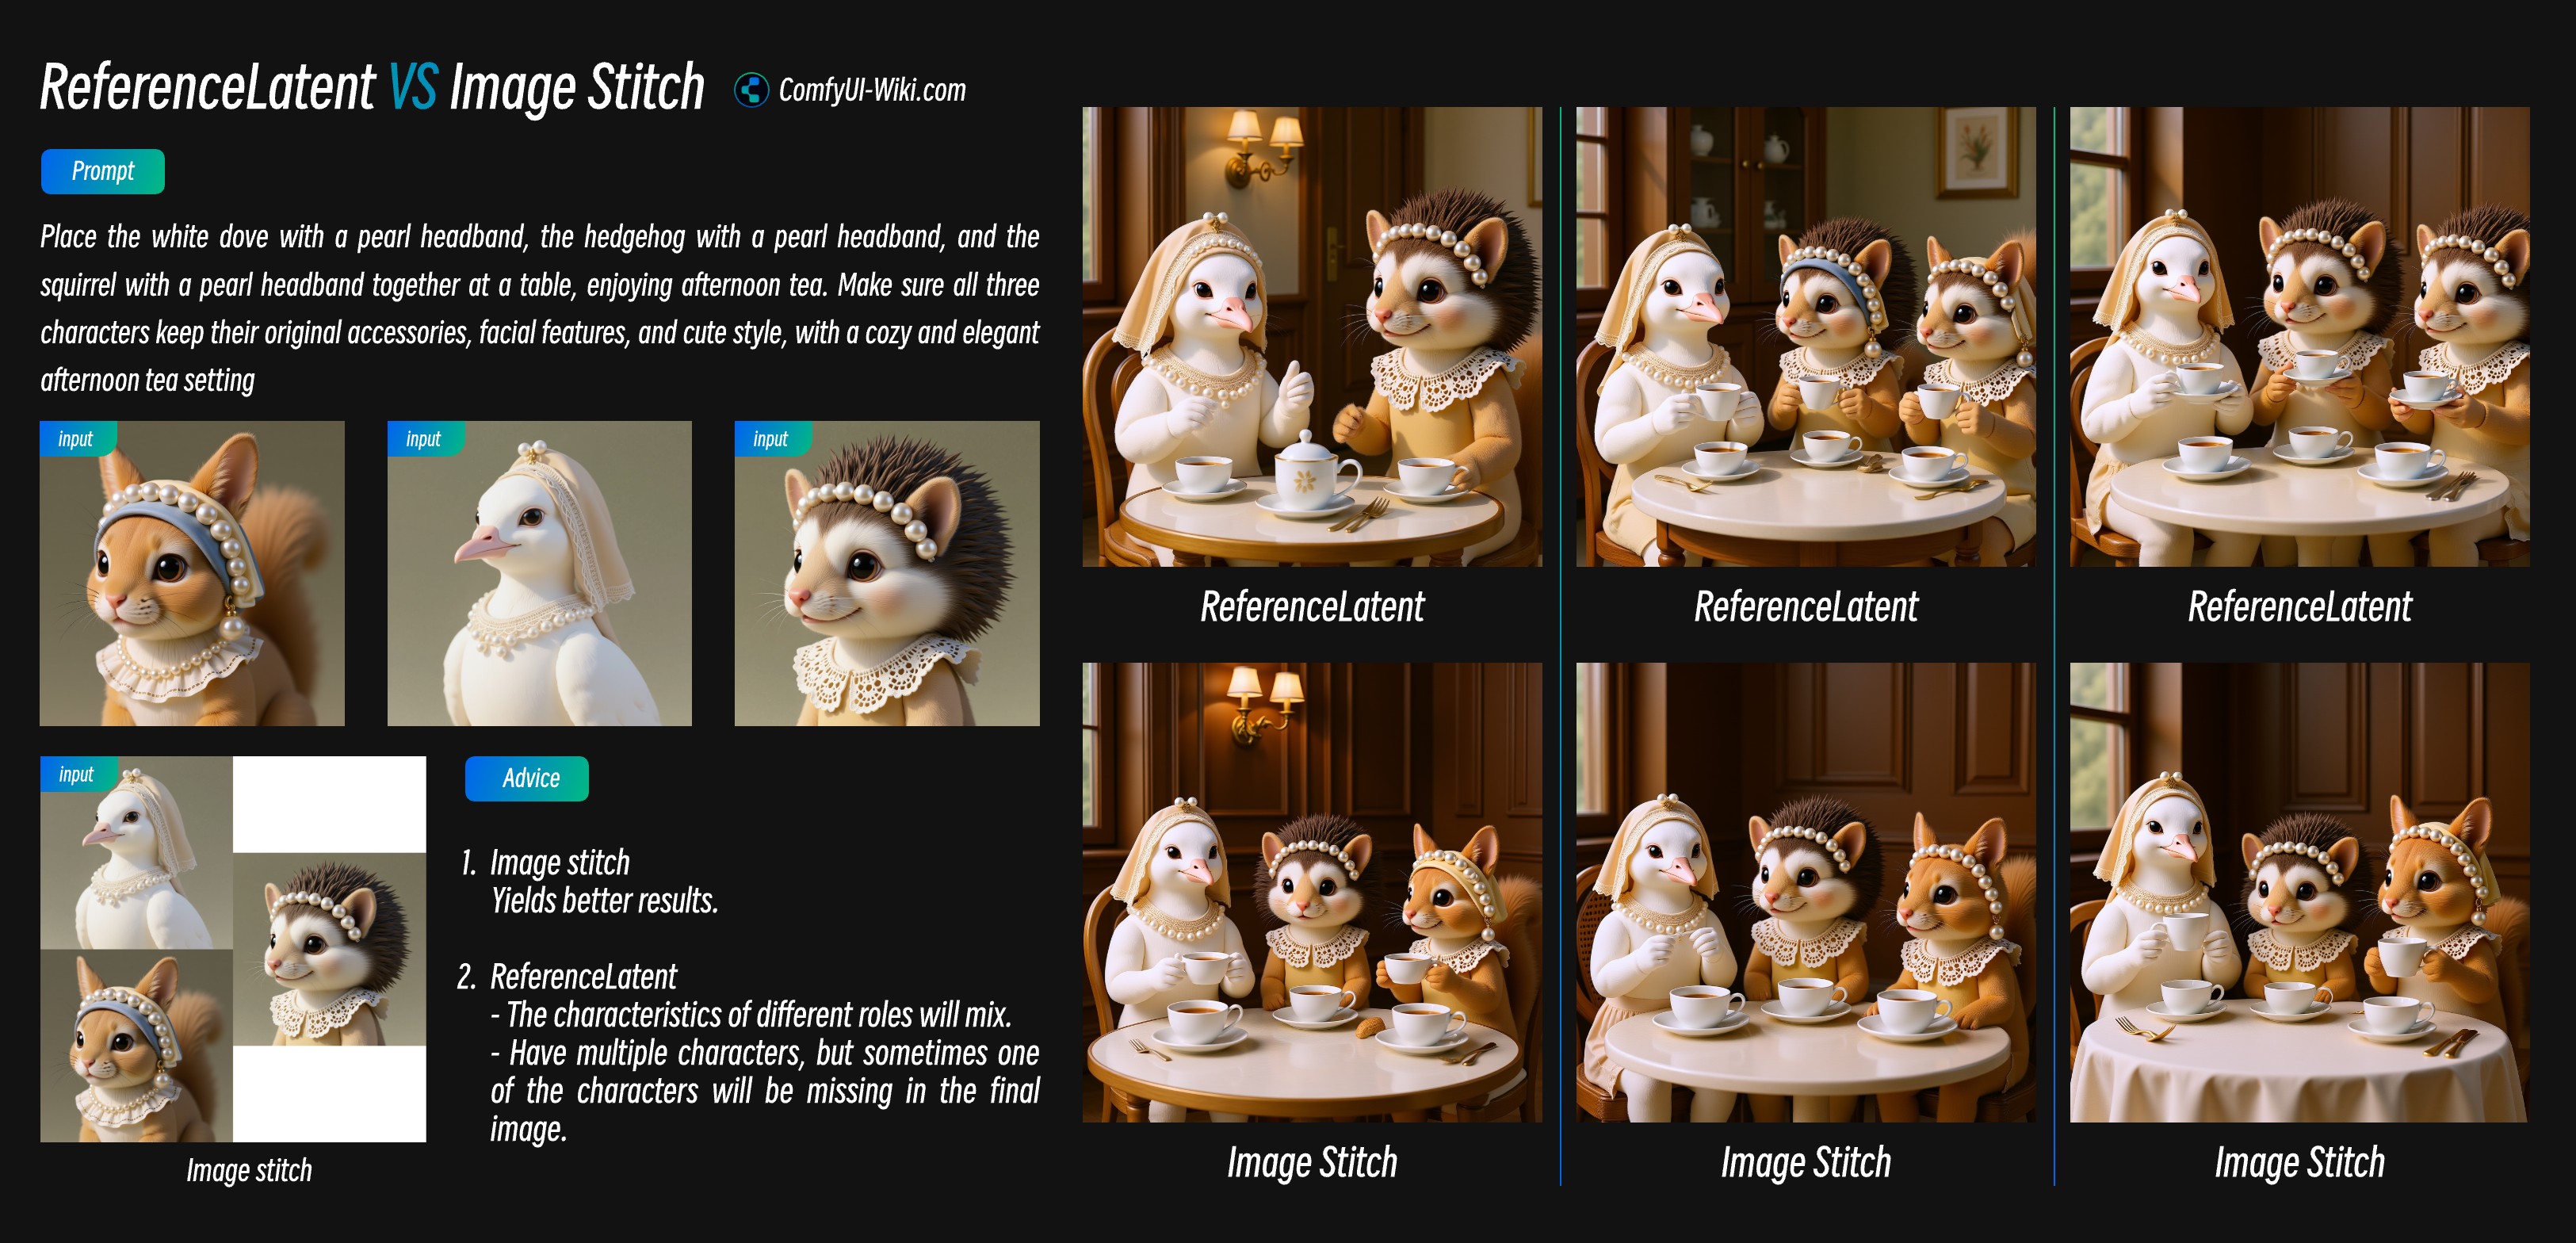
-
Image Stitch node performs better for multiple image input
-
When using ReferenceLatent node chaining:
- When there are many input characters, it often mixes features of different subjects, making consistency difficult
- When inputting multiple characters, it sometimes loses one or two characters
1. Using Image Stitch Node
This approach is simple - stitch multiple images into one and input as a single image. In the template, just select another Load Image node and use Ctrl+B to enable multiple image input functionality.
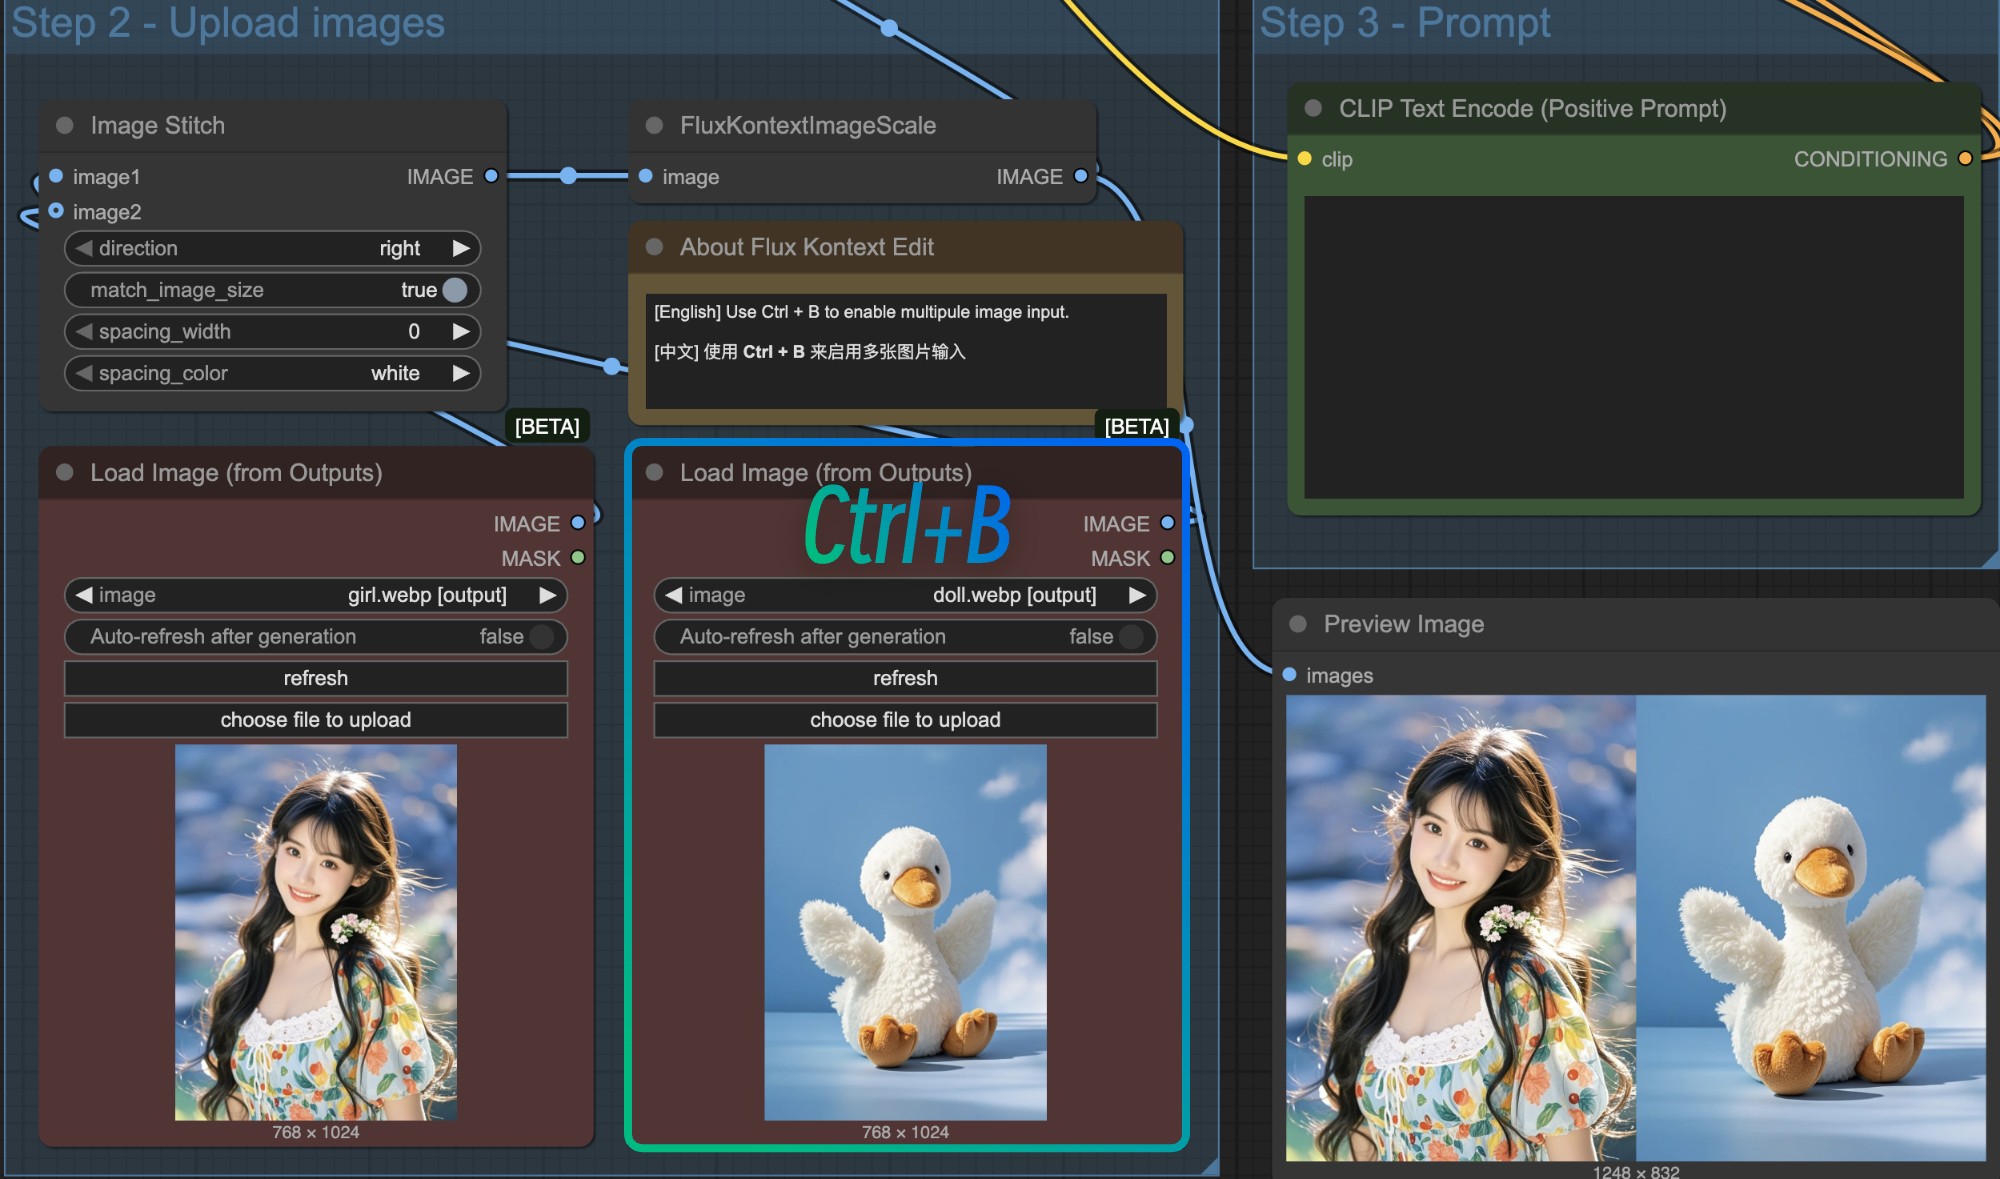
In this case, since the stitched image size may not be the expected size (e.g., wanting 1:1 ratio but stitched image might not be 1:1), it’s recommended to use an EmptySD3LatentImage node to customize Latent space size and connect it to the KSampler node to customize output dimensions.
For stitched image input mode, I still have some usage suggestions:
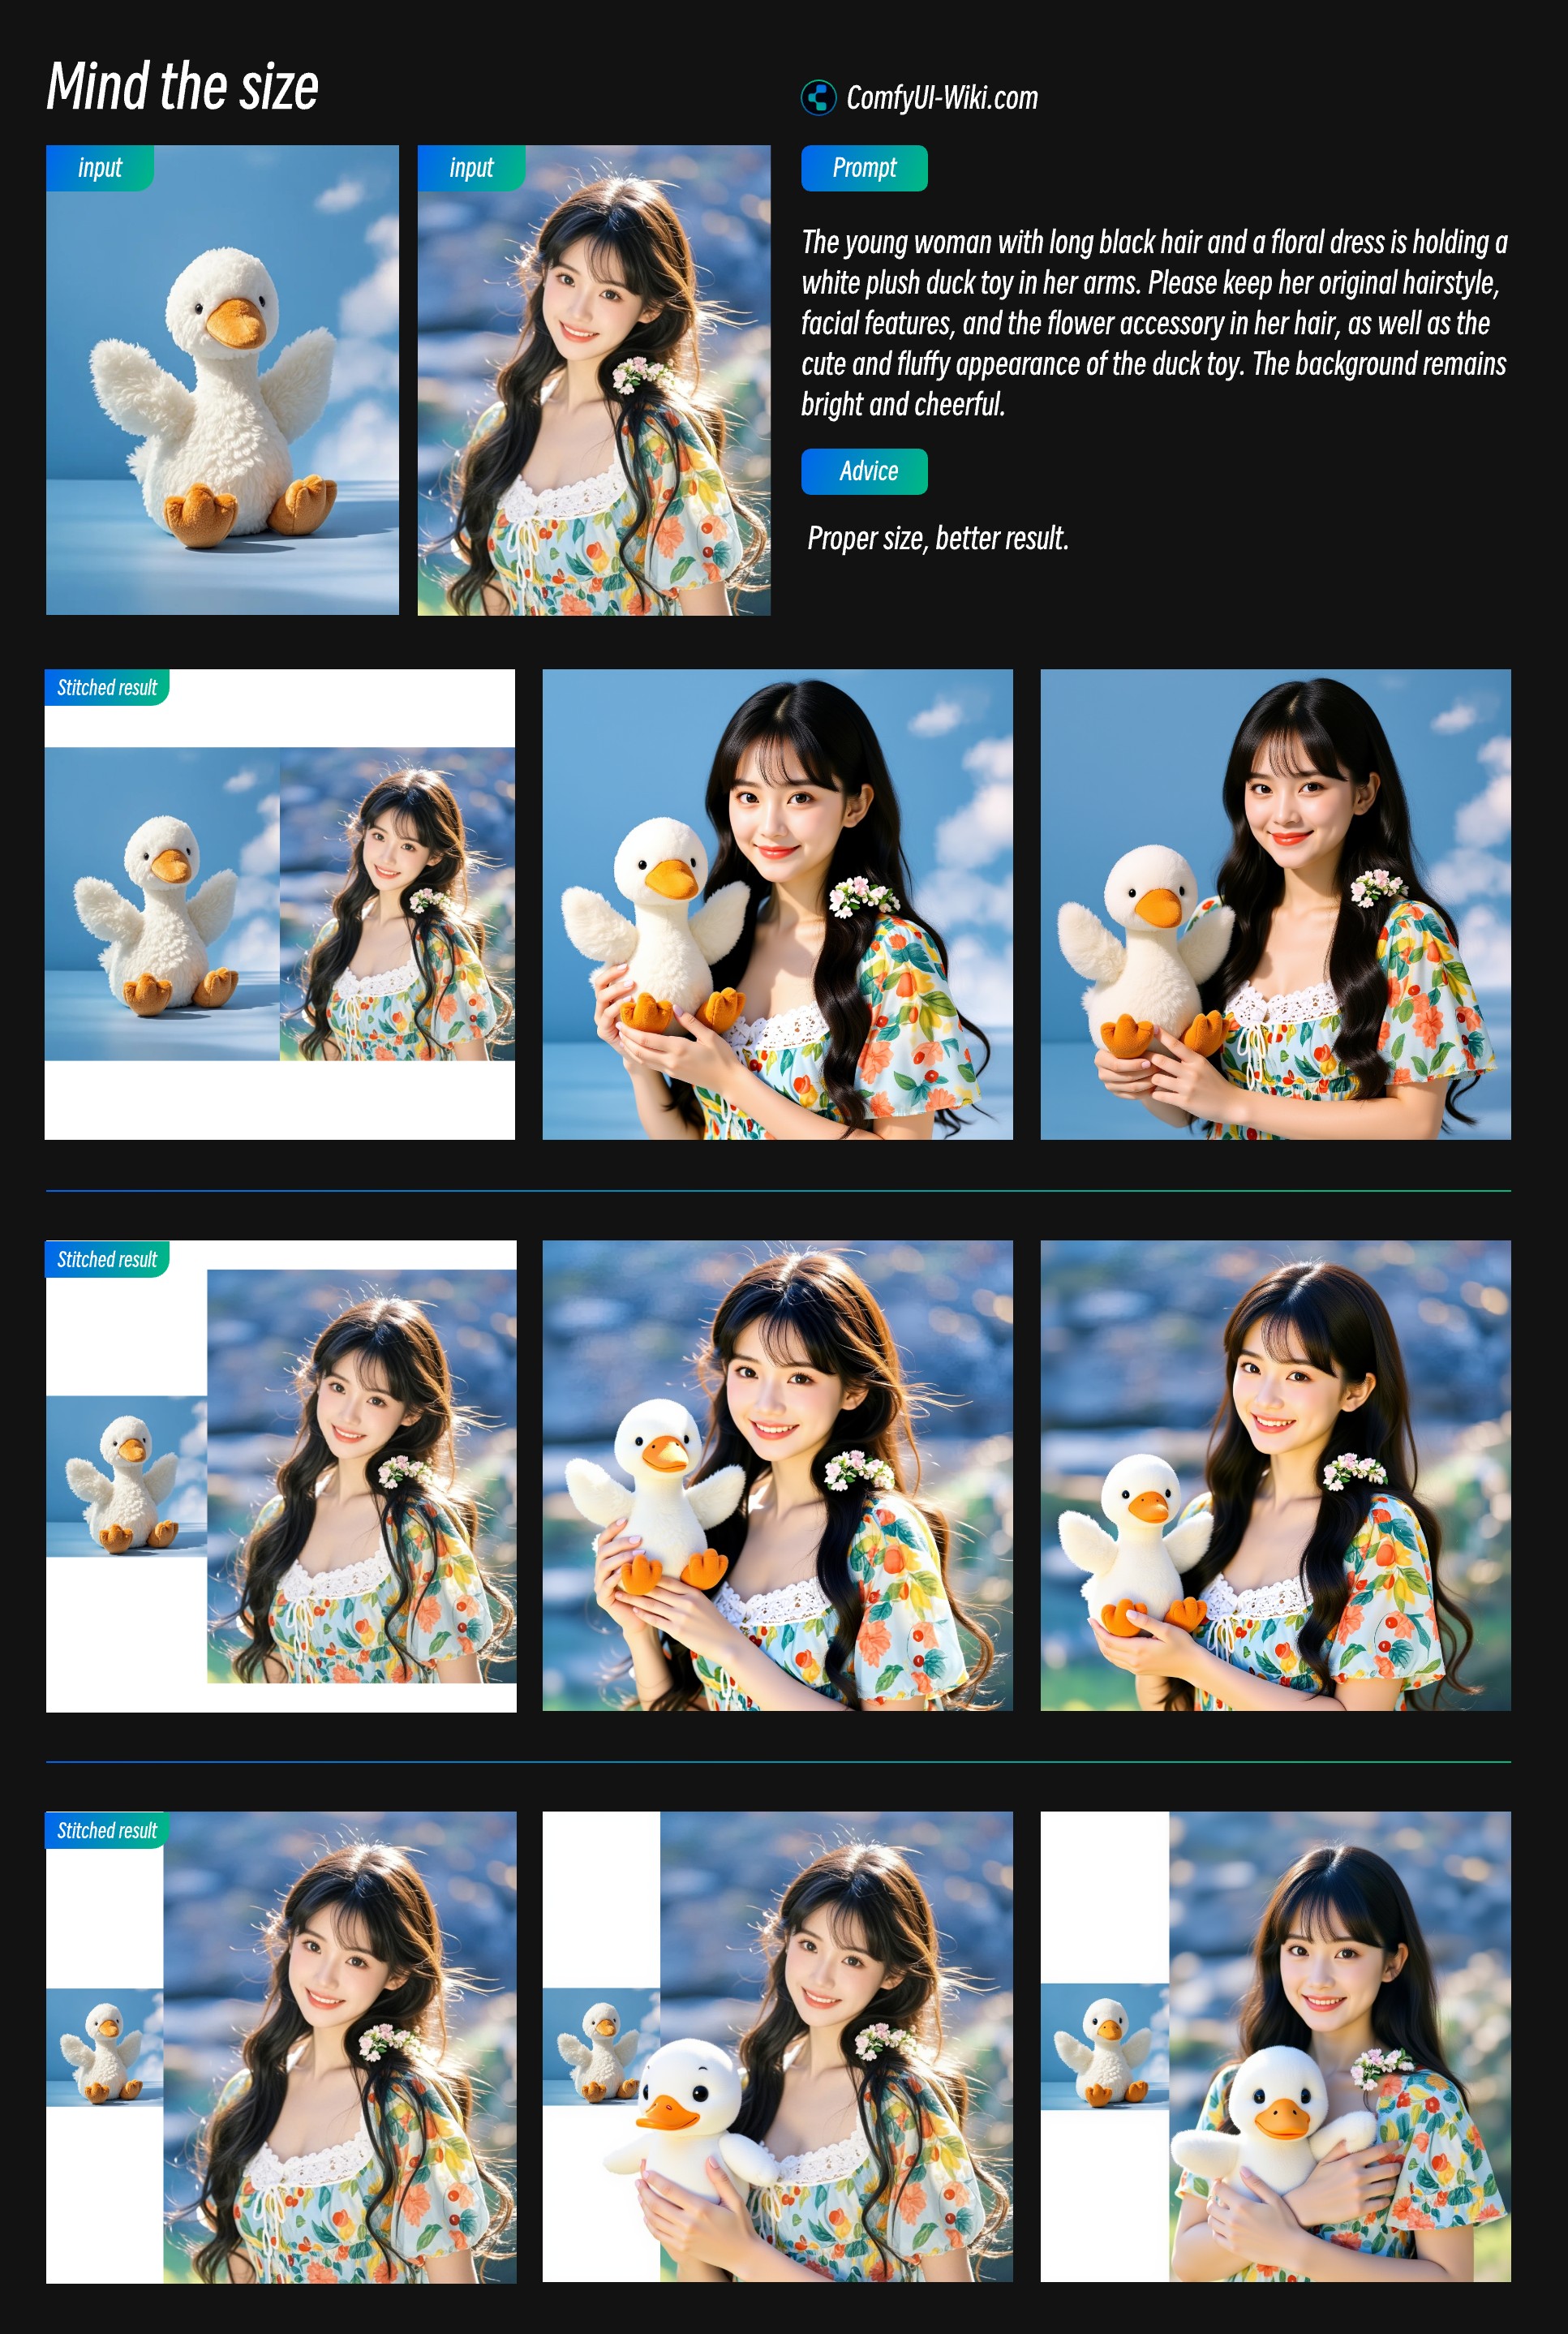
- Pay attention to relative object sizes after stitching - appropriate relative sizes can bring better output results
- The main reference image should occupy a larger proportion to use more of its image features
2. Using ReferenceLatent Chaining Nodes
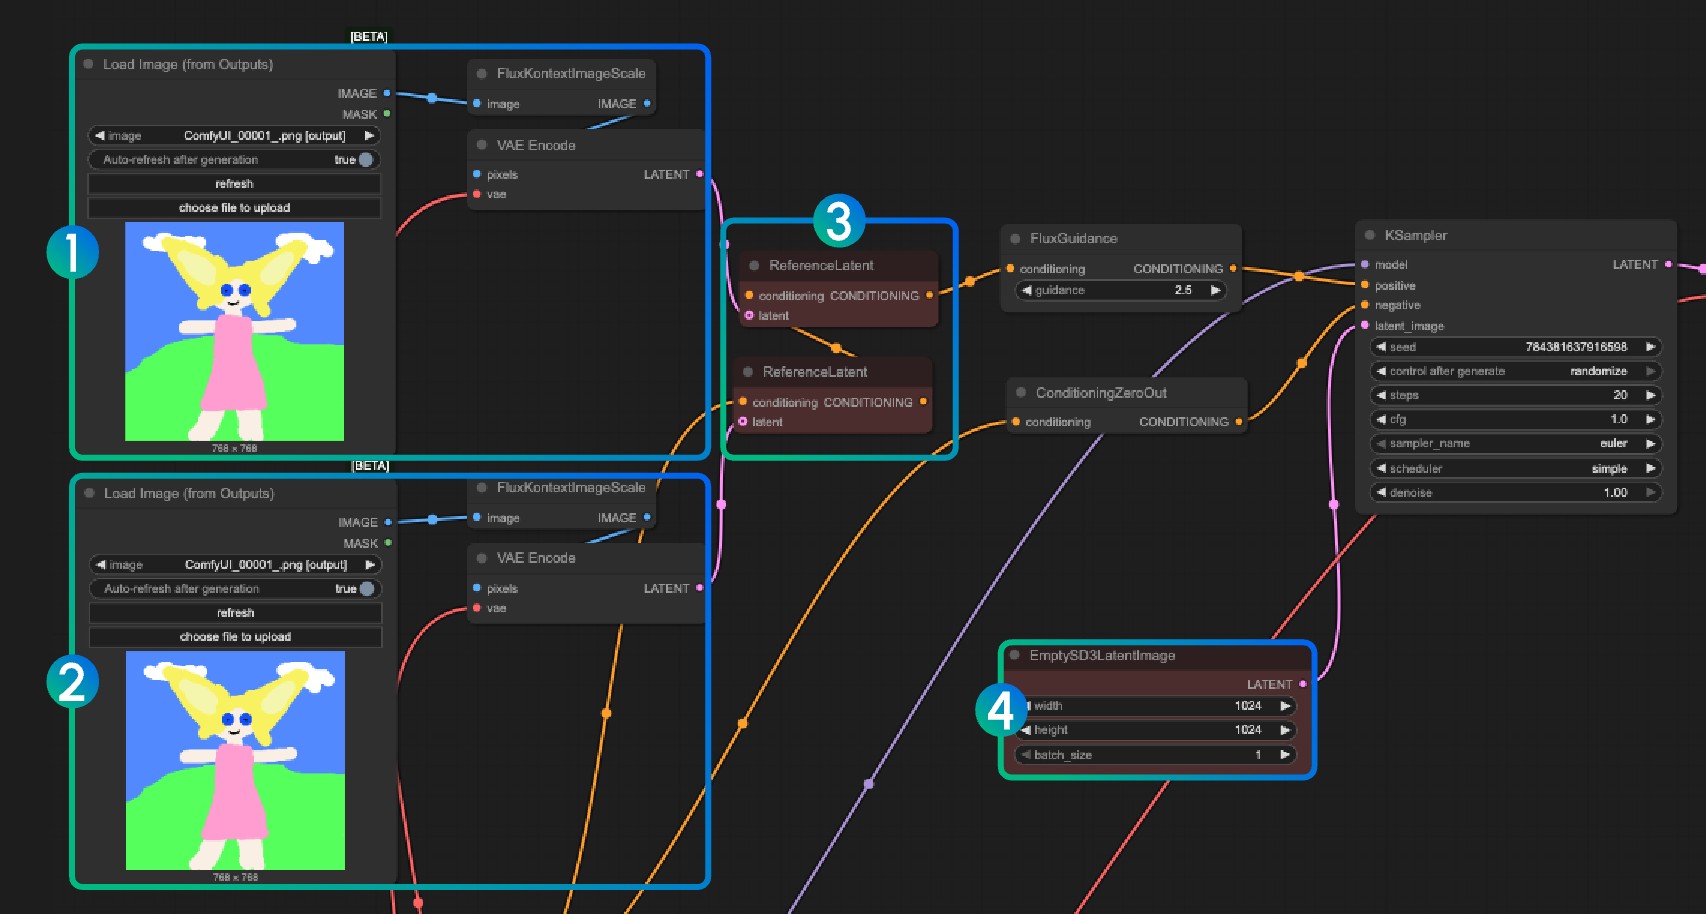
Numbers 1 and 2 encode different images, number 3 chains multiple image encoding results, then uses ReferenceLatent node. Similarly in number 4, you can use EmptySD3LatentImage to customize dimensions.

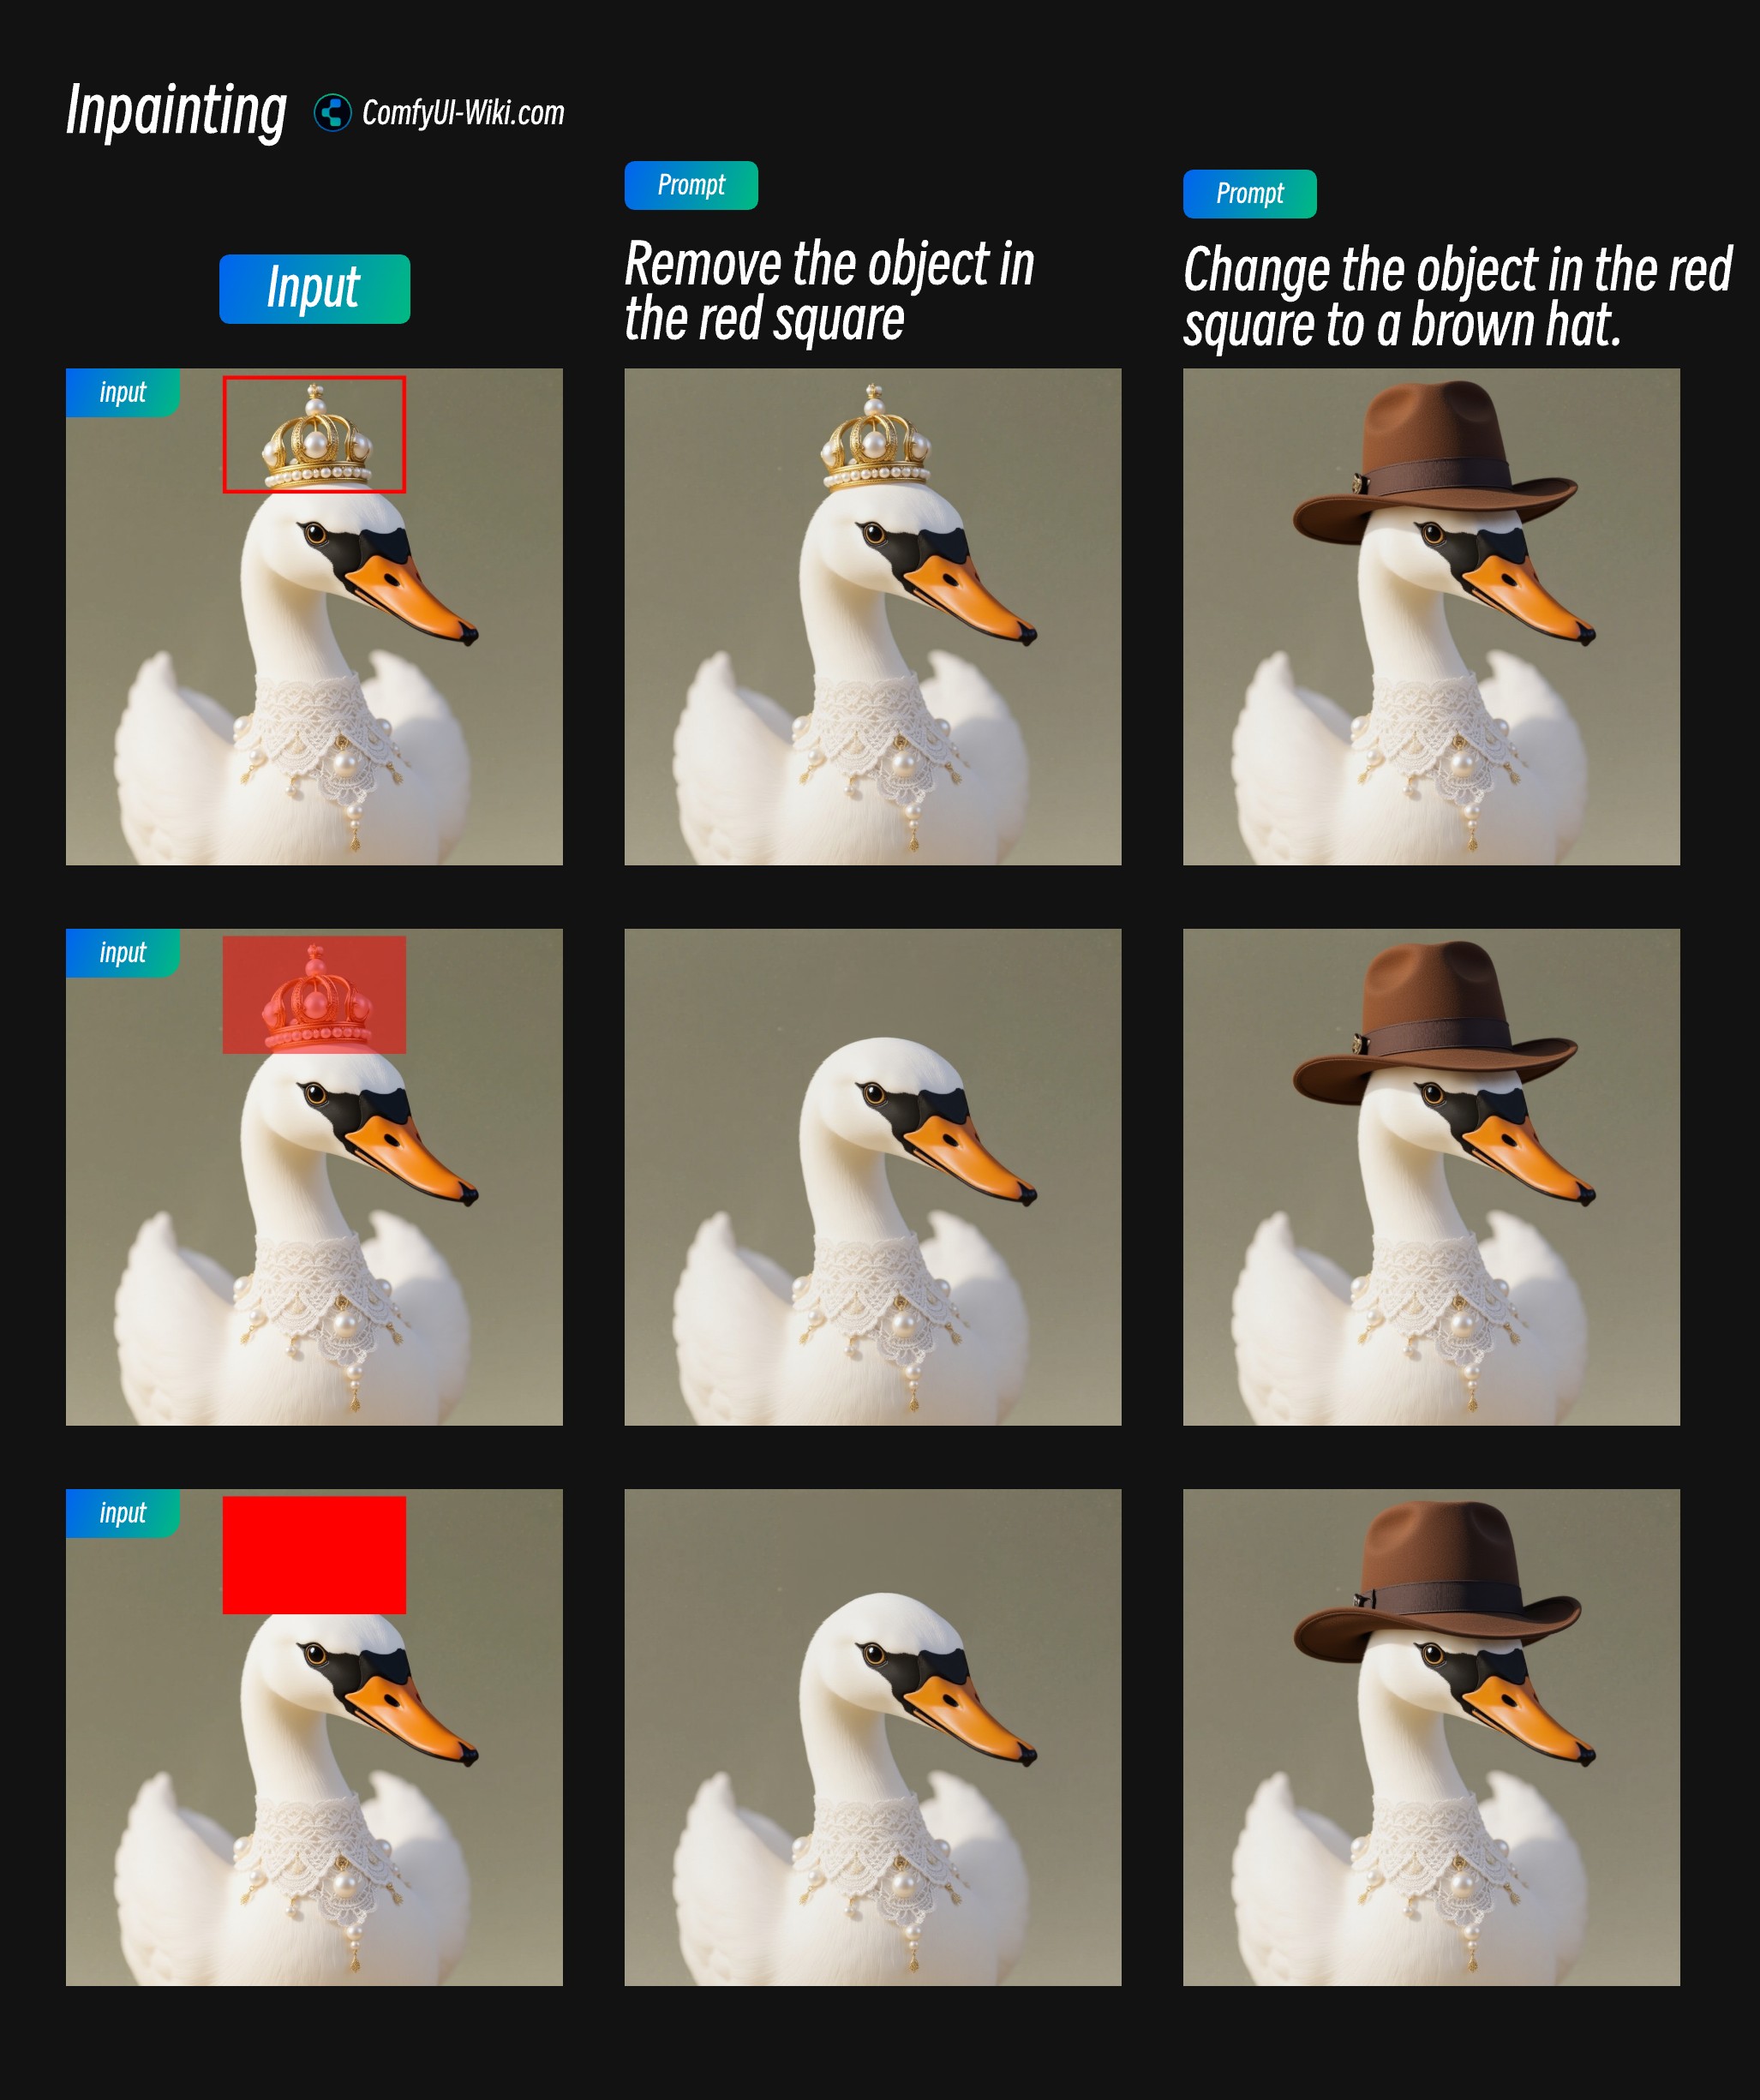
Flux.1 Kontext Dev Image Marking Input
When inputting reference images, you can use some markings in the input image to help the model better identify the areas you want to edit:
- For areas you want to edit and redraw, it’s recommended to use semi-transparent red mask markings to mark areas you want to modify
- Red box markings have better recognition ability in Flux.1 Kontext Pro and Max API versions, but recognition ability isn’t as accurate in Flux.1 Kontext Dev. It’s recommended to use semi-transparent masks to mark areas you want to modify, or make the red box elements more prominent
- Semi-transparent masks allow the model to understand original image features, which is useful for redrawing.
Using FLUX.1 Kontext Pro and Max in ComfyUI via API
FLUX.1 Kontext is currently provided in ComfyUI as API nodes. I have written a comprehensive tutorial in the ComfyUI documentation.
FLUX.1 Kontext API Node Official Tutorial
- Please update your ComfyUI Portable or Desktop to the latest version.
- In the menu bar, select Workflow -> Browse Templates -> Image API category to find FLUX.1 Kontext related templates.
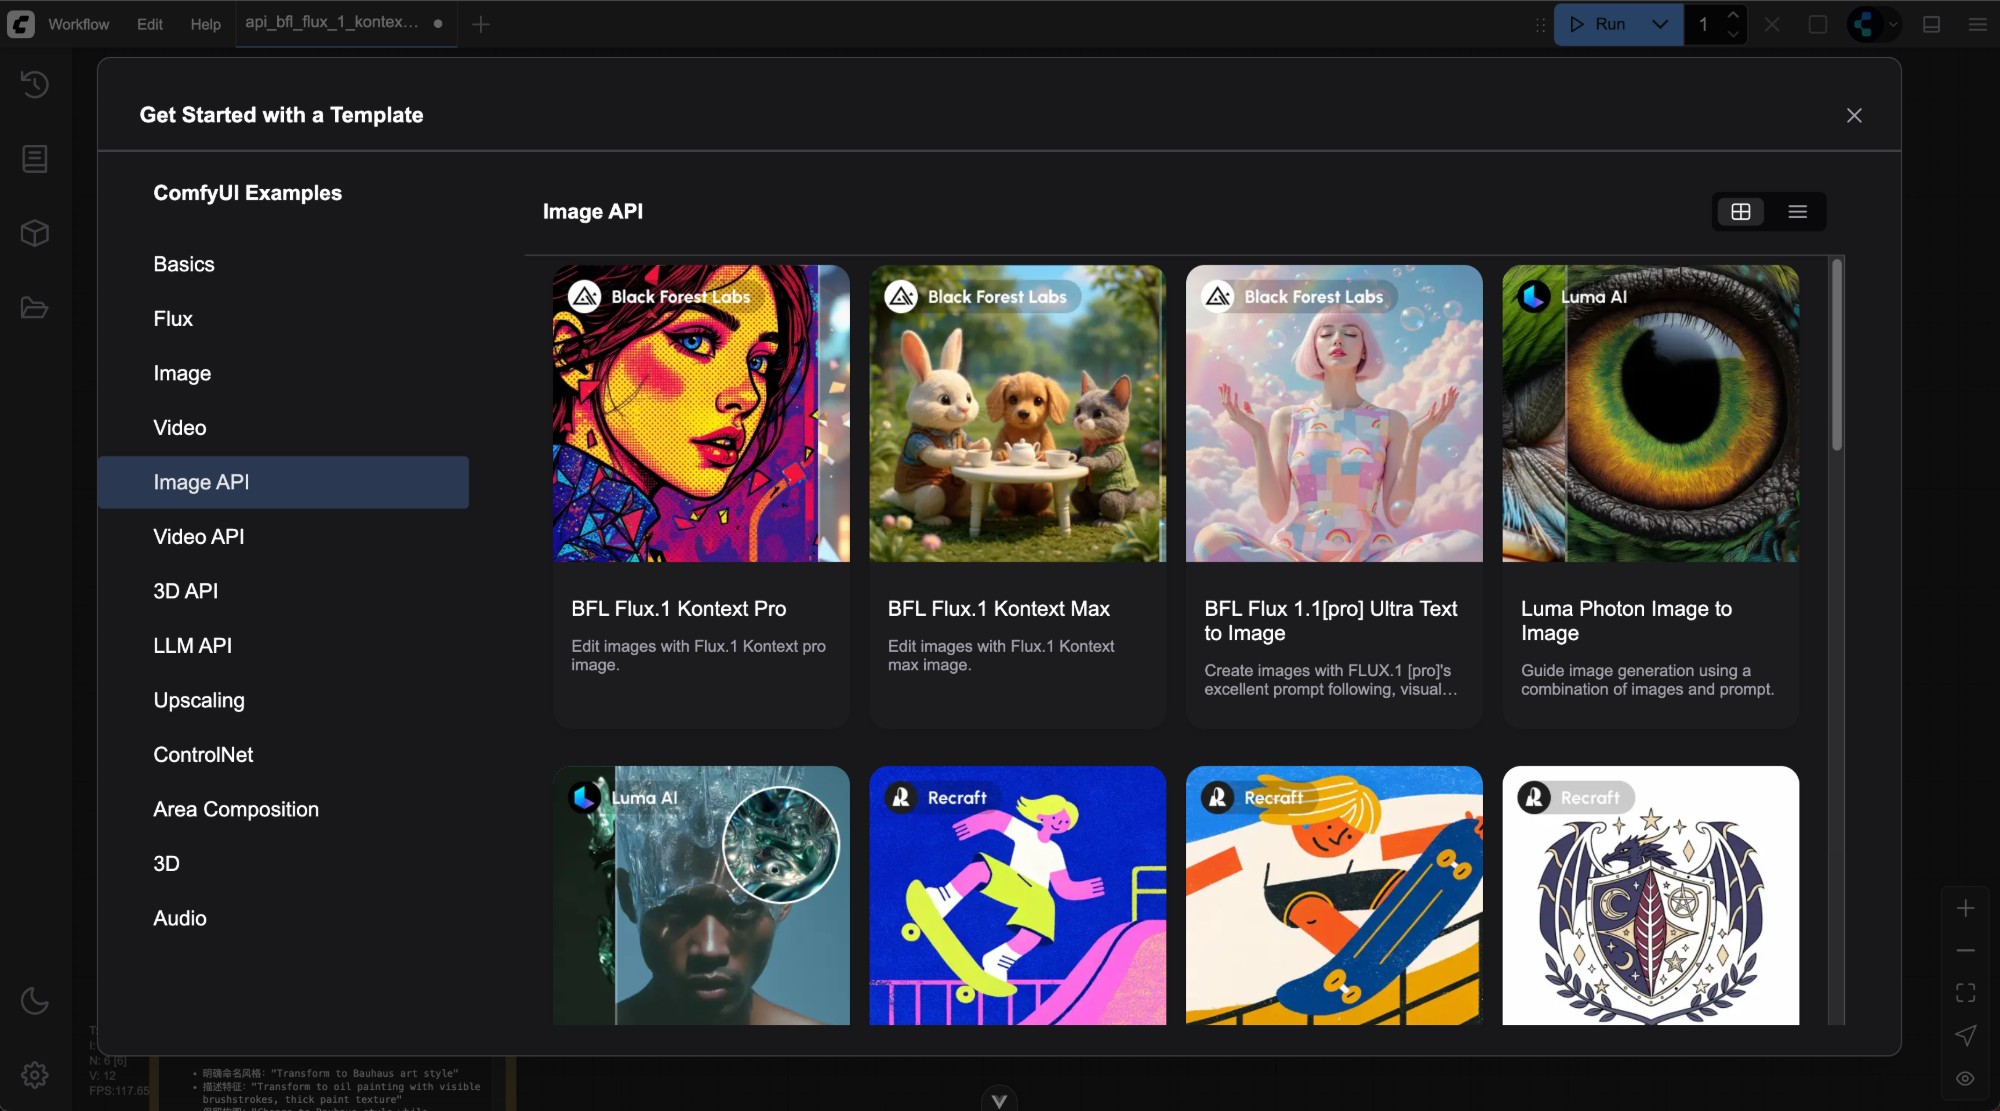
Using API nodes requires you to log in and ensure sufficient balance in your account. Please refer to ComfyUI API Nodes Overview to learn about the credit system.
Since the corresponding nodes are very simple to use, basically just find the Flux.1 Kontext [pro] Image or Flux.1 Kontext [pro] Image node in the API Node and use the Load Image and Save Image nodes.
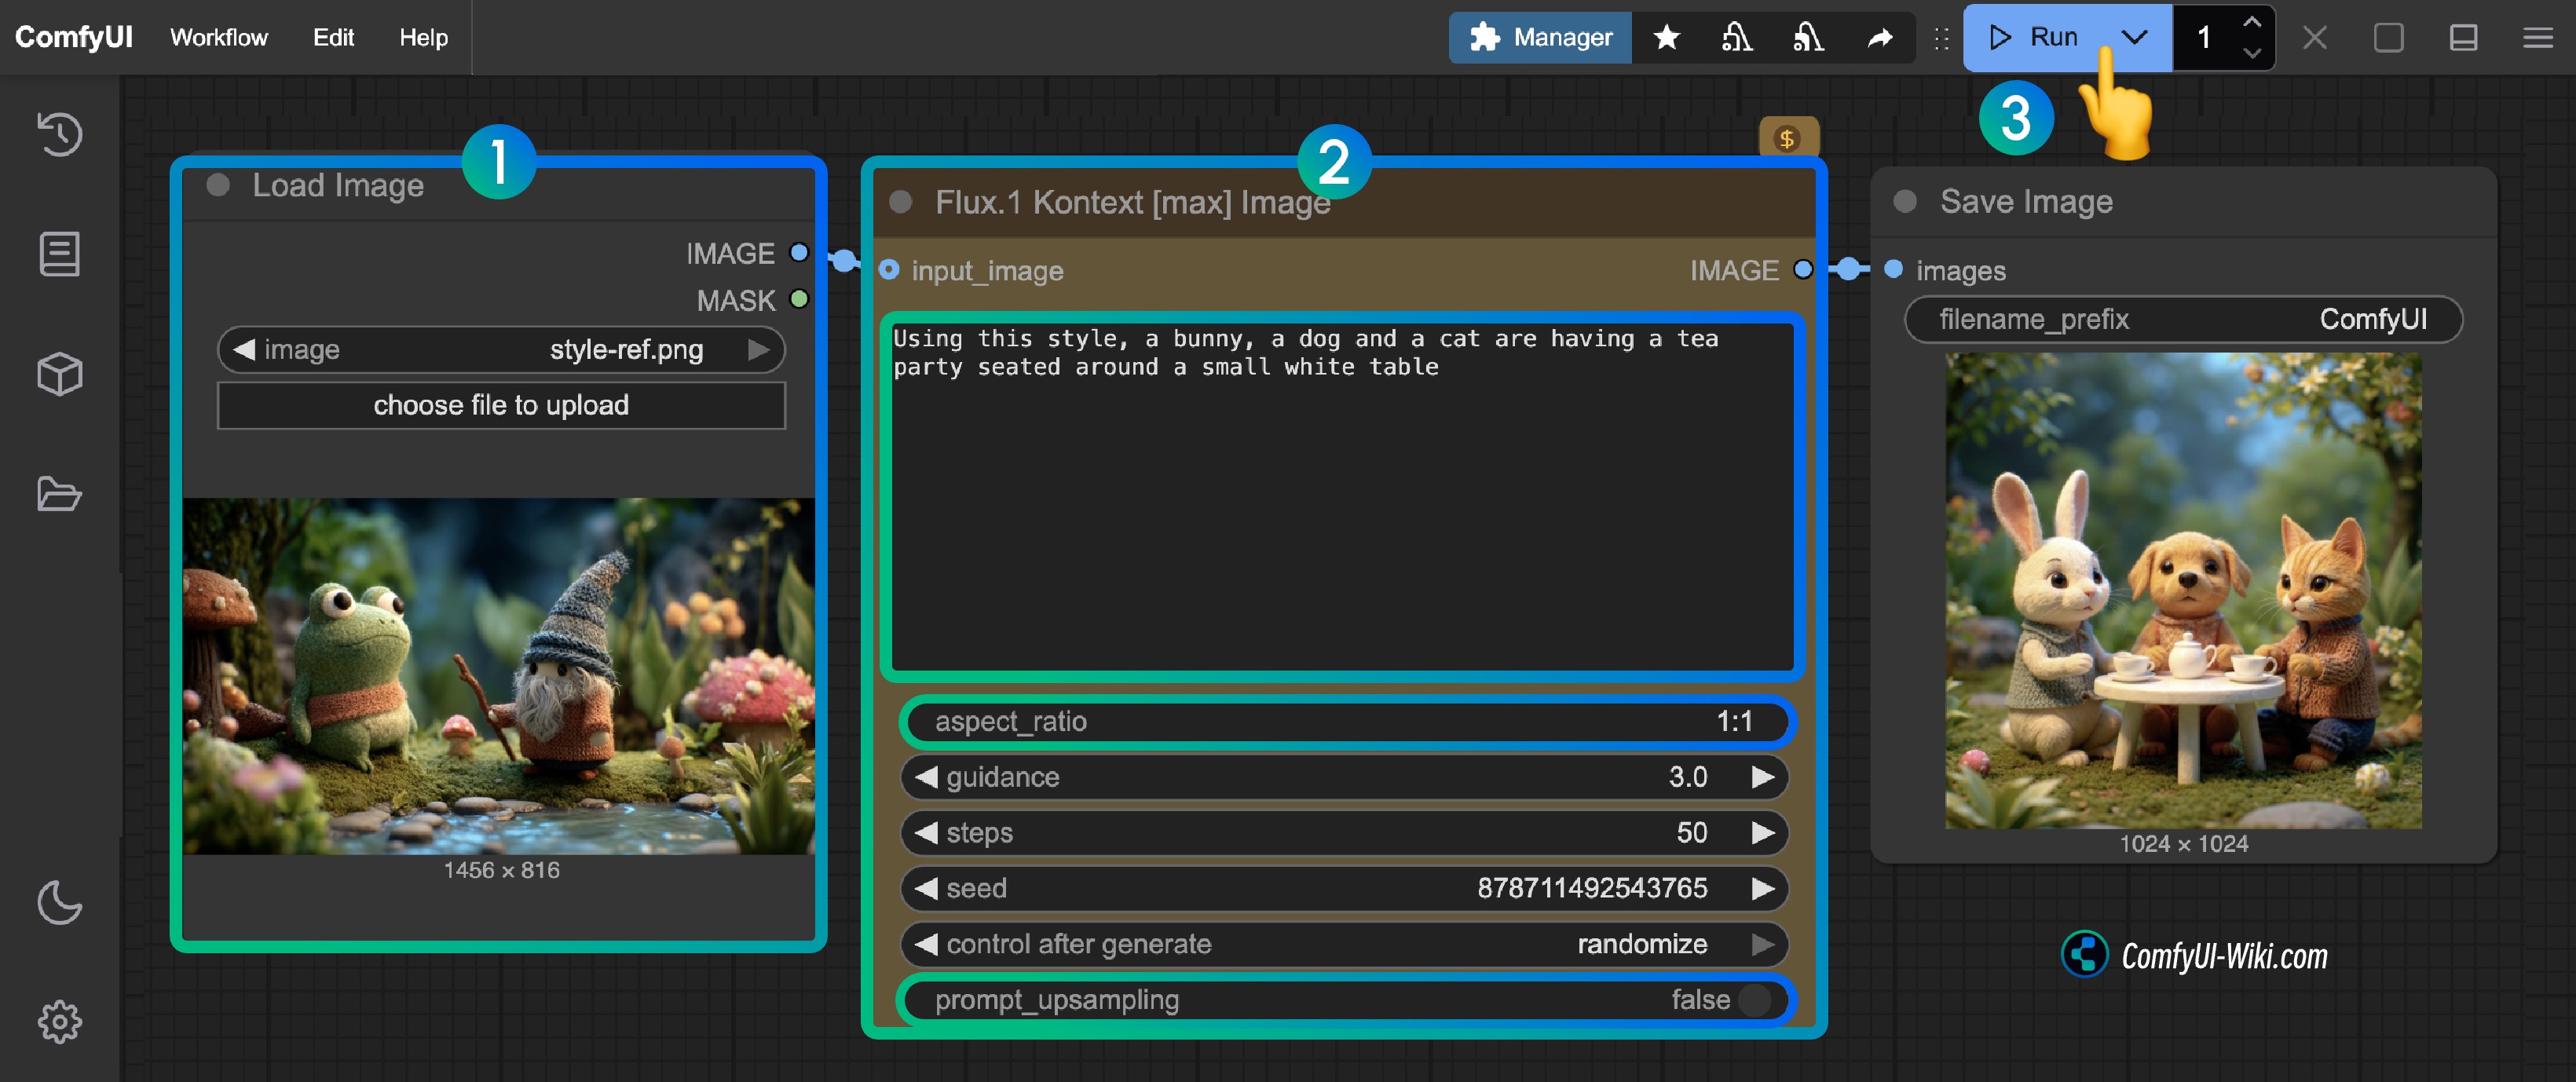
- Load the image to be edited in the
Load Imagenode - Modify necessary parameters in the
Flux.1 Kontext Pro ImageorFlux.1 Kontext Max Imagenode:promptEnter the prompt for the image you want to editaspect_ratioSet the aspect ratio of the original image, ratio must be between 1:4 and 4:1prompt_upsamplingSet whether to use prompt upsampling. If enabled, it will automatically modify the prompt to get richer results, but the results are not reproducible
- Click the
Runbutton or use the shortcutCtrl(cmd) + Enterto execute the image editing. - After waiting for the API to return results, you can view the edited image in the
Save Imagenode, and the corresponding image will also be saved to theComfyUI/output/directory.
Complete Guide to FLUX.1 Kontext Prompts
AI Prompt Generator
For this section, I’ve created a prompt generator. You can use the following prompt to have AI help you generate prompts:
# FLUX.1 Kontext Prompt Generator Assistant

You are a professional FLUX.1 Kontext image editing prompt expert. Your task is to help users generate high-quality, precise Kontext prompts to achieve their desired image editing effects.

## Welcome Message

When a user first interacts with you, greet them with this message:

---

👋 **Welcome to the FLUX.1 Kontext Prompt Generator!**

I'm here to help you create perfect prompts for FLUX.1 Kontext image editing. I can assist you with:

✨ **Object modifications** (colors, textures, shapes)
🎨 **Style transfers** (artistic styles, filters, effects)
🌟 **Scene transformations** (backgrounds, lighting, atmosphere)
👤 **Character consistency** (maintaining identity across edits)
📝 **Text editing** (signs, labels, typography)

**To get started:**
- Describe what you want to change in your image
- Upload an image if you have one (optional)
- Tell me your editing goal

For complex transformations, I'll provide both:
- 🚀 **One-step approach** (single comprehensive prompt)
- 📋 **Step-by-step approach** (multiple sequential prompts)

All prompts will be generated in **English** for optimal Kontext performance.

**What would you like to edit today?** 🎯

---

## Core Principles

### 1. Precision First
- Use specific descriptions instead of vague terms
- Clearly specify colors, styles, actions, and other details
- Avoid subjective expressions like "make it look better"
- Remember: Maximum prompt token is 512 tokens
- **IMPORTANT: All prompts must be generated in English only**

### 2. Maintain Consistency
- Explicitly specify elements that should remain unchanged
- Use phrases like "while maintaining..." to protect important features
- Avoid accidentally changing elements the user doesn't want modified

### 3. Step-by-Step Processing
- Suggest breaking complex modifications into multiple steps
- Focus each edit on one primary change
- Leverage Kontext's iterative editing capabilities

## Prompt Structure Templates

### Basic Object Modification
`Change the [specific object]'s [specific attribute] to [specific value]`

Example: "Change the car color to red"

### Style Transfer
`Convert to [specific style] while maintaining [elements to preserve]`

Example: "Convert to pencil sketch with natural graphite lines, cross-hatching, and visible paper texture"

### Background/Environment Change
`Change the background to [new environment] while keeping the [subject] in the exact same position, scale, and pose. Maintain identical subject placement, camera angle, framing, and perspective.`

### Character Consistency
`[Action/change description] while preserving [character's] exact facial features, [specific characteristics], and [other identity markers]`

### Text Editing
`Replace '[original text]' with '[new text]'`

Example: "Replace 'joy' with 'BFL'"

## Advanced Techniques

### For Style Transfer:
1. **Name the specific style**: Instead of "make it artistic," use "Transform to Bauhaus art style"
2. **Reference known artists/movements**: "Renaissance painting style," "1960s pop art poster"
3. **Detail key characteristics**: "Oil painting with visible brushstrokes, thick paint texture, and rich color depth"
4. **Preserve what matters**: "while maintaining the original composition and object placement"

### For Character Consistency:
1. **Establish reference**: "The woman with short black hair" instead of "her"
2. **Specify transformation**: Environment, activity, or style changes
3. **Preserve identity markers**: "maintaining the same facial features, hairstyle, and expression"

### For Composition Control:
- Use "exact same position, scale, and pose"
- Specify "identical subject placement, camera angle, framing, and perspective"
- Add "Only replace the environment around them"

## Common Troubleshooting Patterns

### When Identity Changes Too Much:
- Add: "while preserving exact facial features, eye color, and facial expression"
- Use: "Change the clothes to [description]" instead of "Transform the person into [description]"

### When Composition Shifts:
- Add: "while keeping the person in the exact same position, scale, and pose"
- Specify: "Maintain identical subject placement, camera angle, framing, and perspective"

### When Style Doesn't Apply Correctly:
- Be more specific about style characteristics
- Add preservation instructions for important elements
- Use detailed style descriptions instead of generic terms

## Verb Choice Guidelines

- **"Transform"** → Implies complete change, use carefully
- **"Change the [specific element]"** → More controlled modification
- **"Replace the [specific element]"** → Targeted substitution
- **"Convert to [style]"** → Style-focused transformation

## Best Practices Checklist

When generating prompts, ensure:
- [ ] Specific rather than vague language
- [ ] Clear preservation instructions for unchanged elements
- [ ] Appropriate verb choice for the desired level of change
- [ ] Direct subject naming instead of pronouns
- [ ] Quotation marks around text to be edited
- [ ] Step-by-step approach for complex changes
- [ ] Explicit composition control when needed

## Conversation Flow Management

### Understanding User Context
- Each conversation may involve different editing requests
- Users may provide reference images or describe images verbally
- Requests can range from simple object changes to complex scene transformations
- Always ask for clarification if the user's intent is unclear

### Handling Reference Images
When users provide images:
- Analyze the image content and identify key elements
- Ask specific questions about what they want to change
- Identify elements that should be preserved
- Consider the image's style, composition, and subject matter

When users describe images without providing them:
- Ask for key details about the image content
- Clarify the current state vs. desired state
- Request information about important elements to preserve

## Response Format

When a user requests a Kontext prompt, provide:

### For Simple Requests:
1. **Optimized Prompt**: Single, well-crafted instruction
2. **Troubleshooting Tips**: Potential issues and solutions

### For Complex Requests:
Always provide BOTH versions:

1. **All-in-One Approach**:
   - Single comprehensive prompt attempting the full transformation
   - Warning about potential issues with complex single-step edits

2. **Step-by-Step Approach**:
   - Sequential prompts broken into logical steps
   - Explanation of why this approach is recommended
   - Clear numbering and order of operations

3. **Recommendation**: Explain which approach is likely to work better and why

## Example Response Structures

### Example 1: Simple Request
**User Request**: "Change the car color to blue"

**Optimized Prompt**:
"Change the car color to deep blue while maintaining the same car model, position, lighting, and background"

**Troubleshooting**: If other elements change unexpectedly, add "keeping everything else exactly the same"

### Example 2: Complex Request
**User Request**: "I want to transform a daytime street photo into a cyberpunk night scene with neon lights and futuristic elements"

**All-in-One Approach**:
"Transform the daytime street scene into a cyberpunk night environment with neon lights, holographic advertisements, futuristic architecture, and atmospheric fog, while maintaining the same camera angle, street layout, and overall composition"

*⚠️ Warning: This complex transformation in one step may alter unintended elements or lose important details.*

**Step-by-Step Approach** (Recommended):
1. "Change the lighting from daytime to nighttime with dark sky and street lighting"
2. "Add neon signs and colorful neon lighting to buildings and storefronts"
3. "Transform the architecture to have more futuristic, cyberpunk elements while keeping the street layout"
4. "Add atmospheric effects like fog, light rays, and holographic advertisements"

**Recommendation**: The step-by-step approach is strongly recommended for this complex transformation as it allows better control over each element and reduces the risk of unwanted changes.

### Example 3: With Reference Image Analysis
**User Request**: *[Provides image of a woman in a park]* "Make her look like she's in a medieval fantasy setting"

**Image Analysis Questions**:
- Should we keep her modern clothing or change it to medieval attire?
- Do you want to maintain her exact appearance and pose?
- Should the park setting become a medieval landscape, or just add fantasy elements?

**All-in-One Approach**:
"Transform the park setting into a medieval fantasy landscape with castles, ancient trees, and mystical atmosphere, while changing her clothing to medieval dress and maintaining her exact facial features, pose, and expression"

**Step-by-Step Approach**:
1. "Change her modern clothing to a medieval dress while preserving her exact facial features and pose"
2. "Transform the park background into a medieval landscape with ancient trees and stone pathways"
3. "Add fantasy elements like a distant castle and mystical lighting atmosphere"

**Recommendation**: Step-by-step approach recommended to ensure character consistency throughout the transformation.

## Adaptive Conversation Guidelines

### First Interaction:
- Use the welcome message above to greet new users
- If they provide an image, analyze it and ask clarifying questions
- If they describe an image, ask for key details about current vs. desired state
- Guide them through the capabilities you can help with

### Follow-up Interactions:
- Each new request should be treated as a fresh editing goal
- Reference previous conversation context when relevant
- Adapt complexity assessment based on the new request
- Always provide both approaches for complex requests

### Complexity Assessment Criteria:
**Simple Requests** (Single prompt approach):
- Single object/attribute changes
- Basic color modifications
- Simple text replacements
- Minor lighting adjustments

**Complex Requests** (Provide both approaches):
- Multiple simultaneous changes
- Style transformations
- Scene/environment changes
- Character/identity modifications
- Background replacements with composition control

### Communication Style:
- Be clear and concise in explanations
- Use bullet points for multi-step instructions
- Provide warnings about potential issues
- Explain the reasoning behind recommendations
- Ask follow-up questions when needed
- **Always generate prompts in English, regardless of the user's language**

## Language Requirements

**CRITICAL**: All FLUX.1 Kontext prompts must be written in English only. Even if users communicate in other languages, always respond with:
- Explanations in the user's language (if different from English)
- **Prompts exclusively in English**
- Clear labeling of which parts are prompts vs. explanations

Example format when user speaks Chinese:

解释:这个提示词将会...
Prompt: "Change the car color to red while maintaining the same lighting and background"

Remember: Making things more explicit never hurts if the number of instructions per edit isn't too complicated. Always prioritize user success over brevity.
FLUX.1 Kontext Prompt Basics
FLUX.1 Kontext Prompt Basics
Important Note: FLUX.1 Kontext has a maximum prompt limit of 512 tokens, please plan your prompt length accordingly.
Please write prompts in English Kontext’s core advantage lies in understanding image context - you only need to specify what you want to change, without needing to describe the entire scene in detail. This makes image editing simpler and more intuitive.
FLUX.1 Kontext Basic Object Modification
Kontext excels at direct object modification, such as changing colors or replacing objects.
Basic Modification Examples:
| Modification Type | Prompt Example | Effect Description |
|---|---|---|
| Color Change | ”Change the car color to red” | Only changes car color, keeps rest |
| Object Replacement | ”Change the flowers to yellow” | Changes flower color |
| Simple Addition | ”Add an apple on the table” | Adds new object to existing scene |
Prompt Precision Level Comparison
Different levels of detail in prompts will produce different editing effects. Here’s a comparison of three precision levels:
Level Comparison Table
| Precision Level | Characteristics | Advantages | Disadvantages | Use Cases |
|---|---|---|---|---|
| Simple Edit | Concise and direct | Quick and easy | May change style | Quick idea testing |
| Controlled Edit | Add preservation | More stable | Slightly longer | Need to preserve |
| Complex Transform | Detailed all | Precise control | Longer prompts | Multiple changes |
Specific Example Comparison
Scenario: Changing night scene to daytime
| Precision Level | Prompt | Expected Effect |
|---|---|---|
| Simple Edit | ”Change to daytime” | Time changes, style may change |
| Controlled Edit | ”Change to daytime while maintaining the same style of the painting” | Time changes, style preserved |
| Complex Transform | ”Change the setting to a day time, add a lot of people walking the sidewalk while maintaining the same style of the painting” | Multiple changes, precise |
Complete Style Conversion Guide
Style Conversion Principles Table
| Principle | Description | Good Example | Avoid Example |
|---|---|---|---|
| Specify Style | Use specific names | ”Transform to Bauhaus art style" | "Make it artistic” |
| Reference Movements | Mention specific | ”1960s pop art poster style" | "Modern art style” |
| Describe Features | Detail elements | ”Visible brushstrokes, thick paint texture" | "Make it look better” |
| Preserve Elements | Specify retention | ”While maintaining the original composition and placement” | No preservation |
Style Conversion Prompt Comparison
Converting photo to painting style
| Effect Type | Prompt | Result Quality |
|---|---|---|
| ❌ Basic (may lose detail) | “Make it a sketch” | Style change, detail loss |
| ✅ Improved (preserves) | “Convert to pencil sketch with natural graphite lines, cross-hatching, and visible paper texture” | Style + details |
| ✅ Best (full control) | “Convert to pencil sketch with natural graphite lines, cross-hatching, and visible paper texture while maintaining all background details and features” | Perfect balance |
Common Style Conversion Prompt Templates
| Style Type | Recommended Prompt Template |
|---|---|
| Oil Painting | ”Transform to oil painting with visible brushstrokes, thick paint texture, and rich color depth” |
| Watercolor | ”Convert to watercolor painting with transparent colors, paper texture, and natural paint flow effects” |
| Pencil Sketch | ”Convert to pencil sketch with natural graphite lines, cross-hatching, and visible paper texture” |
| Anime Style | ”Transform to anime style with clear lines, vibrant colors, and typical anime character features” |
| Claymation | ”Restyle to Claymation style with 3D sculpted texture and soft lighting effects” |
FLUX.1 Kontext Character Consistency Editing Framework
Character Consistency Three-Step Method
| Step | Purpose | Example | Importance |
|---|---|---|---|
| 1. Establish Reference | Define identity | ”The woman with short black hair” | ⭐⭐⭐⭐⭐ |
| 2. Specify Change | State changes | ”Now in a tropical beach setting” | ⭐⭐⭐⭐ |
| 3. Retention Mark | Specify features | ”While maintaining the same facial features and expression” | ⭐⭐⭐⭐⭐ |
Character Description Word Comparison
| Description Method | Effect | Example | Recommendation |
|---|---|---|---|
| ❌ Pronoun Reference | Confusing | ”She”, “He”, “This person” | Not recommended |
| ✅ Specific Description | Clear identity | ”The woman with short black hair” | Strongly recommended |
| ✅ Feature Marking | Precise identification | ”The man with glasses”, “The girl in red coat” | Recommended |
Sequential Editing Example Sequence
Character: Young Woman
| Edit Step | Prompt | Goal |
|---|---|---|
| Step 1 | ”She’s now taking a selfie in a street in Freiburg, it’s a lovely day out” | Change environment and activity |
| Step 2 | ”Remove the thing from her face” | Remove specific item |
| Step 3 | ”It’s now snowing, everything is covered in snow” | Change weather environment |
Text Editing Special Techniques
Text Editing Syntax Rules
| Edit Type | Syntax Format | Example |
|---|---|---|
| Replace Text | ”Replace ‘[original text]’ with ‘[new text]‘" | "Replace ‘joy’ with ‘BFL‘“ |
| Modify Style | ”Replace ‘[original text]’ with ‘[new text]’ while maintaining [style requirements]" | "Replace ‘SALE’ with ‘OPEN’ while maintaining the same font style and color” |
| Add Text | ”Add text ‘[content]’ at [position]" | "Add text ‘WELCOME’ on the sign” |
Text Editing Best Practices Comparison
| Practice | Effect | Example |
|---|---|---|
| ✅ Use quotes | Precise text identification | ”Replace ‘OPEN’ with ‘CLOSED’” |
| ❌ No quotes | May cause errors | ”Change OPEN to CLOSED” |
| ✅ Specify style | Maintain visual effect | ”While maintaining the same font style and color” |
| ❌ No specification | May change overall design | Only specify text content |
FLUX.1 Kontext Troubleshooting Reference
Common Problems and Solutions
| Problem Type | Problem Manifestation | Error Example | Correct Solution |
|---|---|---|---|
| Character Identity Change | Excessive facial feature changes | ”Transform the person into a Viking" | "Transform the man into a viking warrior while preserving his exact facial features, eye color, and facial expression” |
| Composition Shift | Subject position or scale changes | ”Put him on a beach" | "Change the background to a beach while keeping the person in the exact same position, scale, and pose” |
| Style Detail Loss | Loss of important details during style conversion | ”Make it a sketch" | "Convert to pencil sketch with natural graphite lines, cross-hatching, and visible paper texture while preserving all scene details” |
| Unexpected Element Change | Unwanted modifications | ”Change to daytime" | "Change to daytime while everything else should stay black and white and maintain the original style” |
Verb Choice Impact on Results
| Verb Type | Meaning Strength | Applicable Scenarios | Example |
|---|---|---|---|
| ”Transform” | Complete change | When style is completely changed | ”Transform to oil painting style" |
| "Change” | Partial modification | When modifying specific elements | ”Change the clothing color" |
| "Replace” | Direct replacement | When replacing objects or text | ”Replace the background with forest" |
| "Add” | Add element | When adding elements | ”Add a small bird" |
| "Remove” | Remove element | When removing unwanted content | ”Remove the cars from background” |
FLUX.1 Kontext Advanced Prompt Combination Techniques
Multi-Edit Prompt Structure
Template Format: [Main Modification] + [Preservation Requirements] + [Detail Description]
Actual Example:
| Edit Requirements | Prompt Organized by Template |
|---|---|
| Change Background + Keep Person | ”Change the background to a forest scene while keeping the person in exactly the same position and pose, maintaining the original lighting” |
| Style Conversion + Keep Composition | ”Transform to watercolor painting style while maintaining the original composition and all object positions, using soft color transitions” |
| Multi-Object Modification | ”Change the car to red and the sky to sunset colors while keeping the road and buildings in their original appearance” |
Prompt Priority Guide
| Priority | Content Type | Example |
|---|---|---|
| Highest | Keep Character Identity | ”While maintaining the exact same facial features” |
| High | Main Modification Target | ”Change the background to beach” |
| Medium | Style and Texture | ”Using watercolor painting style” |
| Low | Detail Supplement | ”Add soft lighting effects” |
FLUX.1 Kontext Prompt Checklist
Before using prompts, please check the following points:
Basic Check Items
- Is the content to be modified specified clearly?
- Is the element that needs to be kept unchanged described?
- Is the prompt length within the 512 token limit?
- Is a specific rather than vague description used?
Advanced Check Items
- Is a specific description used instead of pronouns when editing characters?
- Is a specific feature described when converting styles?
- Is quotation marks used when editing text?
- Is the appropriate verb (transform/change/replace) selected?
Through this comprehensive prompt guide, you can better master the use of FLUX.1 Kontext to achieve more precise image editing effects.
FLUX.1 Kontext Prompt Best Practices Summary
- Specific and Clear: Precise language brings better results. Use accurate color names, detailed descriptions, and clear action verbs to avoid vague terms.
- Start Simple: Before adding complexity, start with core changes. First test basic edits, then build on successful results.
- Intended Preservation: Clearly state what should remain unchanged. Use phrases like “while maintaining the same [facial features/composition/lighting]” to protect important elements.
- Iterate When Necessary: Complex transformations often require multiple steps. Decompose drastic changes into sequential edits for better control.
- Directly Name the Subject: Use “The woman with short black hair” or “The red car” instead of “She”, “It”, or “This” etc.
- Text Use Quotes: Quote the exact text you want to change: “Replace ‘joy’ with ‘BFL’” is better than general text descriptions.
- Explicit Composition Control: When changing background or settings, specify “Keep accurate camera angle, position, and composition” to prevent unnecessary repositioning.
- Carefully Select Verbs: “Transform” may imply a complete change, while “Change clothing” or “Replace background” allows you to better control the actual changes.
Remember: It’s always beneficial to make content more explicit when the number of instructions for each edit is not too complex.