ByteDance USO ComfyUI Workflow Guide, Image Style Transfer and Subject Identity Preservation Image Generation
Unified Style and Subject-Driven Generation with ByteDance's USO model
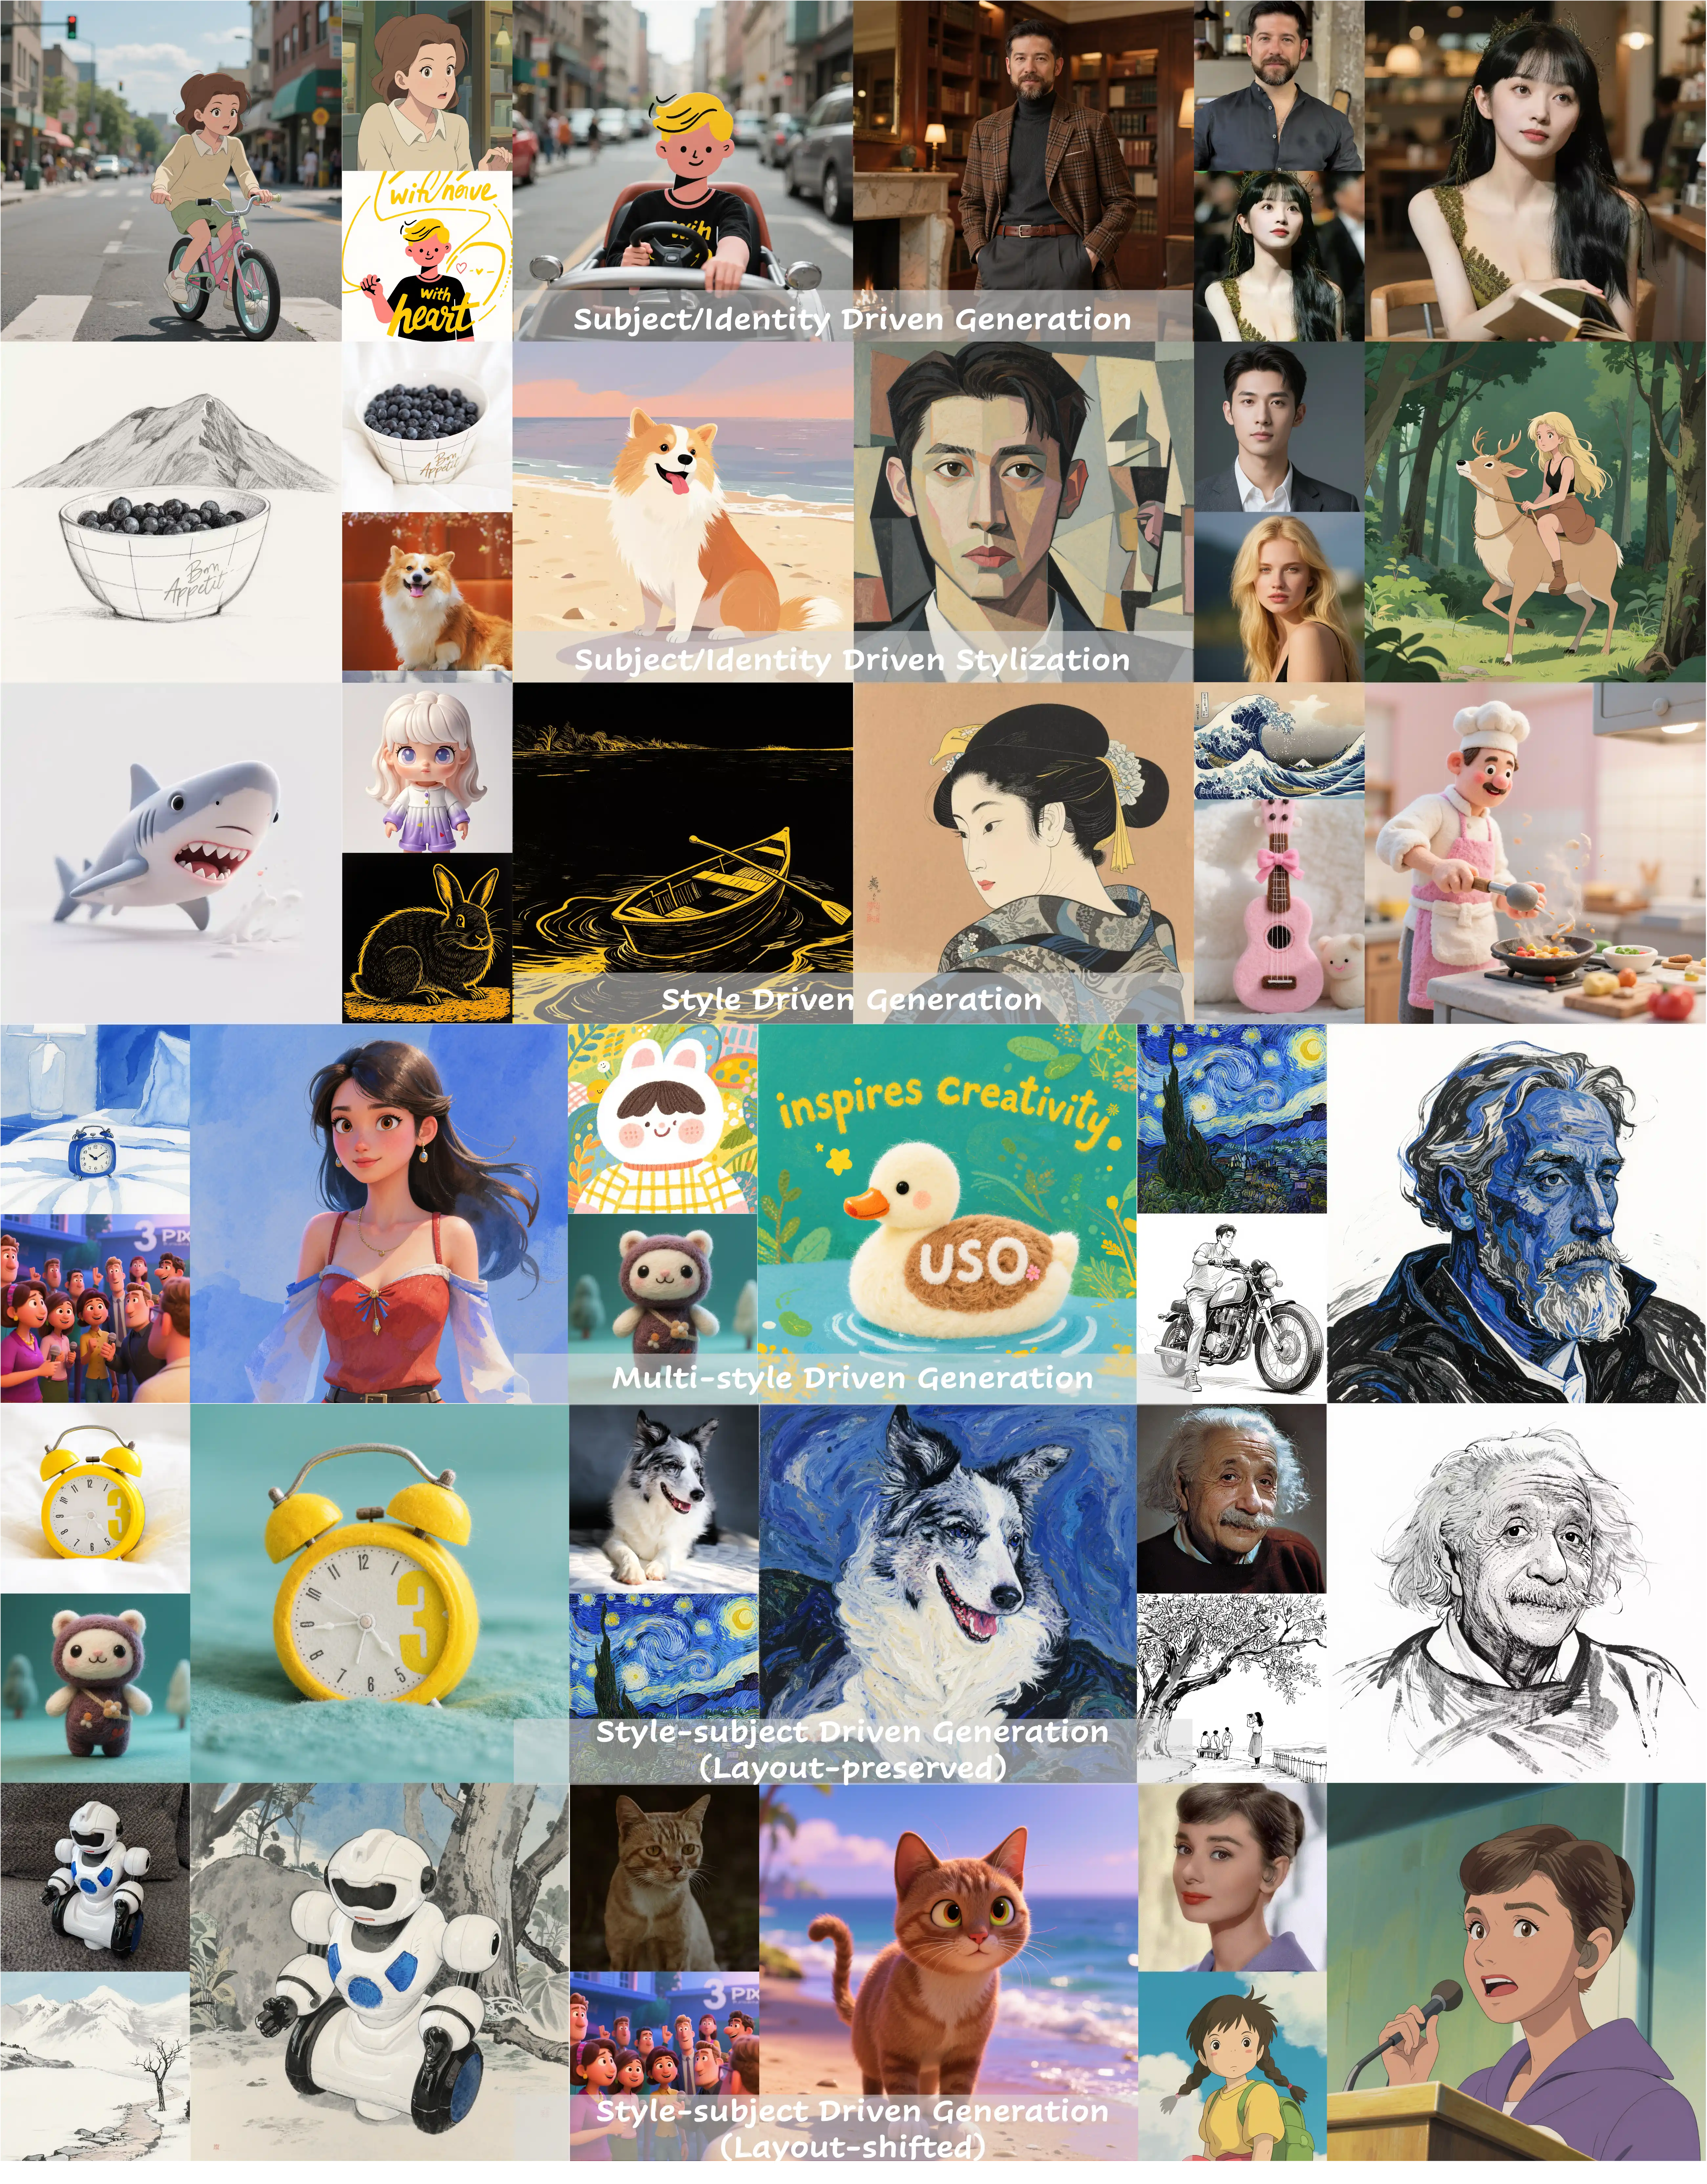
USO (Unified Style and Subject-Driven Generation) is a model developed by ByteDance's UXO Team that unifies style-driven and subject-driven generation tasks. Built on FLUX.1-dev architecture, the model addresses the issue where traditional methods treat style-driven and subject-driven generation as opposing tasks. USO solves this through a unified framework with decoupling and recombination of content and style as its core goal.
The model adopts a two-stage training method:
- Stage One: Align SigLIP embeddings through style alignment training to obtain a model with style capabilities
- Stage Two: Decouple the conditional encoder and train on triplet data to achieve joint conditional generation
USO supports multiple generation modes:
- Subject-Driven Generation: Maintains subject identity consistency, suitable for stylizing specific subjects such as people and objects
- Style-Driven Generation: Achieves high-quality style transfer by applying the style of reference images to new content
- Identity-Driven Generation: Performs stylization while maintaining identity characteristics, particularly suitable for portrait stylization
- Joint Style-Subject Generation: Simultaneously controls subject and style to achieve complex creative expressions
- Multi-Style Mixed Generation: Supports the fusion application of multiple styles
Related Links
ByteDance USO ComfyUI Native Workflow
1. Workflow and input
Download the image below and drag it into ComfyUI to load the corresponding workflow.

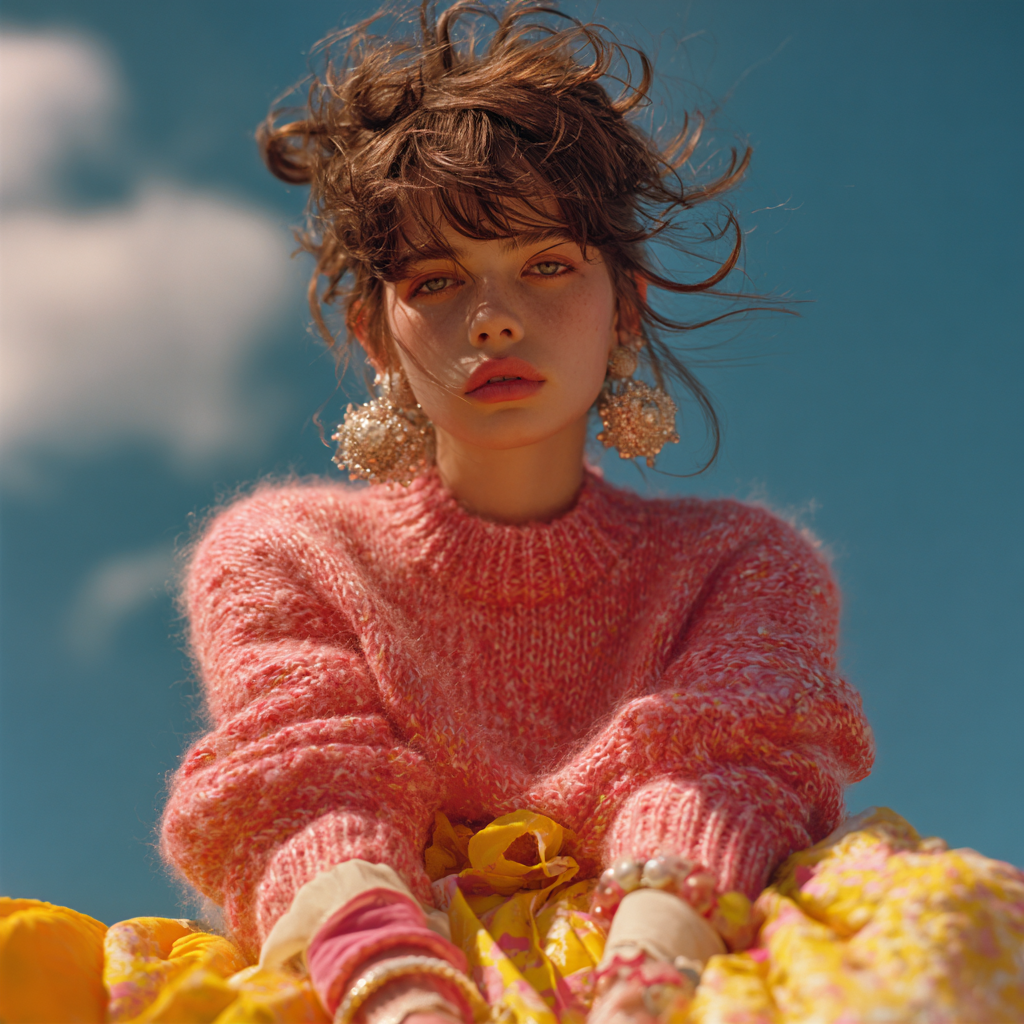
Use the image below as an input image.
2. Model links
checkpoints
loras
model_patches
clip_visions
Please download all models and place them in the following directories:
📂 ComfyUI/
├── 📂 models/
│   ├── 📂 checkpoints/
│   │   └── flux1-dev-fp8.safetensors
│   ├── 📂 loras/
│   │   └── uso-flux1-dit-lora-v1.safetensors
│   ├── 📂 model_patches/
│   │   └── uso-flux1-projector-v1.safetensors
│   ├── 📂 clip_visions/
│   │   └── sigclip_vision_patch14_384.safetensors
3. Workflow instructions
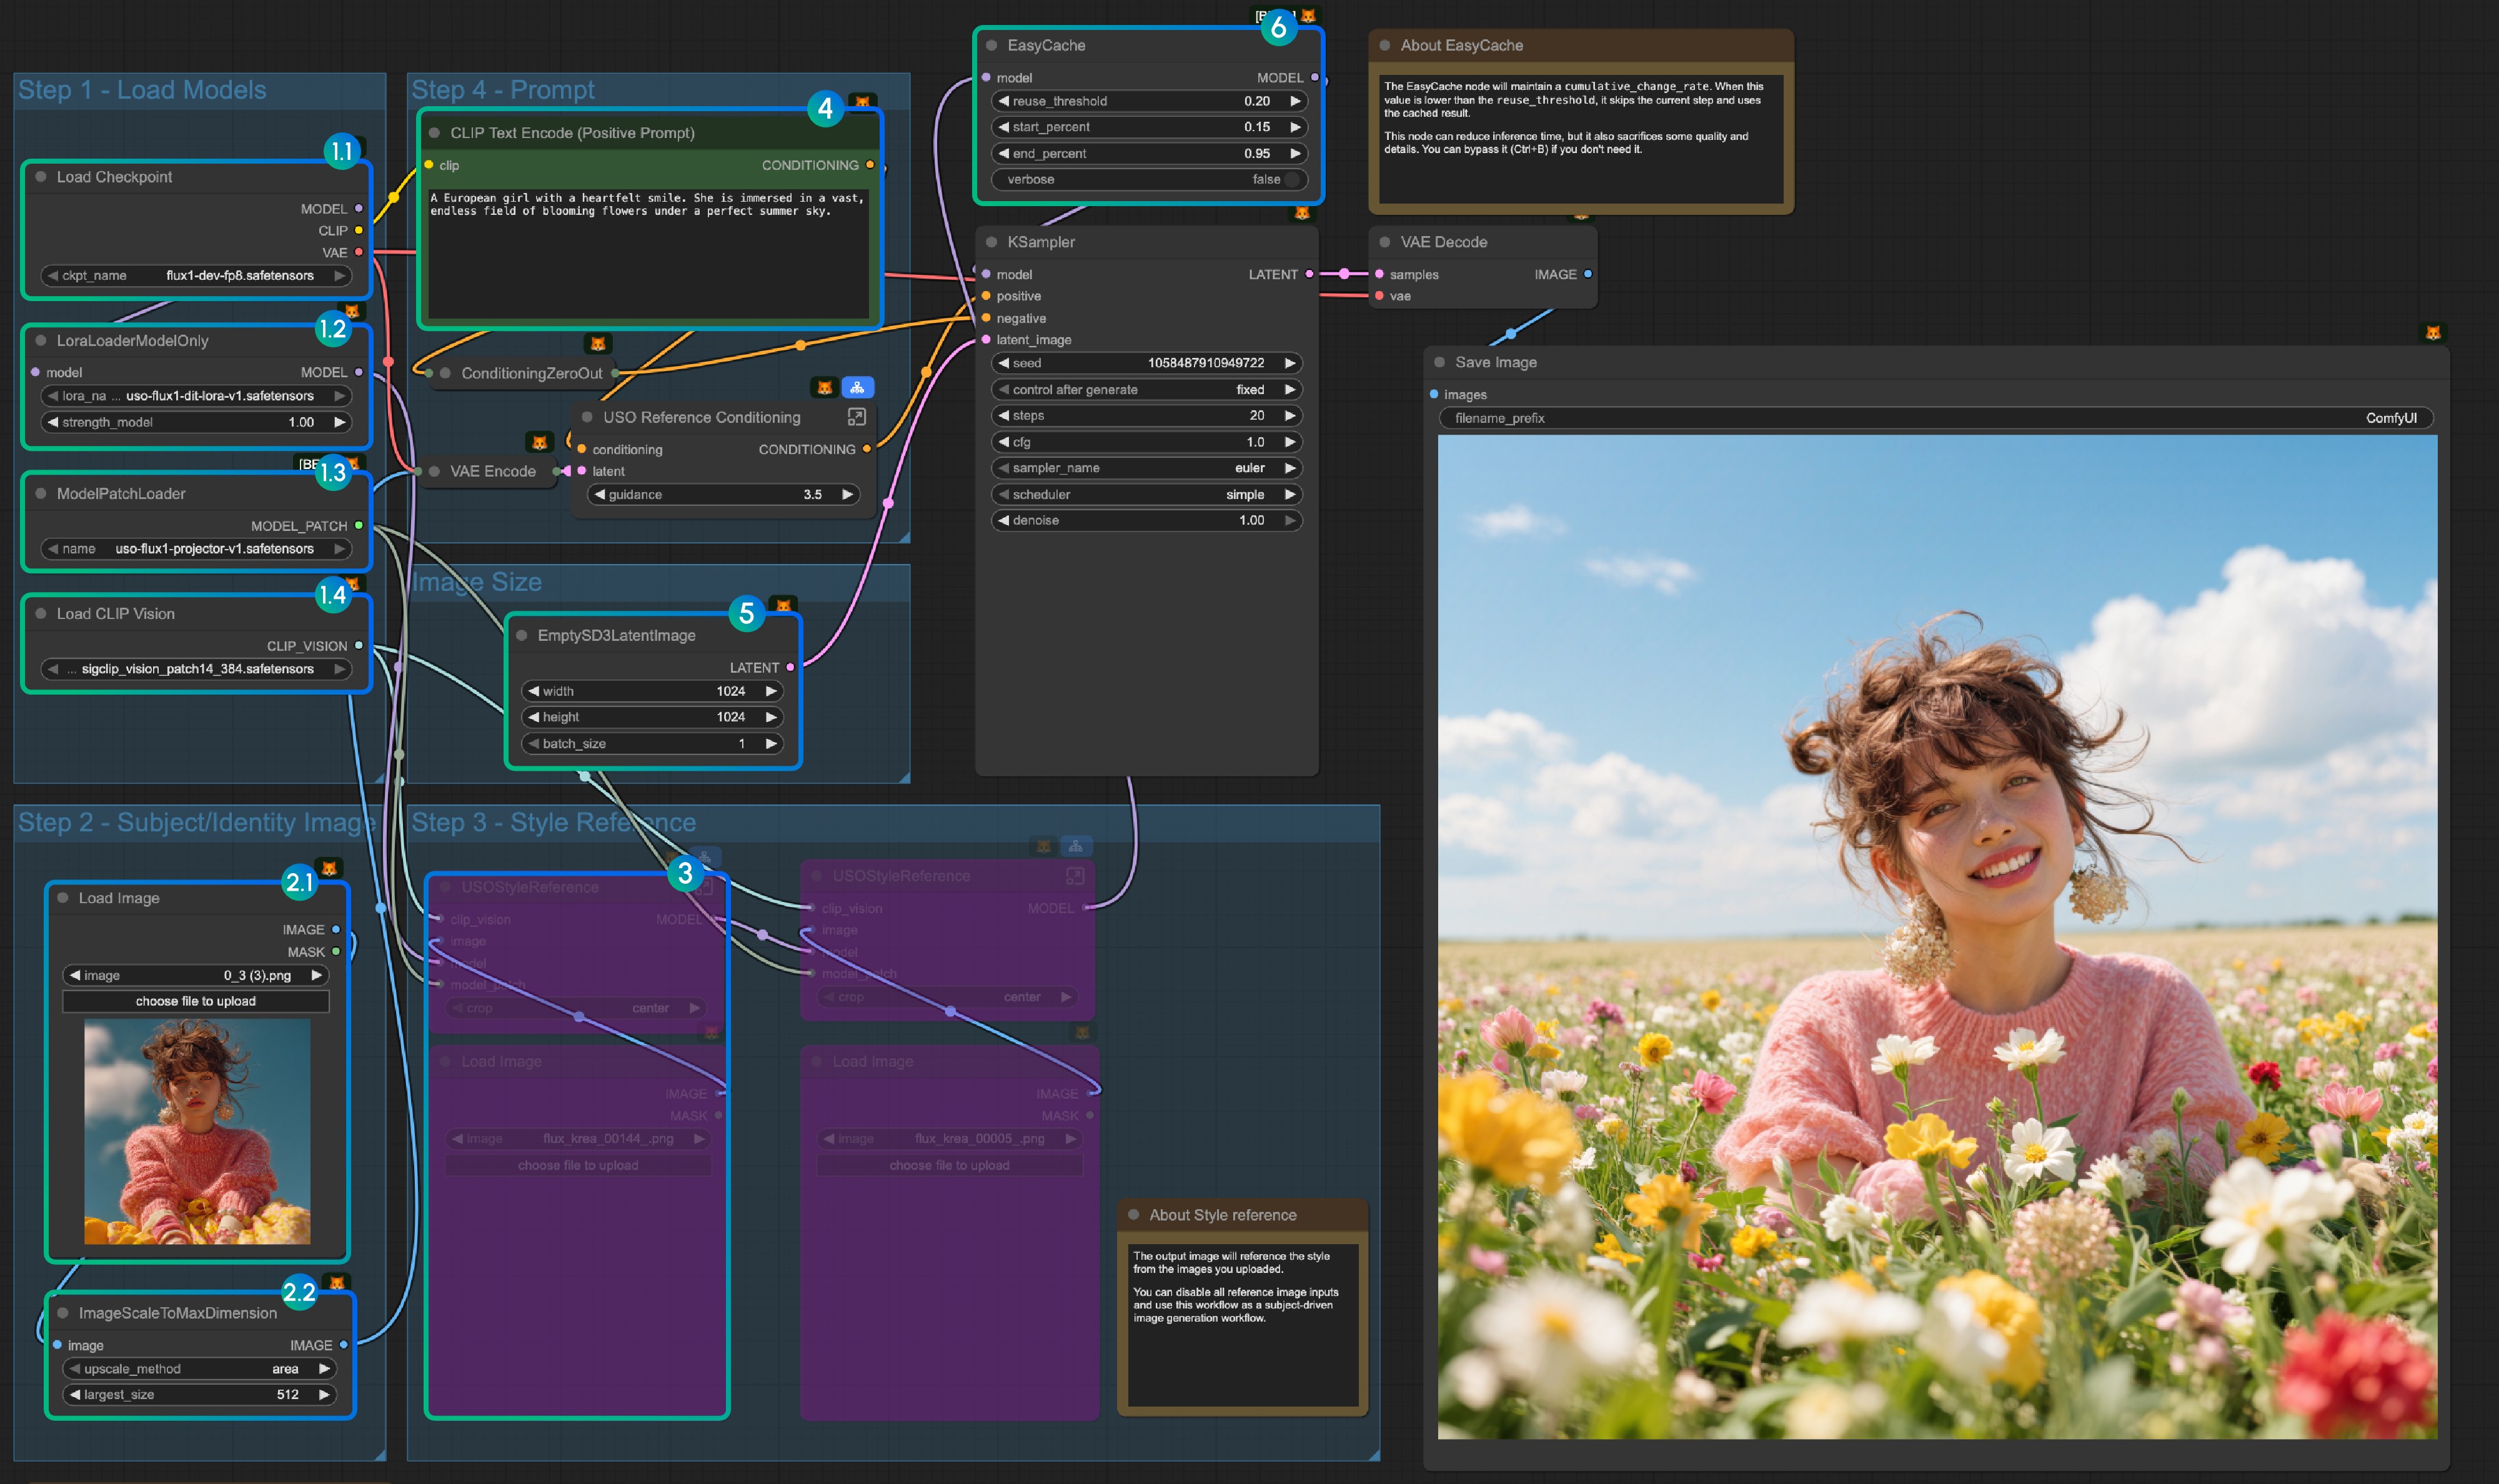
- Load models:
- 1.1 Ensure the
Load Checkpointnode hasflux1-dev-fp8.safetensorsloaded - 1.2 Ensure the
LoraLoaderModelOnlynode hasdit_lora.safetensorsloaded - 1.3 Ensure the
ModelPatchLoadernode hasprojector.safetensorsloaded - 1.4 Ensure the
Load CLIP Visionnode hassigclip_vision_patch14_384.safetensorsloaded
- 1.1 Ensure the
- Content Reference:
- 2.1 Click
Uploadto upload the input image we provided - 2.2 The
ImageScaleToMaxDimensionnode will scale your input image for content reference, 512px will keep more character features, but if you only use the character's head as input, the final output image often has issues like the character taking up too much space. Setting it to 1024px gives much better results.
- 2.1 Click
- In the example, we only use the
content referenceimage input. If you want to use thestyle referenceimage input, you can useCtrl-Bto bypass the marked node group. - Write your prompt or keep default
- Set the image size if you need
- The EasyCache node is for inference acceleration, but it will also sacrifice some quality and details. You can bypass it (Ctrl+B) if you don't need to use it.
- Click the
Runbutton, or use the shortcutCtrl(Cmd) + Enterto run the workflow
4. Additional Notes
- Style reference only:
We also provide a workflow that only uses style reference in the same workflow we provided
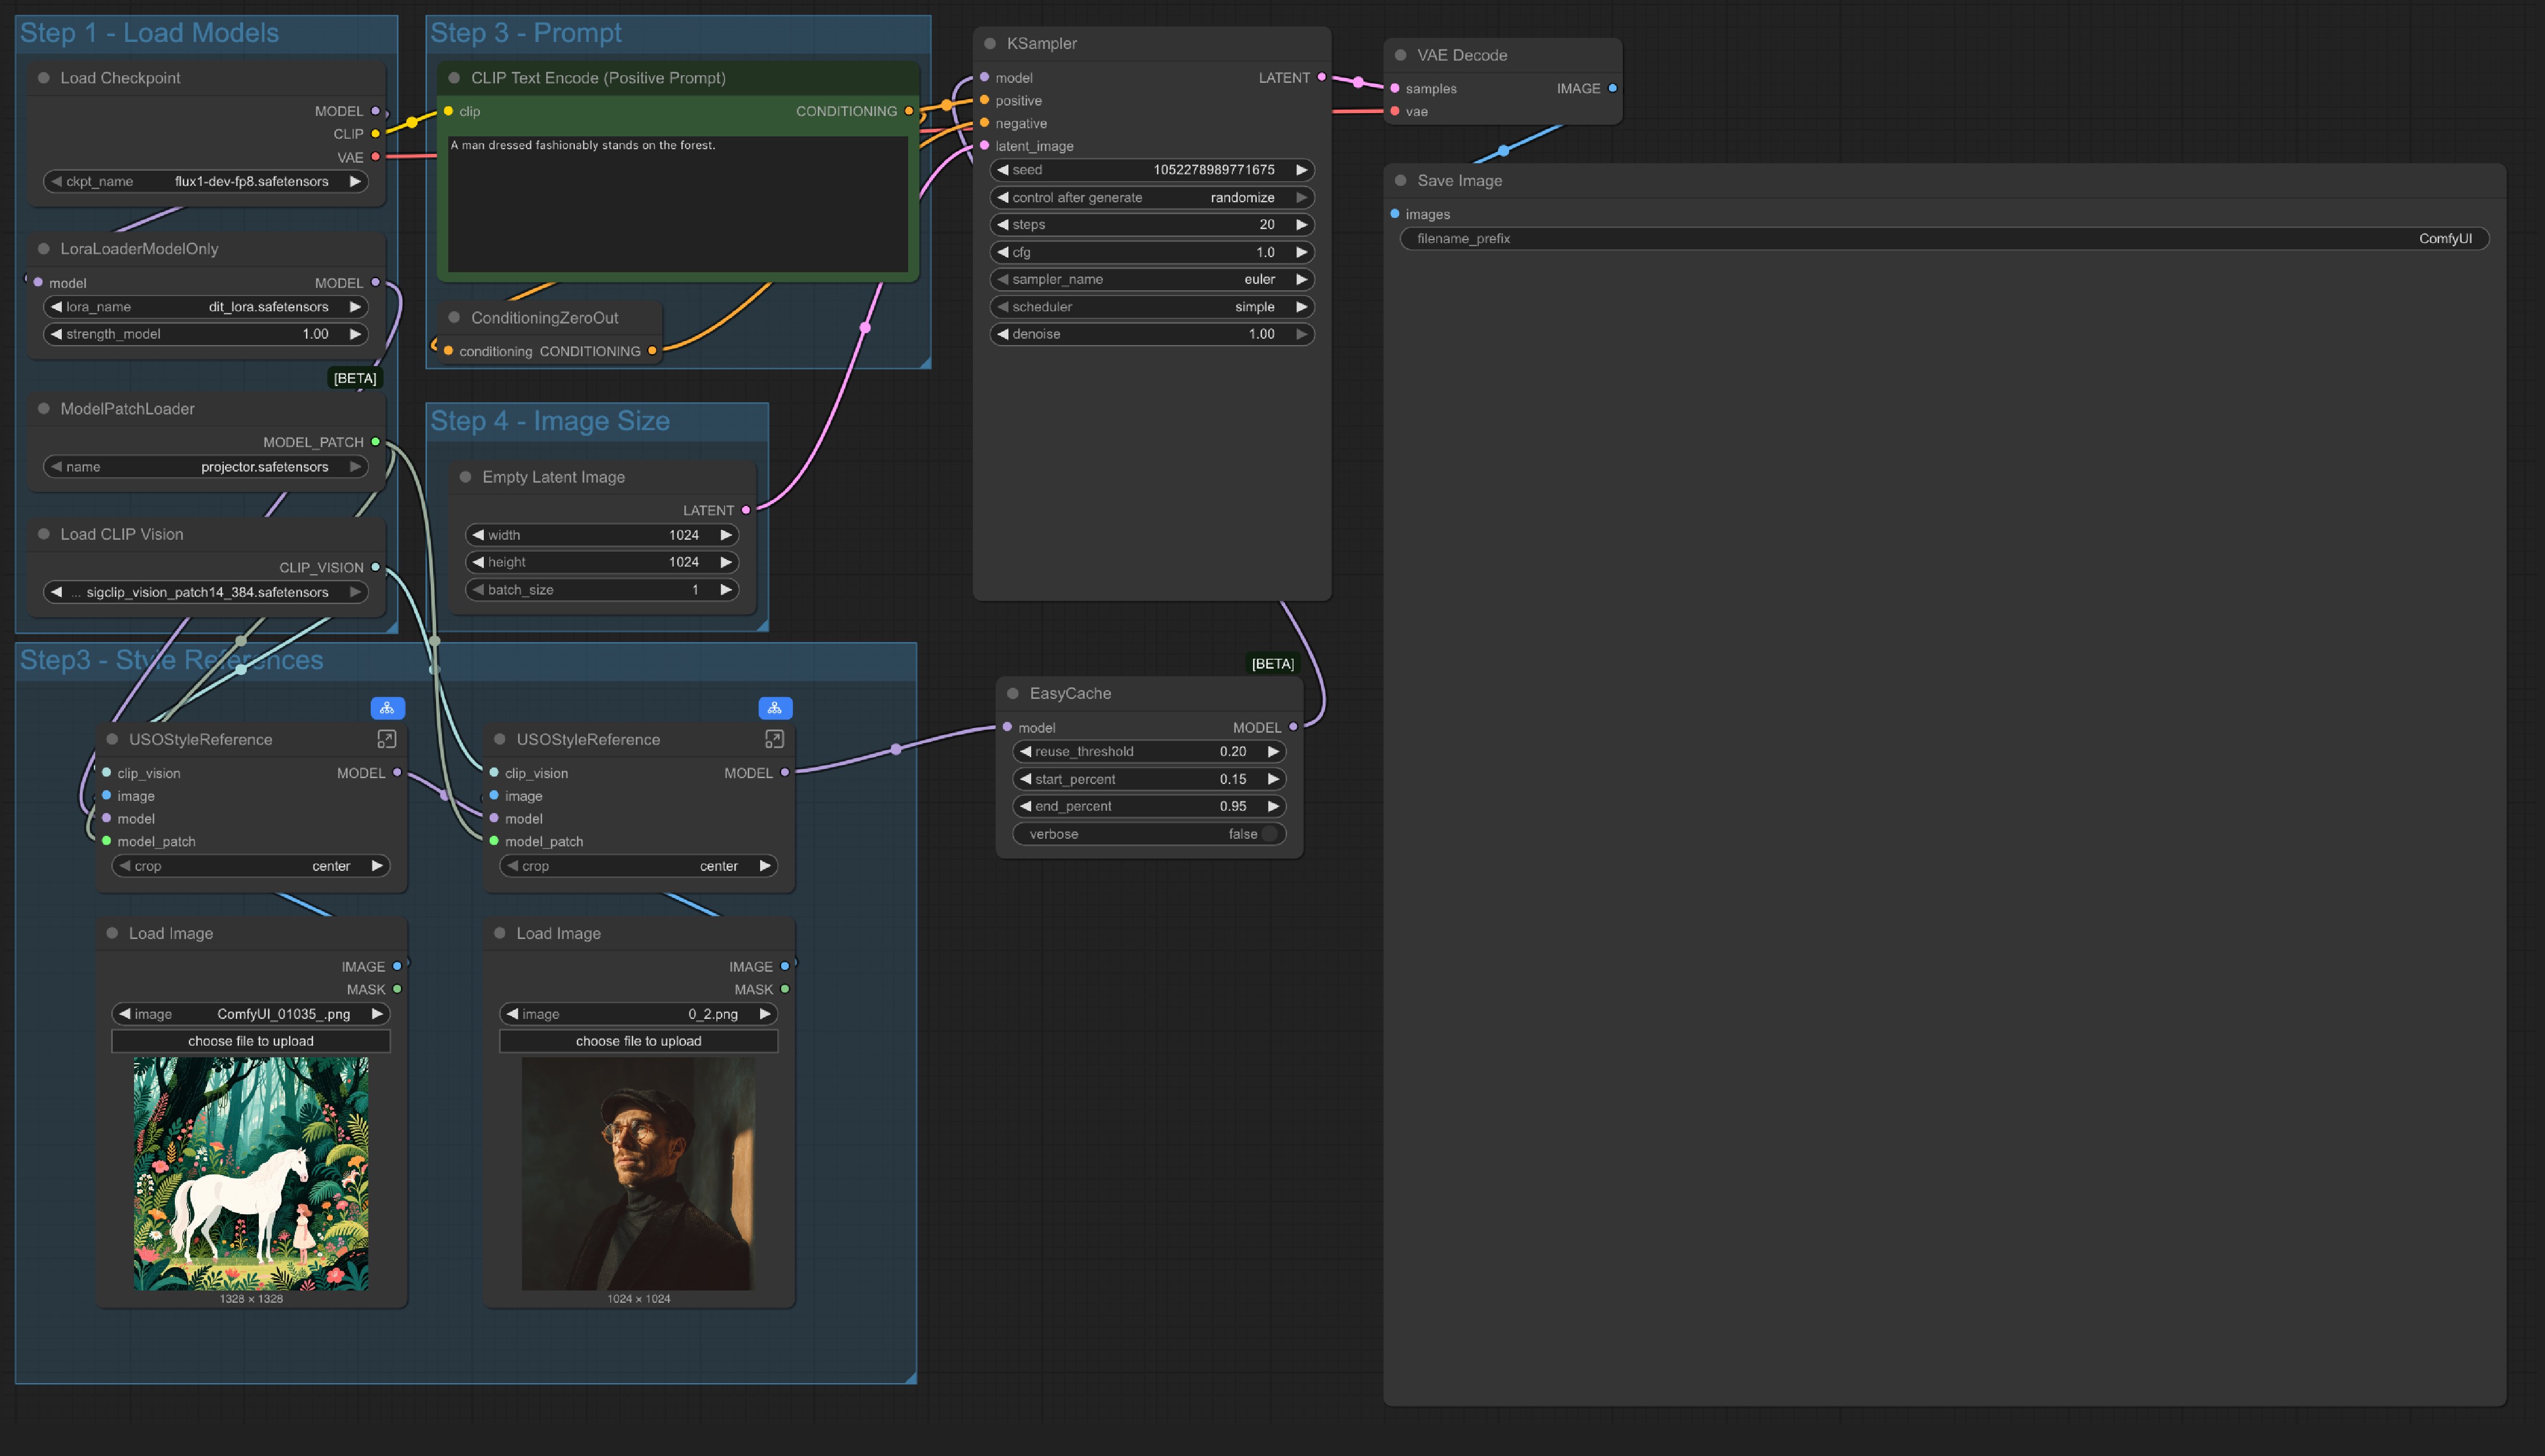 The only different is we replaced the
 content reference node and only use an Empty Latent Image node.
- You can also bypass whole
Style Referencegroup and use the workflow as a text to image workflow, which means this workflow has 4 variations:
- Subject-Driven Generation: Only use content (subject) reference
- Style-Driven Generation: Only use style reference
- Joint Style-Subject Generation: Mixed content and style reference
- Text-to-Image Generation: As a standard text to image workflow
Comments
Sign in with GitHub to join the discussion.