ComfyUI에서 FLUX.1 Kontext Dev 사용하기: 다운로드, GGUF 워크플로 및 프롬프트
flux1-dev-kontext_fp8_scaled.safetensors를 다운로드하고 ComfyUI에서 FLUX.1 Kontext Dev를 실행하세요. 네이티브 및 GGUF 워크플로, 다중 라운드 편집, Pro와 Max API 액세스, 프롬프트 가이드를 제공합니다.
FLUX.1 Kontext는 텍스트 및 이미지 기반 편집을 위해 설계된 생성형 모델 제품군입니다. 기존 텍스트 기반 이미지 생성(T2I) 모델과 달리, Kontext는 컨텍스트 기반 이미지 처리를 지원하며 이미지와 텍스트 콘텐츠를 모두 이해하여 더욱 정밀한 이미지 편집 기능을 구현할 수 있습니다.
FLUX.1 Kontext 모델 주요 기능
- 연속 이미지 편집: 여러 편집 단계에 걸쳐 일관성을 유지합니다
- 정밀한 오브젝트 수정: 이미지 내 특정 오브젝트를 정확하게 수정합니다
- 캐릭터 일관성 편집: 여러 편집 단계에 걸쳐 캐릭터의 특징을 유지합니다
- 스타일 유지 및 전이: 원본 스타일을 유지하면서 스타일 전이도 수행할 수 있습니다
- 이미지 내 텍스트 편집: 이미지의 텍스트 콘텐츠를 직접 편집합니다
- 구도 제어: 이미지 구도, 카메라 앵글, 포즈를 정밀하게 제어합니다
- 빠른 추론: 효율적인 이미지 생성 및 편집 속도
Pro, Max, Dev 버전 비교
- Pro와 Max 버전은 Black Forest Labs 모델의 최고 수준 기능을 계속 제공하며, API 호출을 통해서만 사용할 수 있습니다.
- Dev 버전은 커뮤니티 학습과 연구를 위한 오픈 소스 버전으로, 이제 오픈 소스로 공개되었습니다. 관련 코드와 모델 가중치는 공식 웹사이트에서 확인할 수 있습니다.
Dev 버전은 상업적 사용이 불가능하지만, 상업적 사용을 위한 Dev 버전 라이선스를 구매할 수 있습니다. 상업용 라이선스 구매는 Black Forest Labs 공식 웹사이트를 참조하세요.
Pro 및 Max 버전과 비교하면, Dev 버전은 프롬프트를 작성하는 데 더 많은 시간이 필요하며, Pro 및 Max 버전처럼 간단한 프롬프트로는 좋은 결과를 얻을 수 없습니다.
일부 프롬프트에서는 Dev 버전이 이미지를 전혀 편집하지 않을 수 있으므로, 프롬프트 조정과 수정이 필요합니다.
튜토리얼 콘텐츠 개요
이 튜토리얼에서는 다음 내용을 다룹니다:
- 기본 Flux.1 Kontext Dev 네이티브 워크플로 (fb16, fp8_scaled, gguf)
- Flux.1 Kontext Dev 추론 가속 (Nunchaku, TeaCache)
- 다중 라운드 이미지 편집 구현
- 다양한 이미지 참조 방법
- Flux.1 Kontext Dev 이미지 입력 마킹 제안
- Flux.1 Kontext API 노드 워크플로 (Pro, Max)
- Flux.1 Kontext 프롬프트 사용 가이드
Flux.1 Kontext Dev 관련 모델
이 튜토리얼은 여러 가지 모델 버전을 다루므로, 여기서 모델과 가중치에 대해 간단히 소개합니다. Flux.1 Kontext Dev 모델은 Diffusion 모델을 제외하면 원본 Flux 시리즈와 동일한 모델(Text Encoder, VAE)을 사용합니다. 관련 워크플로를 이전에 사용해 본 적이 있다면 Flux.1 Kontext Dev 관련 모델만 다운로드하면 됩니다.
Kontext 모델의 다양한 버전
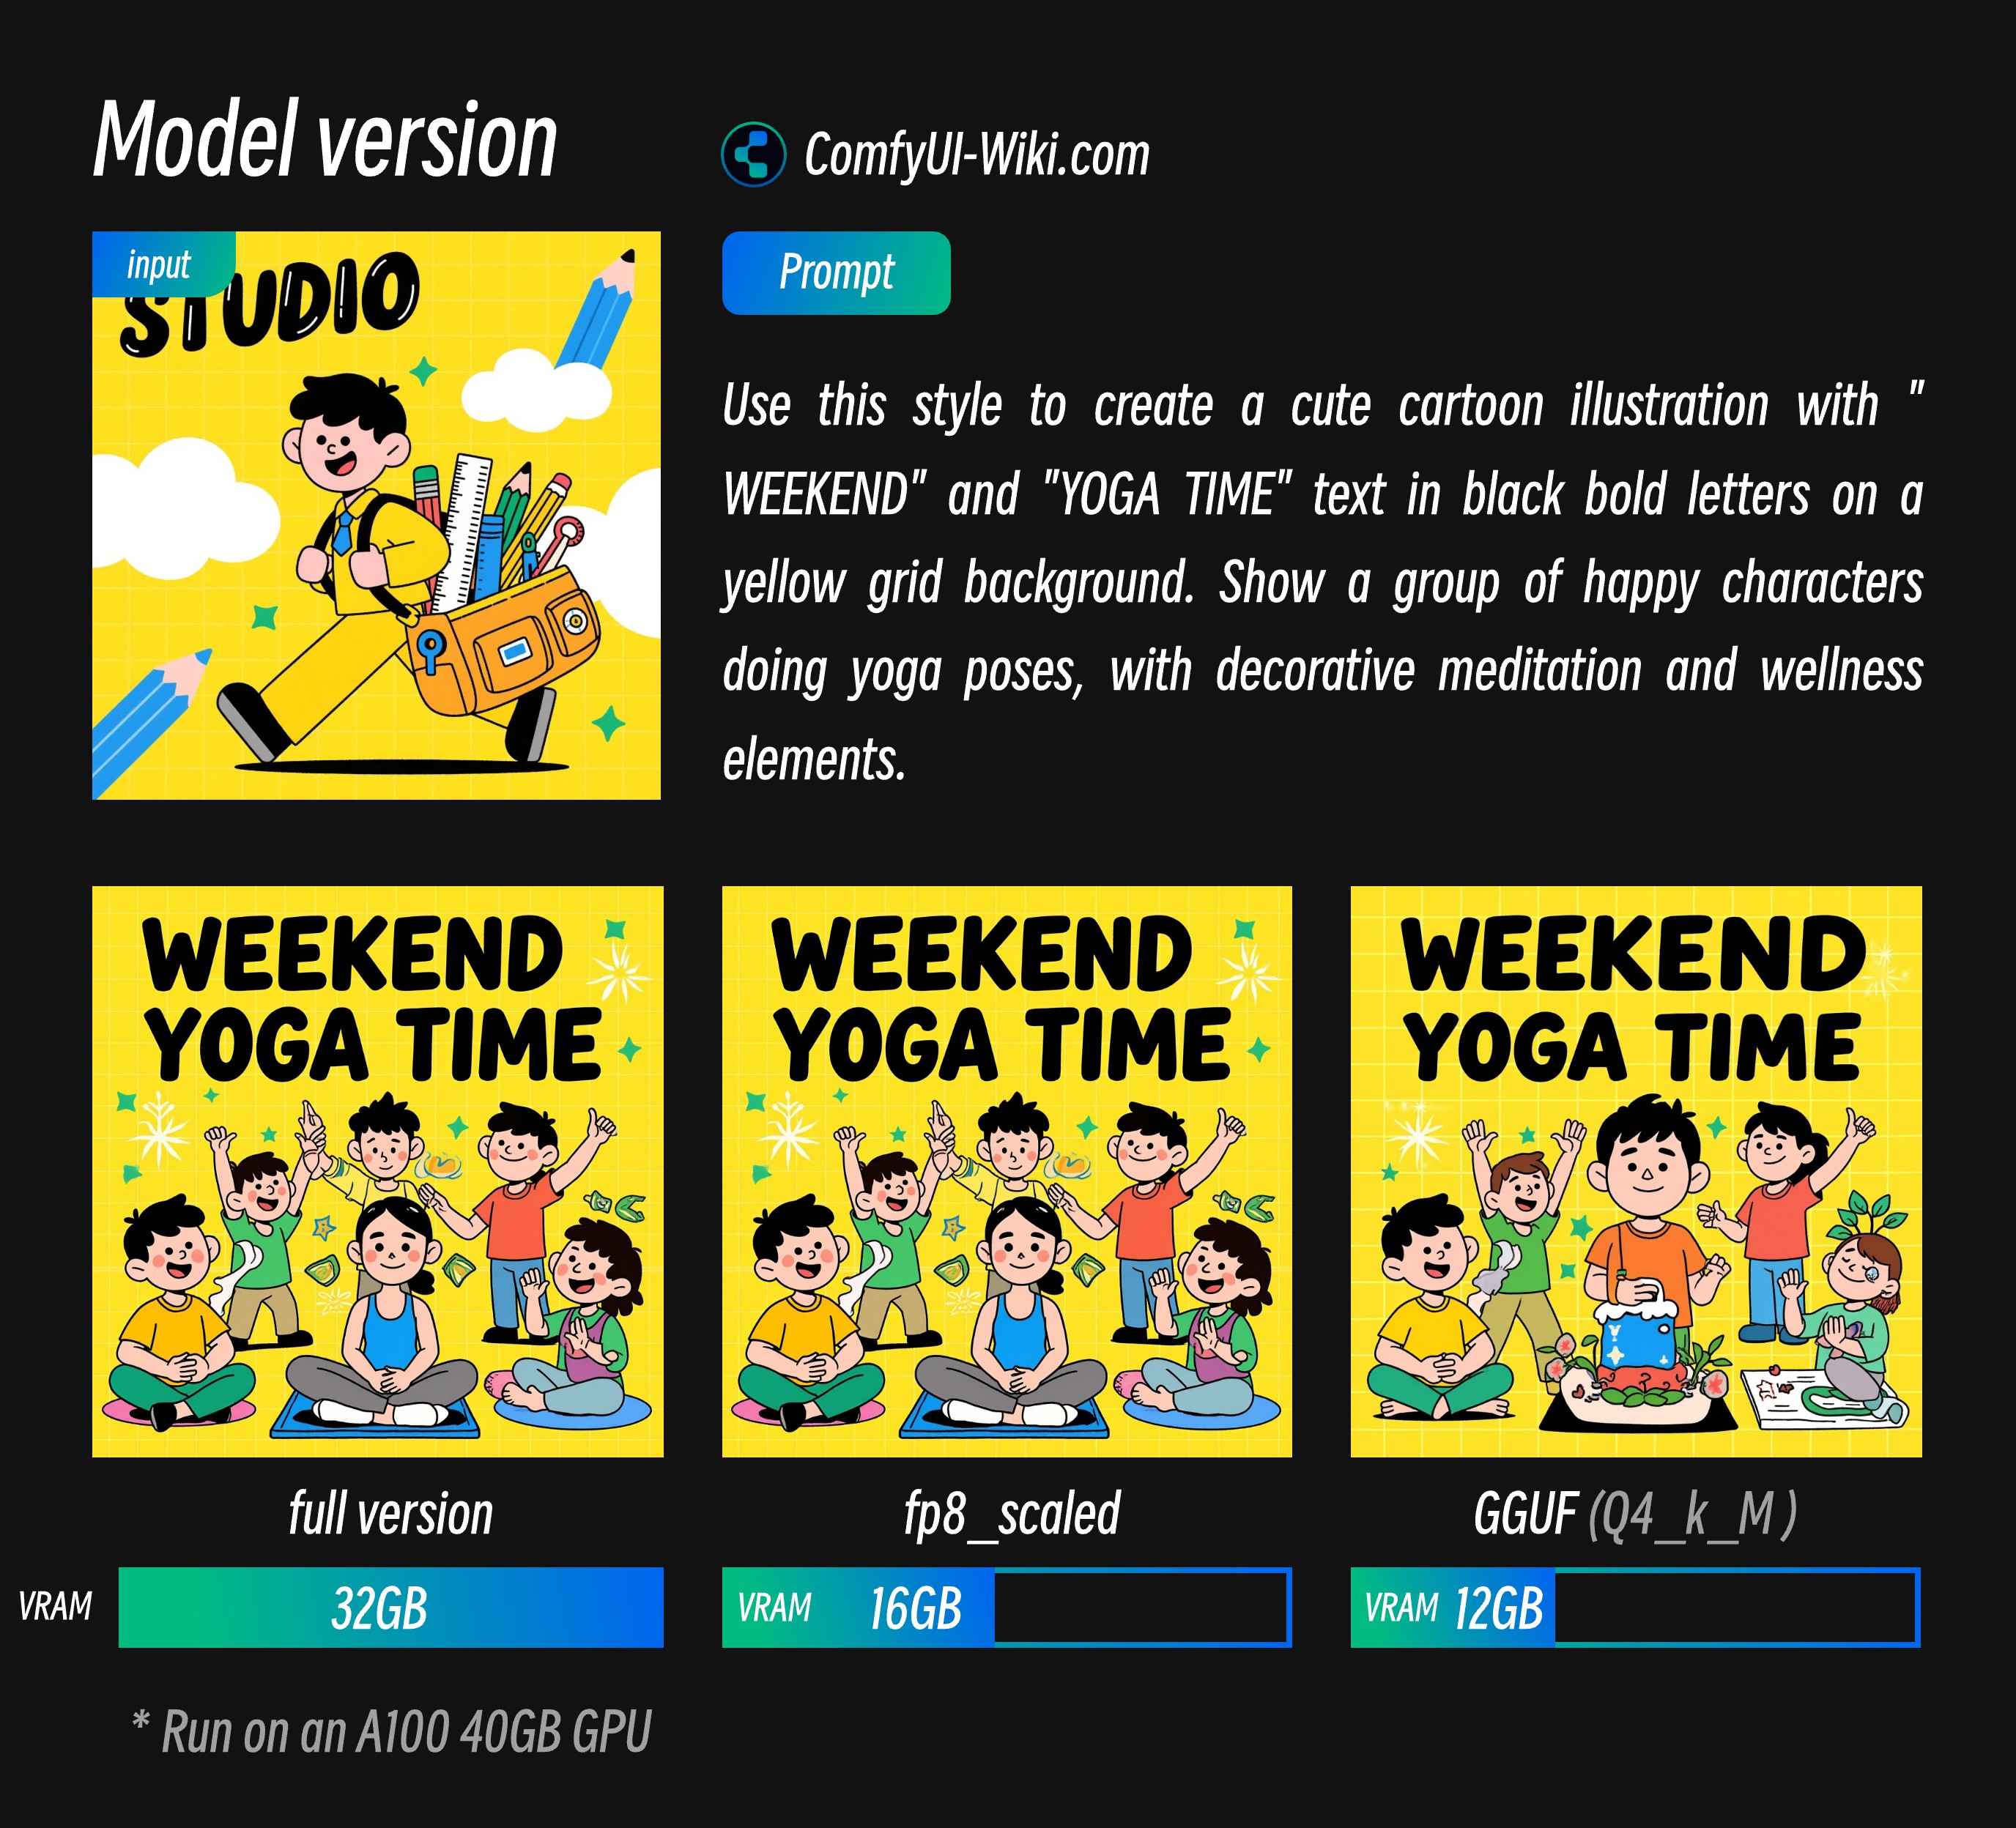
여기에는 세 가지 버전의 모델을 모아 두었습니다. 필요에 따라 하나를 선택해 다운로드할 수 있습니다. 원본 버전과 Fp8 버전은 ComfyUI에서 사용법과 저장 위치가 동일하지만, GGUF 버전은 ComfyUI/models/Unet/ 디렉터리에 저장하고 ComfyUI-GGUF의 Unet Loader (GGUF) 노드로 로드해야 합니다.
Flux.1 Kontext Dev 원본 모델 가중치 및 커뮤니티 버전
- Black Forest Labs 원본 버전: flux1-kontext-dev.safetensors
- ComfyOrg FP8 버전: flux1-dev-kontext_fp8_scaled.safetensors
- 커뮤니티 GGUF 버전: FLUX.1-Kontext-dev-GGUF
- Nunchaku 가속 추론 버전: nunchaku-flux.1-kontext-dev
Flux.1 Kontext Dev 다양한 모델 버전의 효과 및 VRAM 요구 사항 비교
Text Encoder
VAE
모델 저장 위치
📂 ComfyUI/
├── 📂 models/
│   ├── 📂 diffusion_models/
│   │   └── flux1-dev-kontext_fp8_scaled.safetensors or flux1-kontext-dev.safetensors
│   ├── 📂 unet/
│   │   └── such as flux1-kontext-dev-Q4_K_M.gguf, # Only download if you need GGUF version
│   ├── 📂 vae/
│   │   └── ae.safetensors
│   └── 📂 text_encoders/
│       ├── clip_l.safetensors
│       └── t5xxl_fp16.safetensors or t5xxl_fp8_e4m3fn_scaled.safetensors
ComfyUI Flux.1 Kontext Dev 네이티브 기본 워크플로
기본 워크플로의 경우, 제가 이미 ComfyUI 템플릿에 해당 템플릿을 만들어 두었으므로 ComfyUI에서 Flux.1 Kontext Dev 관련 템플릿을 찾아 사용하시면 됩니다.
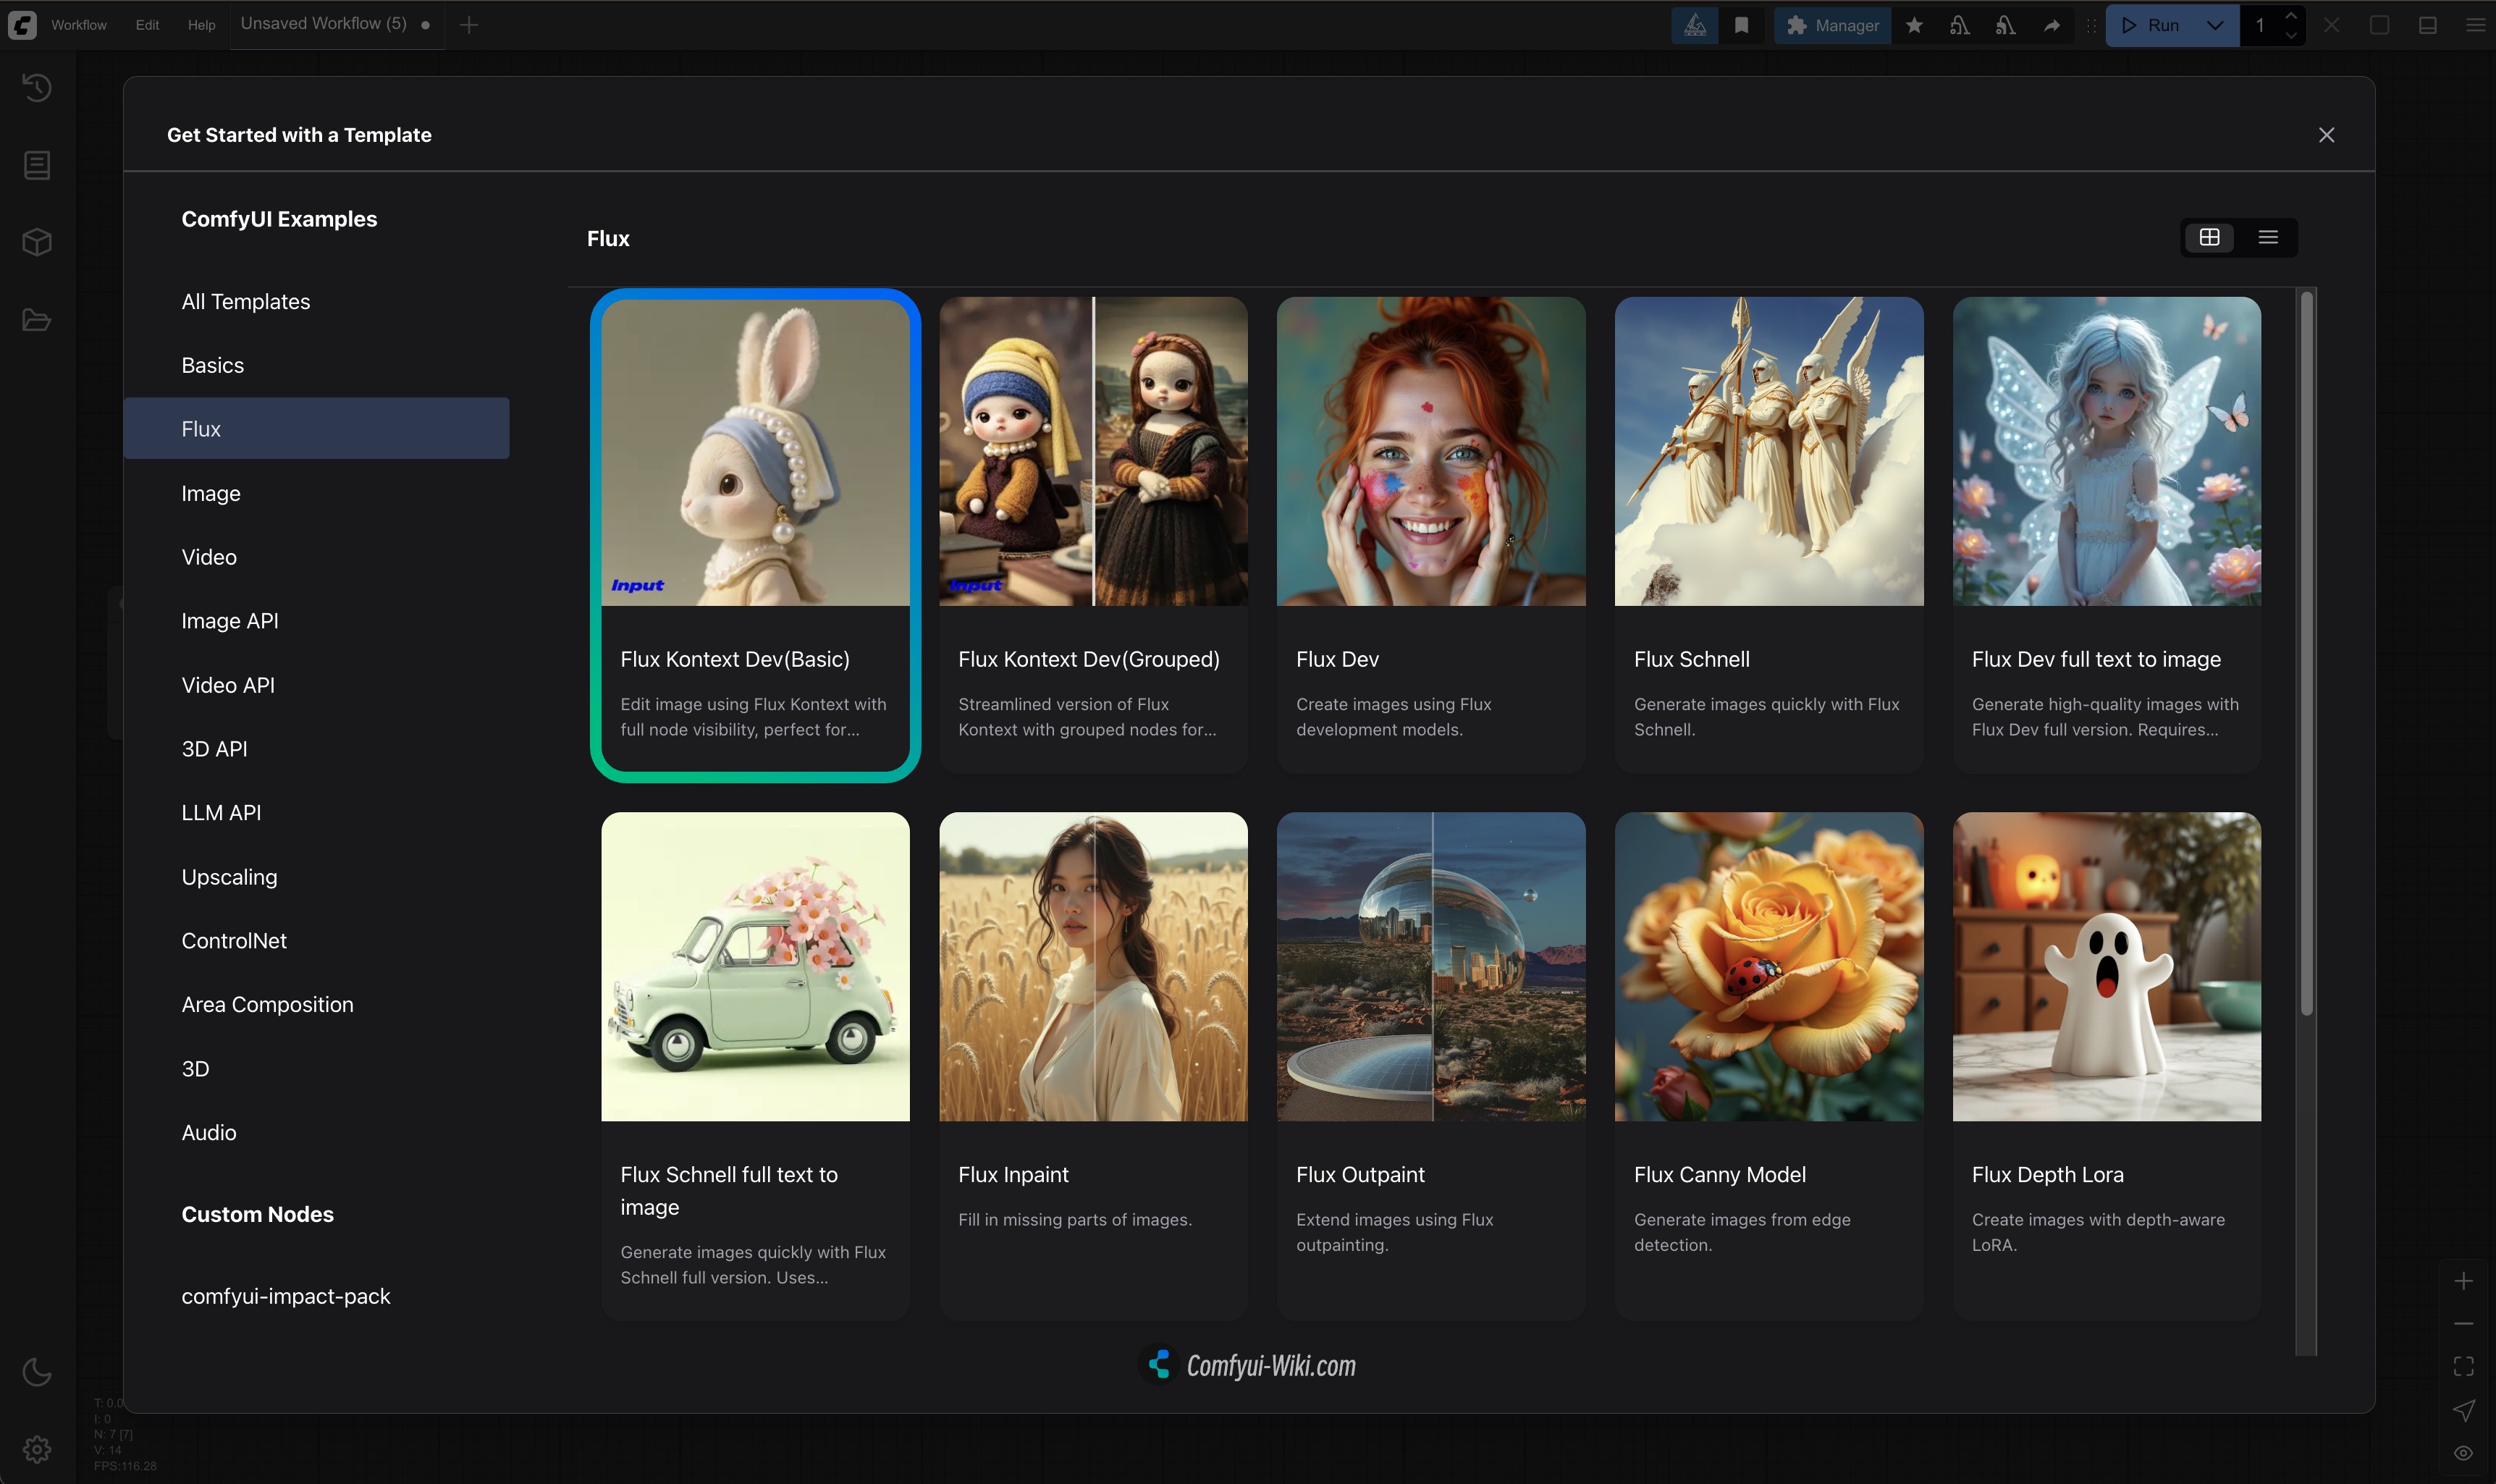
1. 워크플로 및 샘플 자료 다운로드
아래 파일을 다운로드한 뒤 ComfyUI로 드래그하면 해당 워크플로를 로드할 수 있습니다.
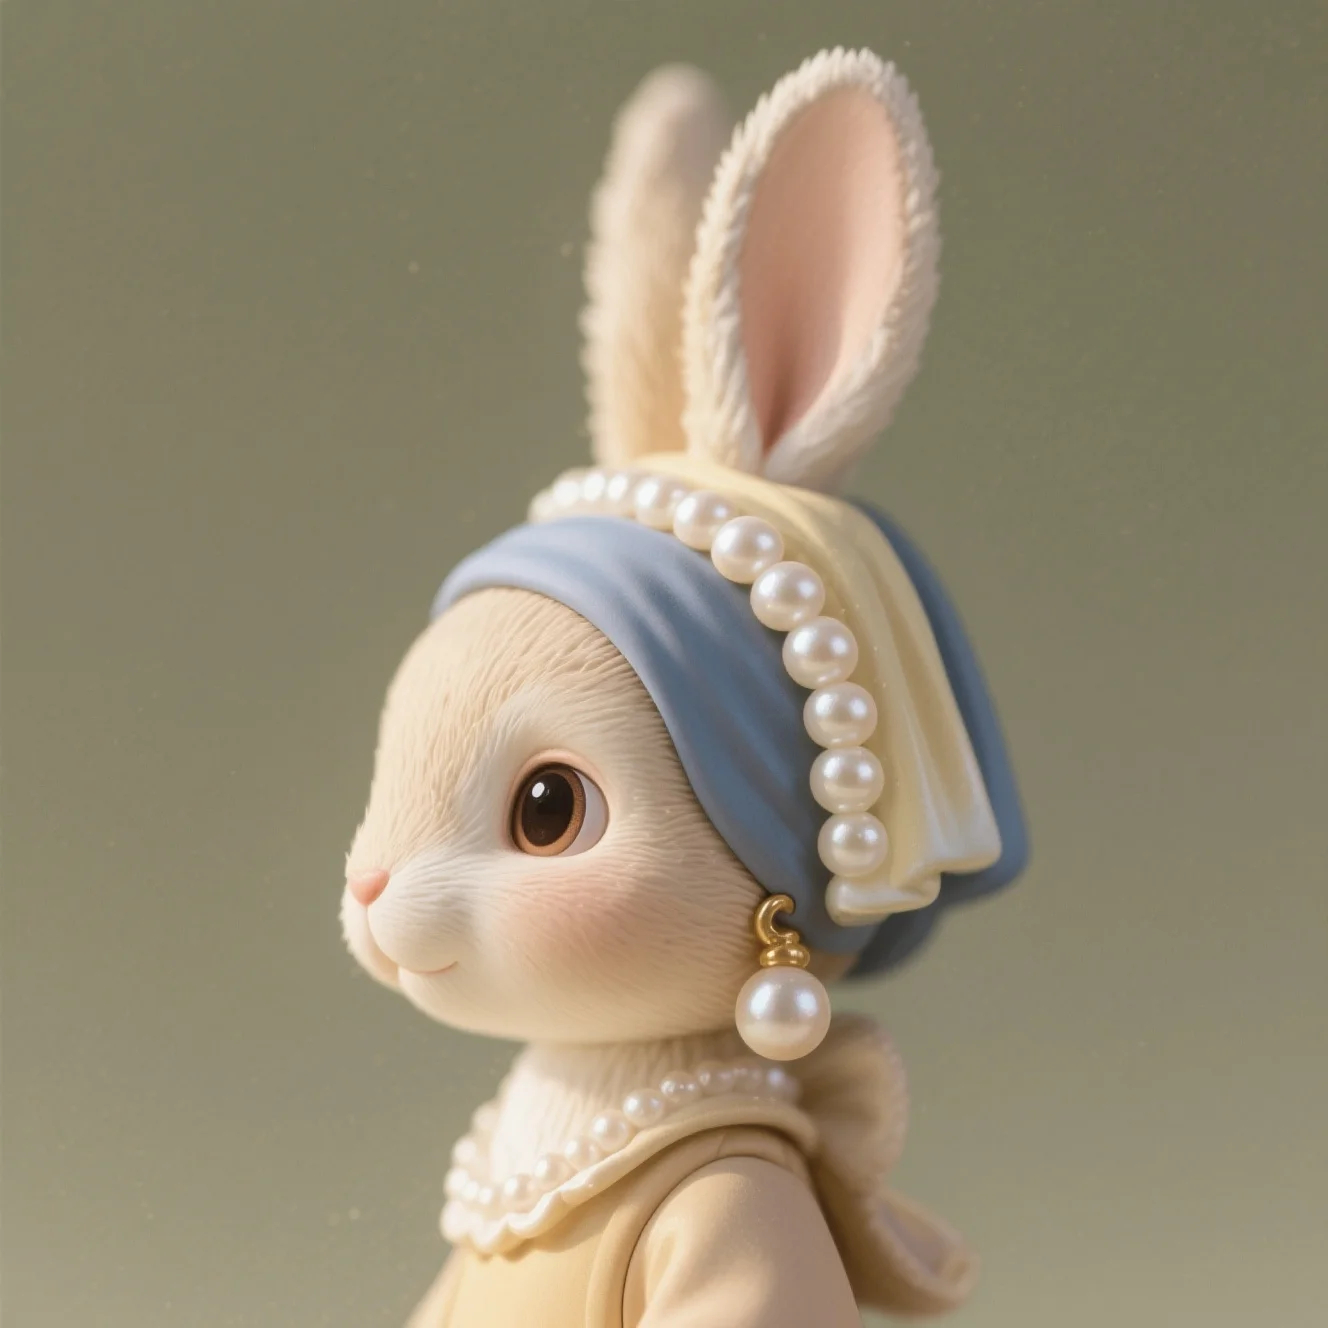
입력 이미지
2. 워크플로 완료 단계
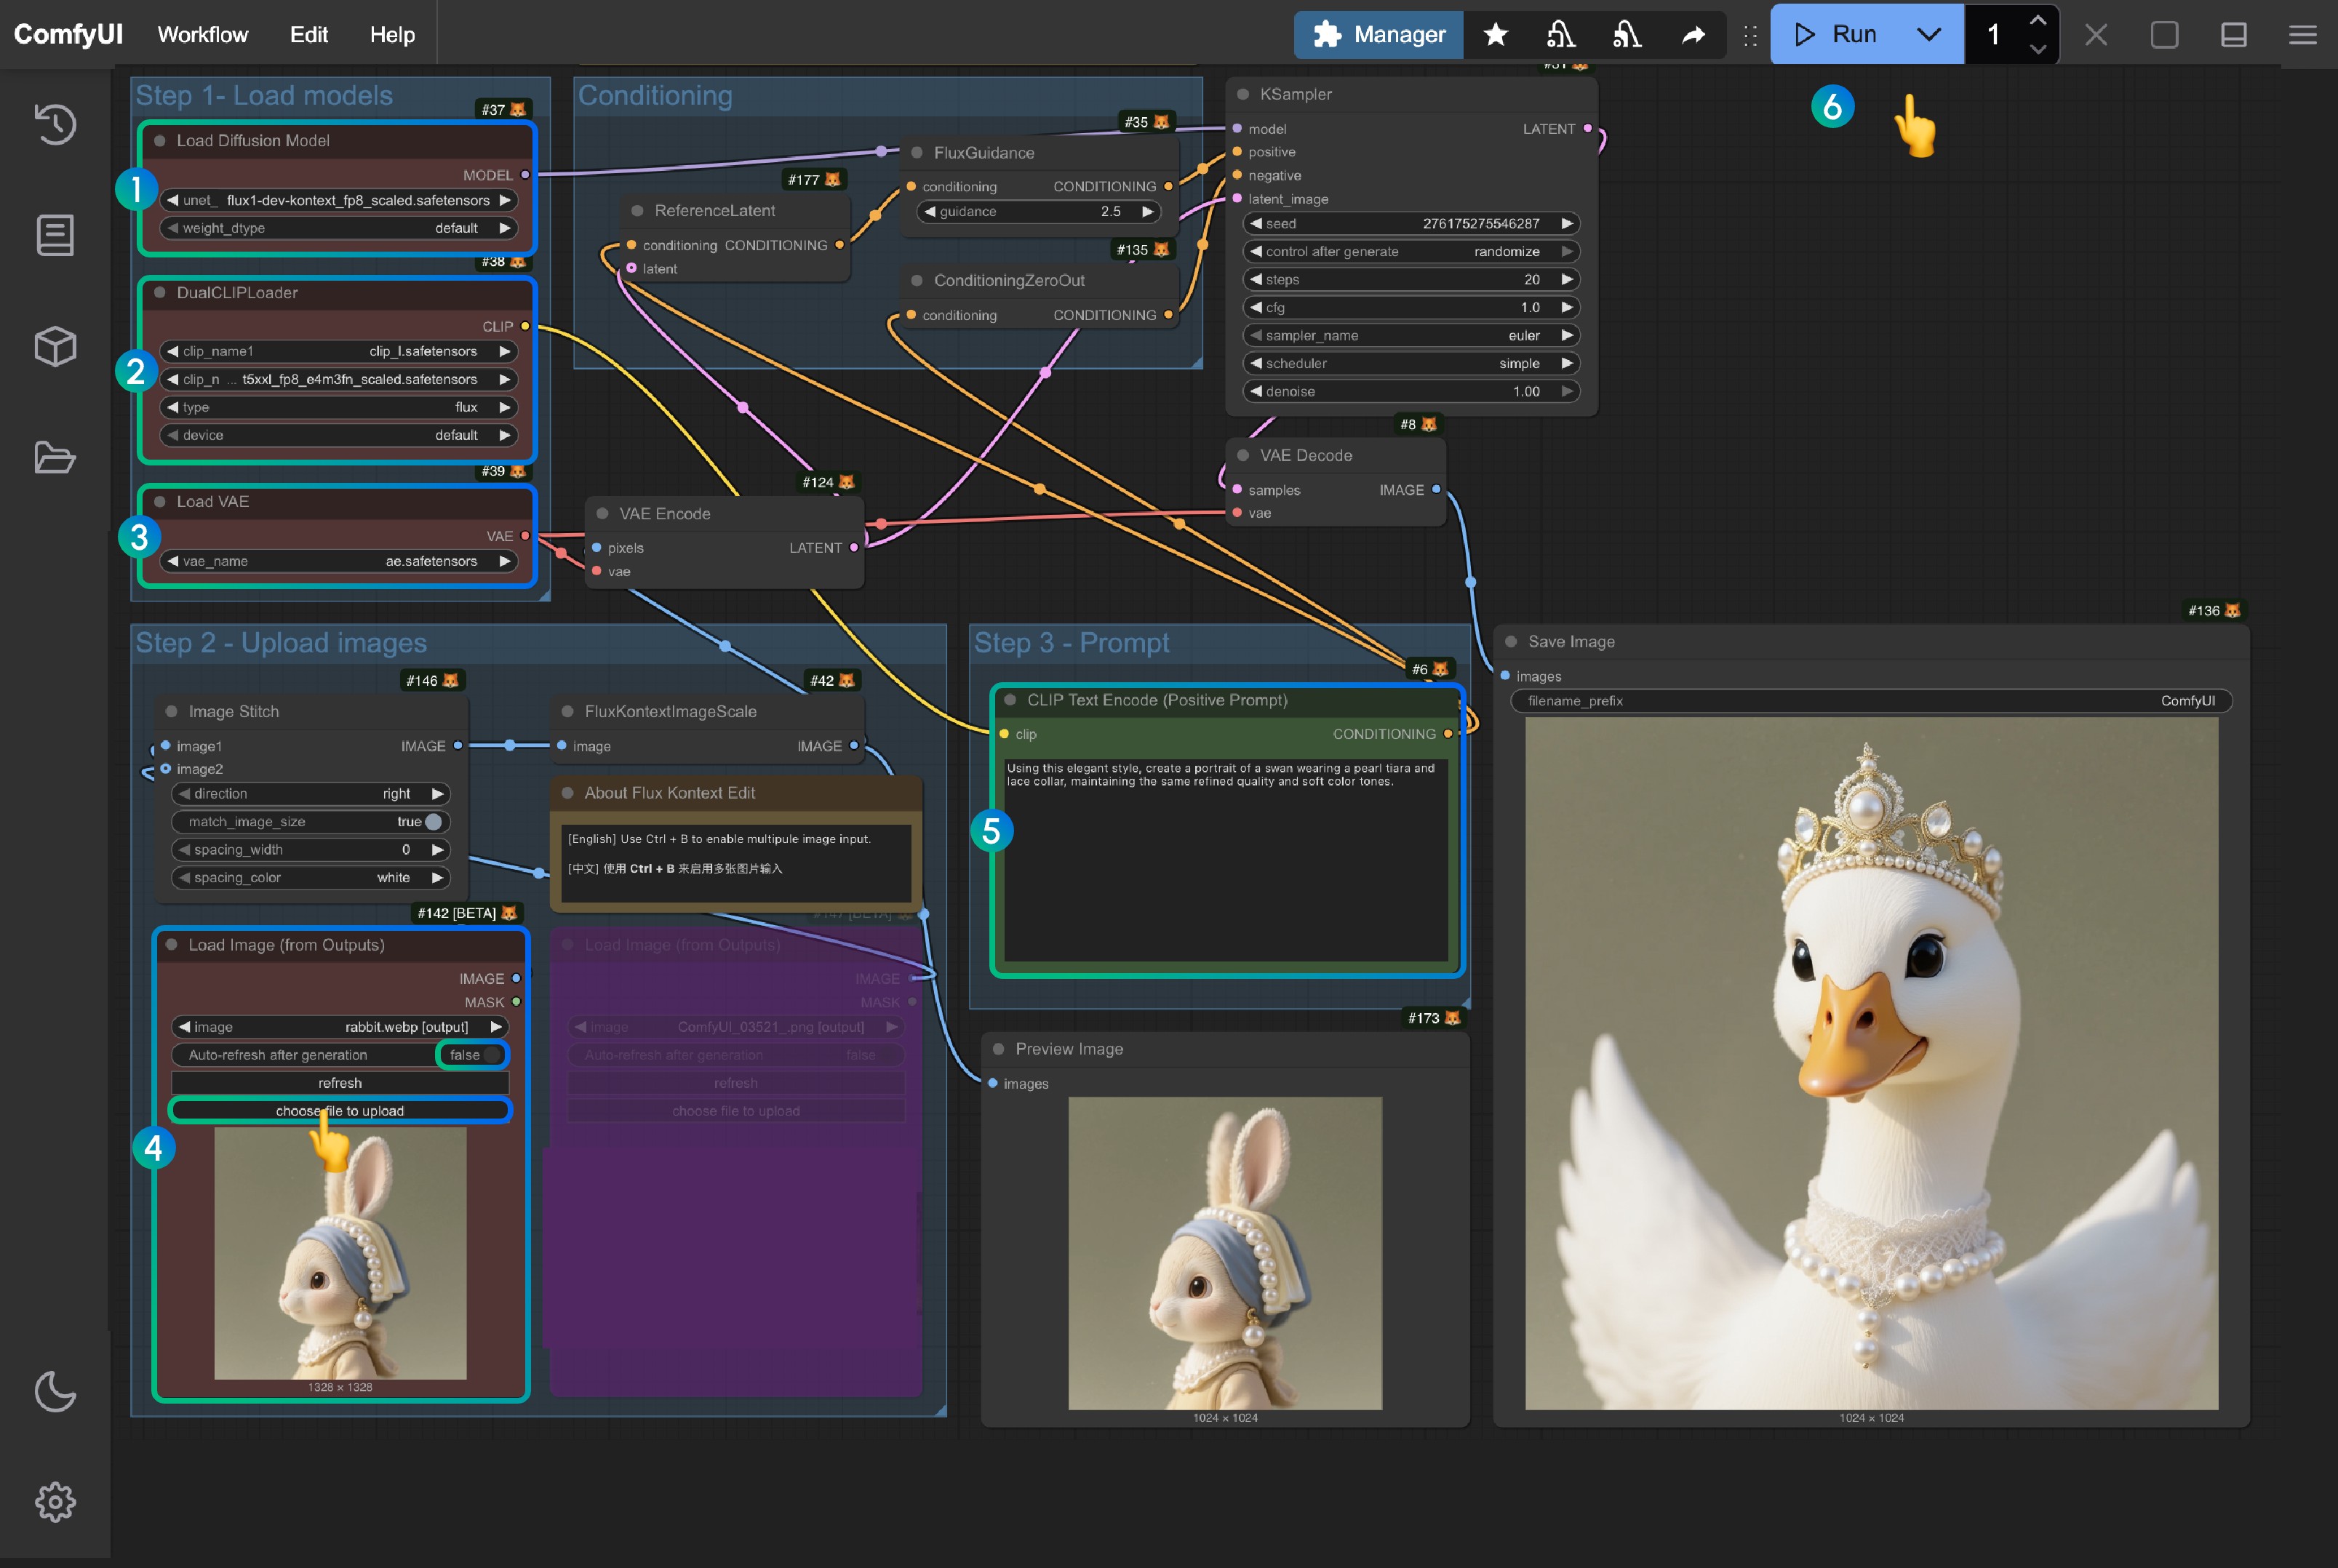
이미지의 번호를 참고하여 워크플로를 완료할 수 있습니다:
Load Diffusion Model노드에서flux1-dev-kontext_fp8_scaled.safetensors모델을 로드합니다DualCLIP Load노드에서clip_l.safetensors와t5xxl_fp16.safetensors또는t5xxl_fp8_e4m3fn_scaled.safetensors가 로드되었는지 확인합니다Load VAE노드에서ae.safetensors모델이 로드되었는지 확인합니다Load Image(from output)노드에서 제공된 입력 이미지를 로드합니다CLIP Text Encode노드에서 프롬프트를 수정합니다. 영어만 지원됩니다Queue버튼을 클릭하거나 단축키Ctrl(cmd) + Enter를 사용하여 워크플로를 실행합니다
FLUX.1 Kontext Dev GGUF 버전 워크플로
GGUF 모델을 사용하려면 ComfyUI-GGUF의 Unet Loader (GGUF) 노드가 필요합니다. 먼저 ComfyUI-Manager로 해당 플러그인을 설치하거나, 커스텀 노드 설치 방법을 참고해 커스텀 노드를 설치하는 방법을 알아보세요.
관련 워크플로는 매우 간단합니다. Flux.1 Kontext Dev 기본 워크플로의 워크플로를 그대로 사용하고 Load Diffusion Model 노드를 Unet Loader (GGUF) 노드로 교체하기만 하면 됩니다.
워크플로 파일 다운로드

단계별 안내
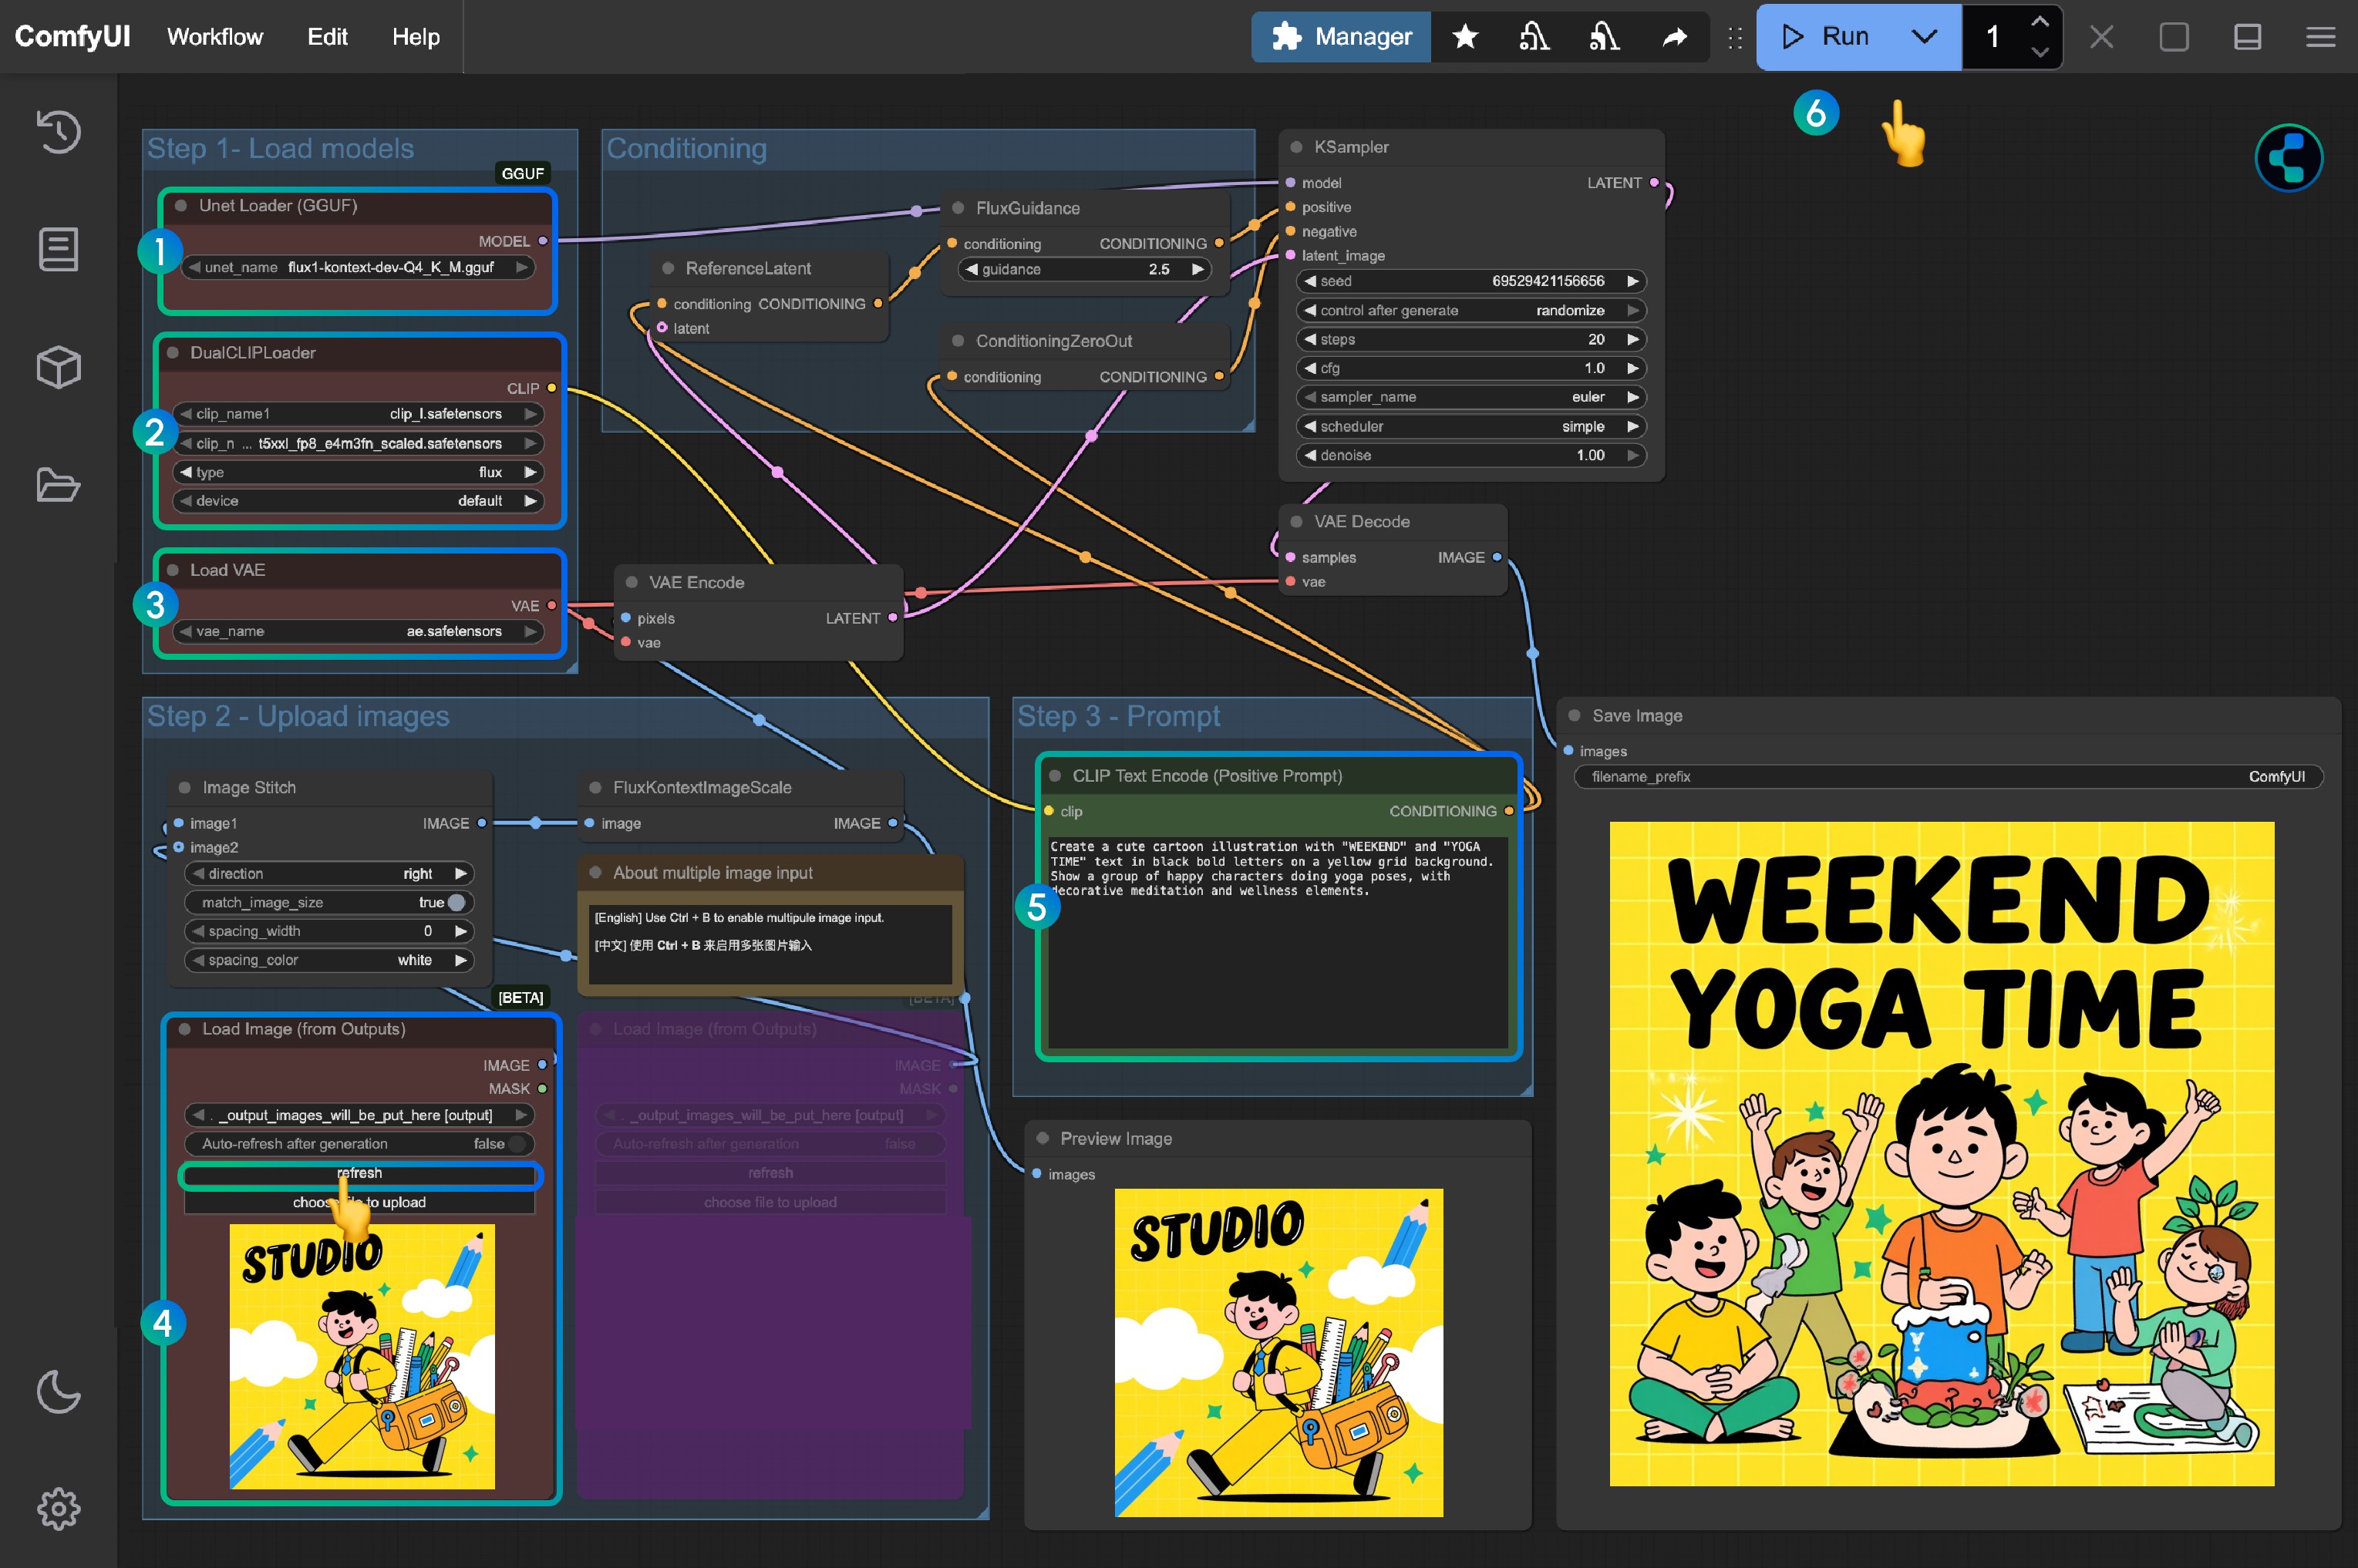
Unet Loader (GGUF)노드에서flux1-kontext-dev-Q4_K_M.gguf(또는 다른 버전)를 로드합니다DualCLIP Load노드에clip_l.safetensors와t5xxl_fp16.safetensors또는t5xxl_fp8_e4m3fn_scaled.safetensors가 로드되었는지 확인합니다Load VAE노드에ae.safetensors모델이 로드되었는지 확인합니다Load Image(from output)노드에 제공된 입력 이미지를 로드합니다CLIP Text Encode노드의 프롬프트를 수정합니다. 영어만 지원됩니다Queue버튼을 클릭하거나 단축키Ctrl(cmd) + Enter를 사용해 워크플로를 실행합니다
Flux.1 Kontext Dev 가속 추론 버전
이 섹션에서는 Flux.1 Kontext Dev 가속의 두 가지 버전인 Nunchaku와 TeaCache를 다룹니다.
- Nunchaku는 전용 모델이 필요합니다
- TeaCache는 원본 워크플로와 GGUF 워크플로에서 사용할 수 있습니다
Flux.1 Kontext Dev Nunchaku 가속 추론 버전
Nunchaku 가속 추론 버전은 MIT-HAN-LAB에서 제공하며, 이 버전을 사용하려면 전용 모델이 필요합니다. 현재 두 가지 버전의 모델이 있습니다:
- Blackwell 아키텍처 50 시리즈 GPU 전용 버전: svdq-fp4_r32-flux.1-kontext-dev.safetensors
- 기타 GPU: svdq-int4_r32-flux.1-kontext-dev.safetensors
해당 모델 역시 설치하여 ComfyUI/models/diffusion_models/ 디렉터리에 다운로드해야 합니다.
아래 비디오를 참고하여 해당 워크플로 튜토리얼을 완료할 수 있습니다:
이 워크플로는 제 커스텀 노드 ComfyUI-Wiki-Workflows에서 로드되며, 이 커스텀 노드는 워크플로만 포함하고 의존성이 없습니다.
1. 커스텀 노드 설치
플러그인 주소: ComfyUI-nunchaku
Nunchaku 모델을 사용하려면 Nunchaku 노드를 사용하고 해당 wheel을 설치해야 합니다. 자세한 내용은 커스텀 노드 설치 방법 섹션을 참고하세요.
- 최초 설치 후에는 해당 wheel이 설치되지 않아 몇몇 노드가 여전히 누락된 상태이므로, wheel을 설치해야 합니다
- "Nunchaku Wheel Installer" 노드를 사용해 wheel을 설치하고, 설치가 끝나면 ComfyUI를 재시작하세요
2. 워크플로 파일 다운로드
아래 이미지를 입력 이미지로 다운로드하세요

3. 전체 워크플로 단계
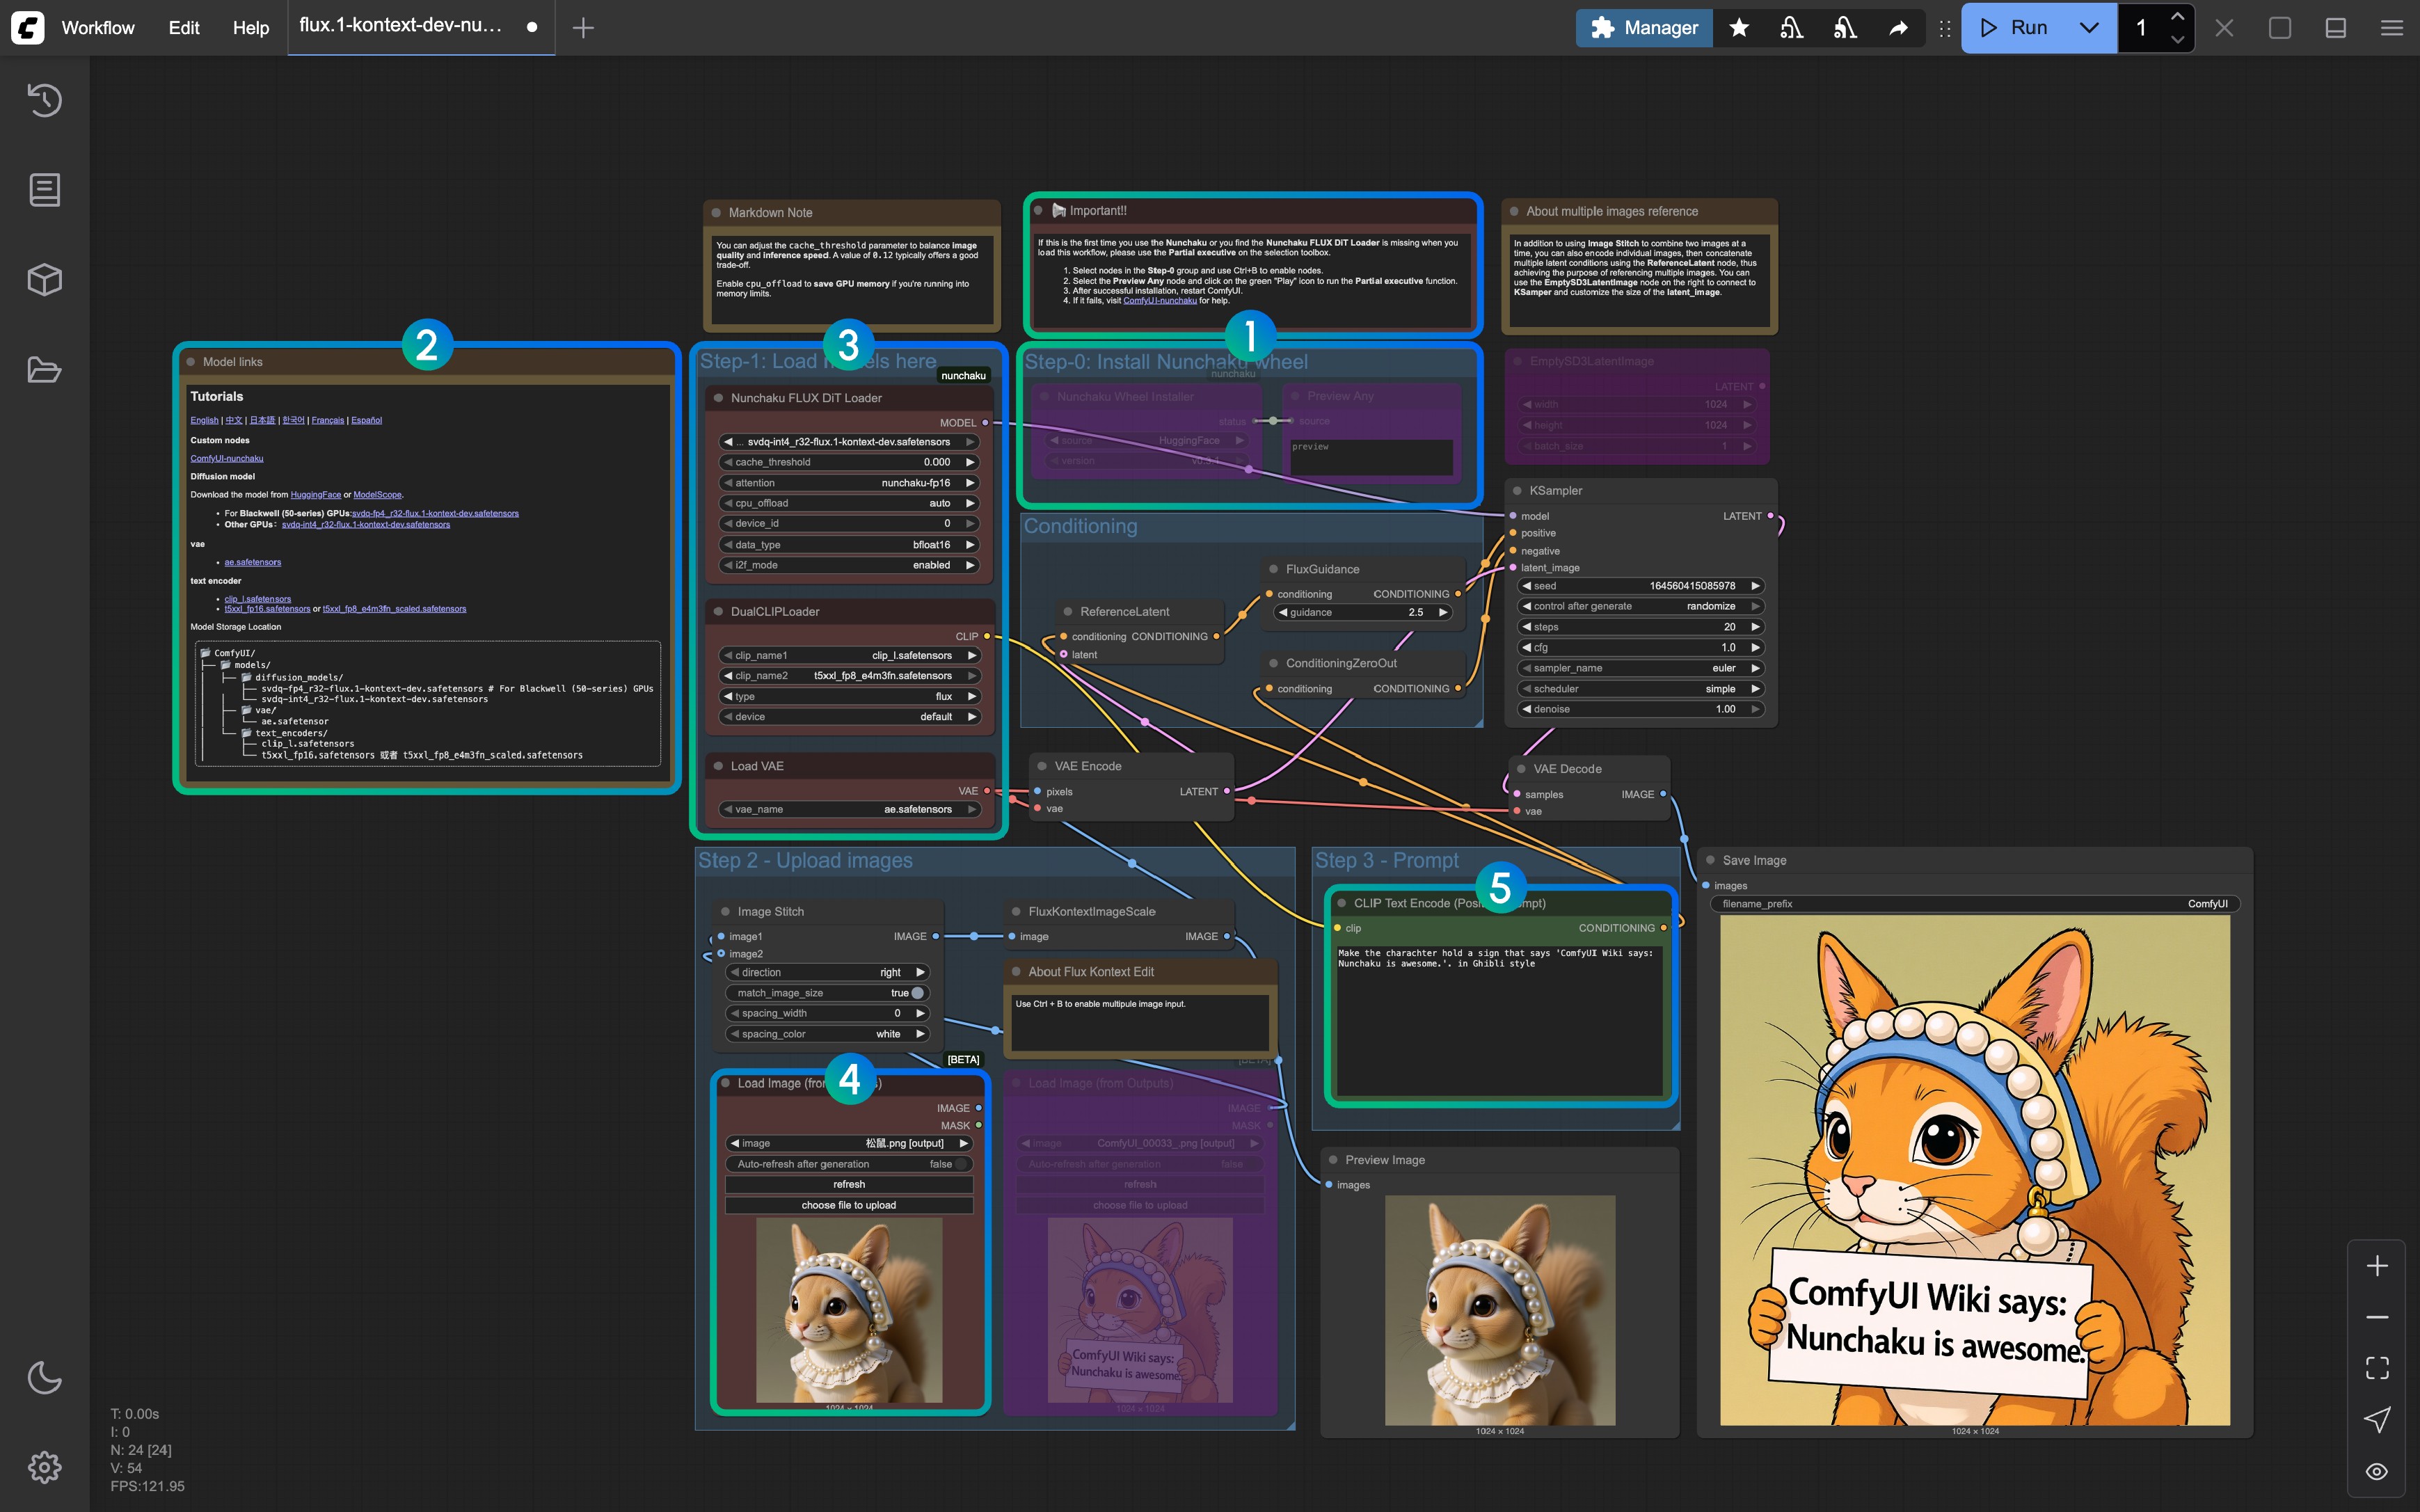
- 안내 사항을 참고하여 처음 실행할 때는 Step-0 이외의 노드를 삭제한 다음 워크플로를 실행해 Nunchaku wheel을 설치하고, 이후 ComfyUI를 재시작하여 워크플로를 다시 로드하세요
- 해당 마크다운 노드에 관련 모델 링크와 커스텀 노드 링크가 제공됩니다
- 모든 모델이 올바르게 로드되었는지 확인하세요 (Blackwell 아키텍처 GPU와 기타 GPU를 구분하세요)
Load Image(from output)노드에서 제공된 입력 이미지를 로드하세요CLIP Text Encode노드에서 프롬프트를 수정하세요. 영어만 지원됩니다Queue버튼을 클릭하거나 단축키Ctrl(cmd) + Enter를 사용하여 워크플로를 실행하세요
Nunchaku와 관련해 문제가 있다면 ComfyUI-nunchaku에서 더 많은 도움을 확인하세요.
Flux.1 Kontext Dev TeaCache 가속 버전
이 버전을 사용하려면 ComfyUI-Teaache 플러그인을 설치해야 합니다. 워크플로를 로드한 후 ComfyUI 매니저의 누락된 노드 설치 기능을 사용할 수 있습니다.
1. 워크플로 파일
동일한 이미지를 입력으로 사용하세요
2. 전체 워크플로 단계
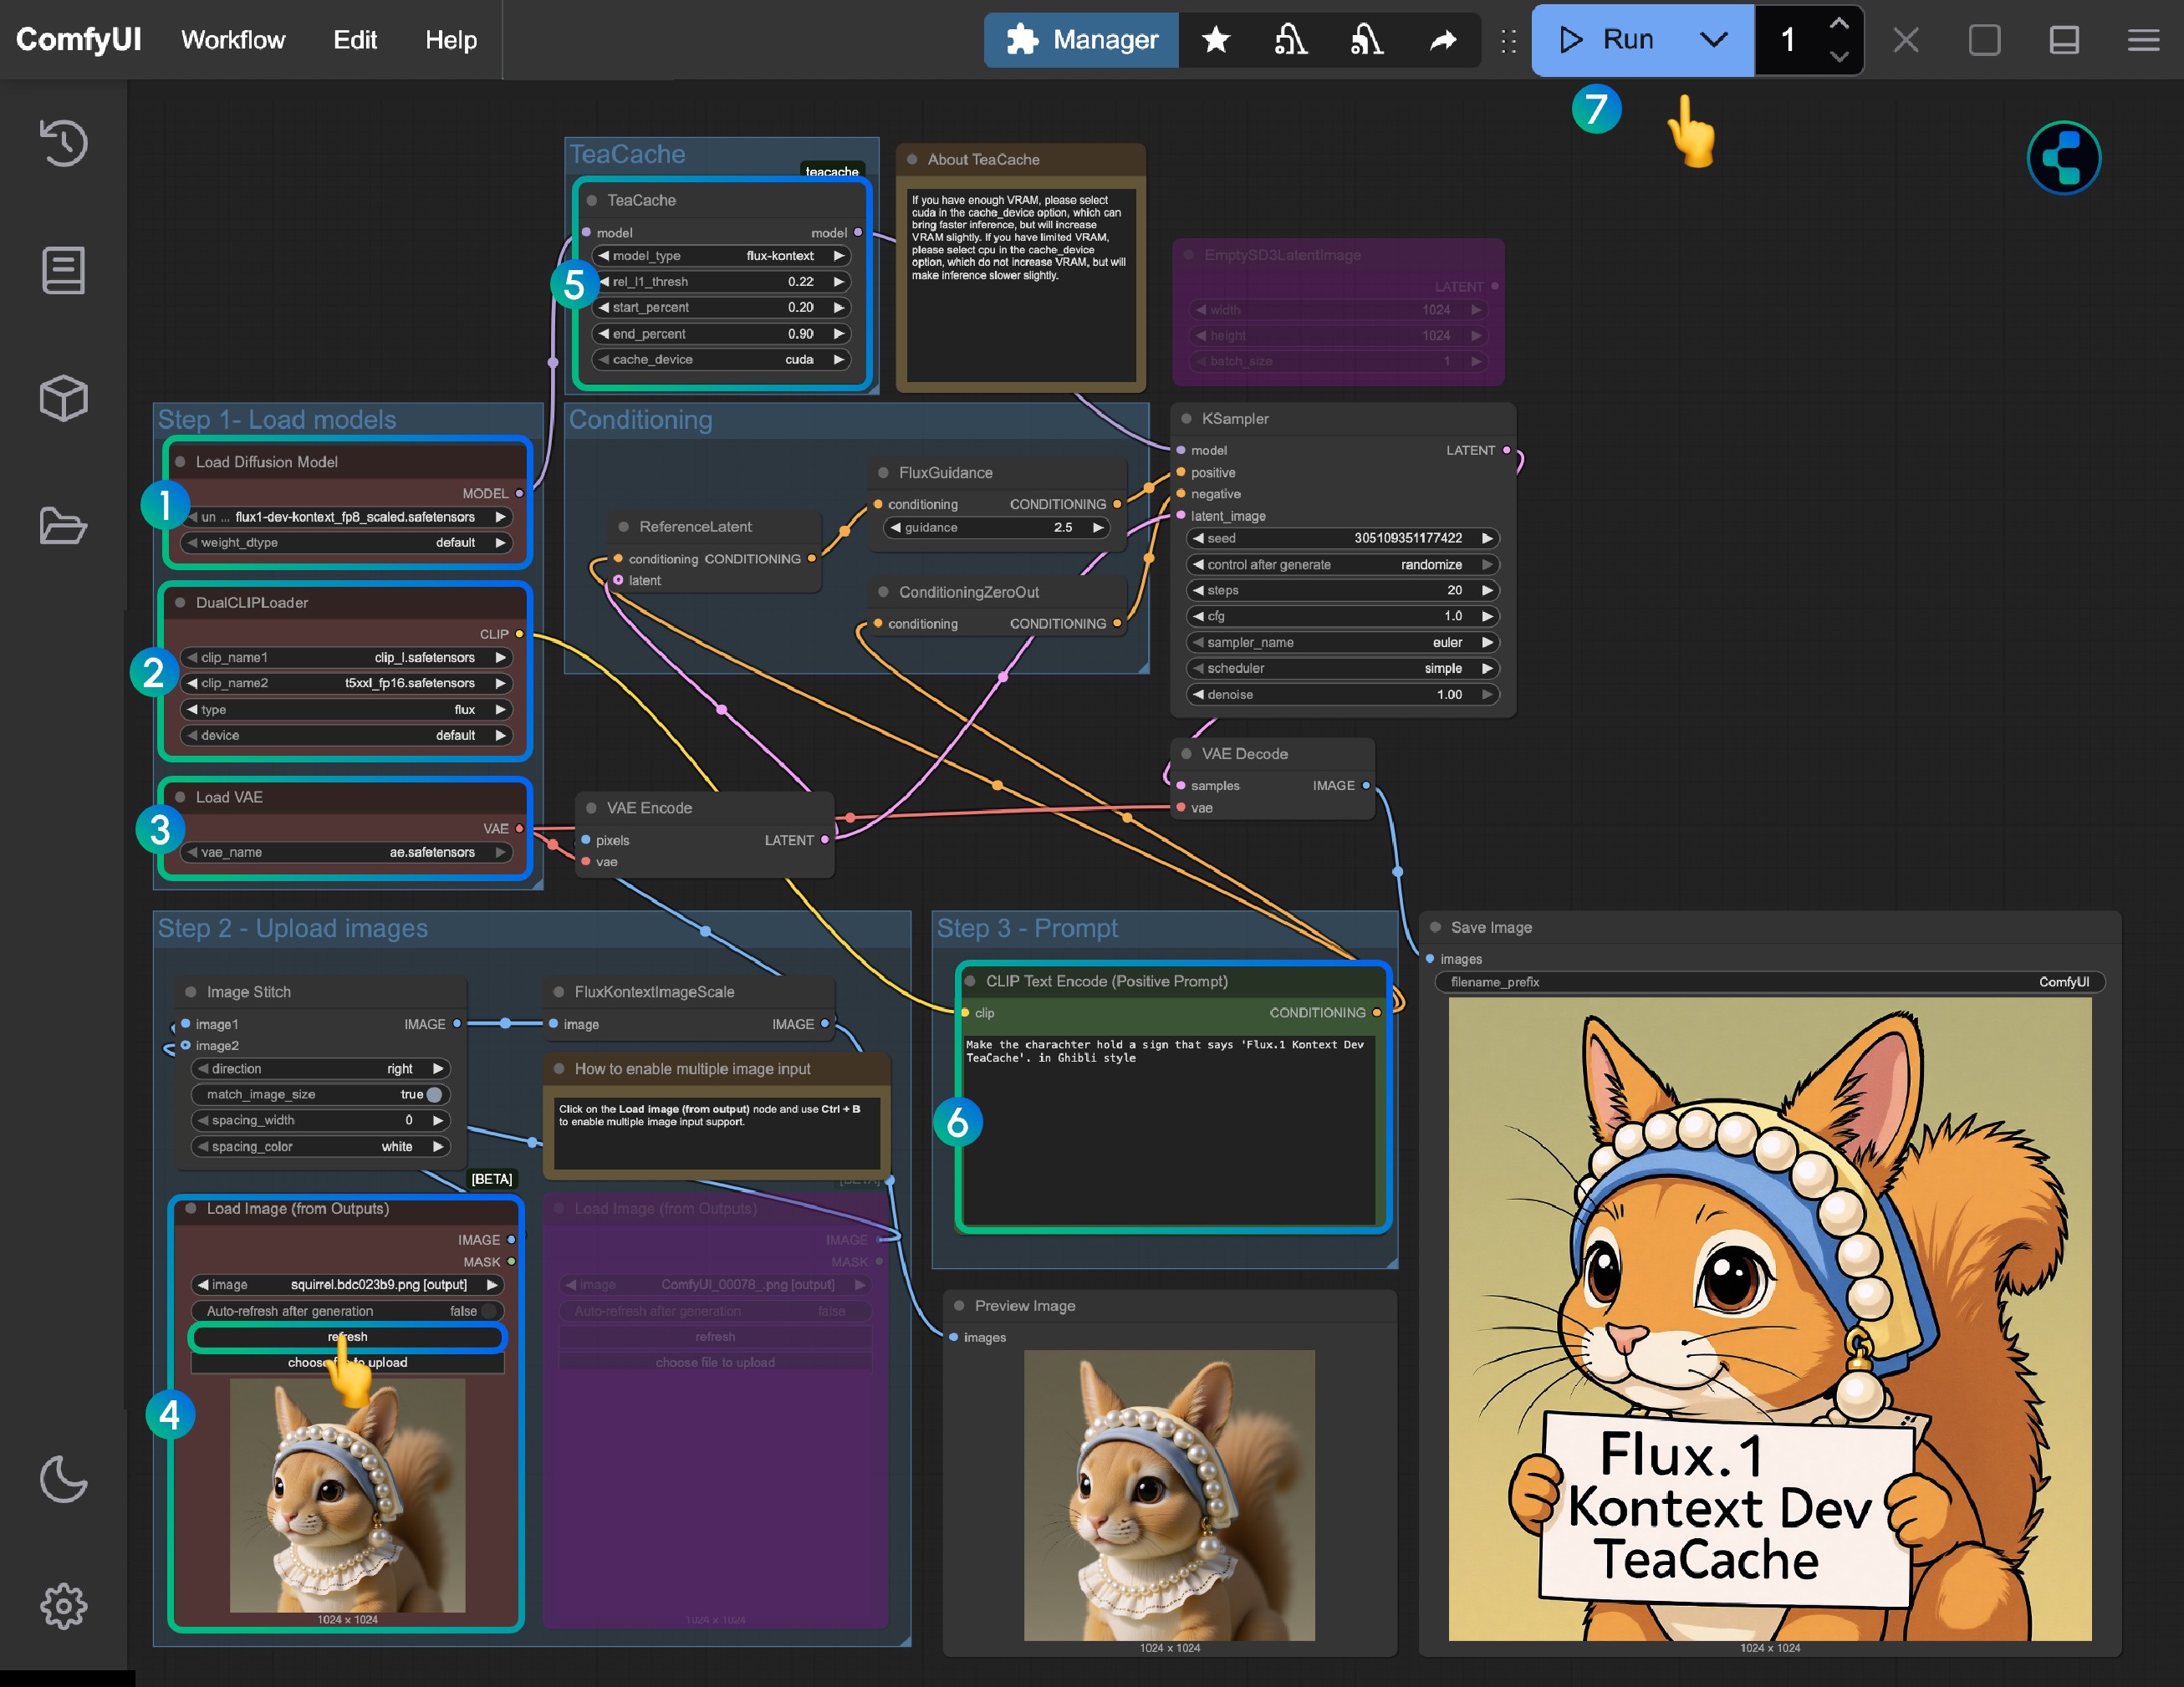
Load Diffusion Model노드에서flux1-dev-kontext_fp8_scaled.safetensors모델을 로드하세요DualCLIP Load노드에서clip_l.safetensors와t5xxl_fp16.safetensors또는t5xxl_fp8_e4m3fn_scaled.safetensors가 로드되었는지 확인하세요Load VAE노드에서ae.safetensors모델이 로드되었는지 확인하세요Load Image(from output)노드에서 제공된 입력 이미지를 로드하세요TeaCache노드에는 기본 설정이 적용되어 있으므로 따로 조정할 필요가 없습니다. 이 노드가 누락된 경우 ComfyUI-Manager를 사용해 ComfyUI-Teaache를 설치하세요CLIP Text Encode노드에서 프롬프트를 수정하세요. 영어만 지원됩니다Queue버튼을 클릭하거나 단축키Ctrl(cmd) + Enter를 사용하여 워크플로를 실행하세요
Flux.1 Kontext Dev 다중 라운드 이미지 편집 구현
1. Load Image(from output) 노드 사용
다중 라운드 편집의 경우 Load Image(from output) 노드의 잠재적인 문제가 이번 Flux.1 Kontext Dev 릴리스 지원에서 수정되었습니다. 기본 워크플로우에서는 Load Image(from output) 노드를 직접 사용하여 이전 라운드의 출력 이미지를 로드할 수 있습니다.
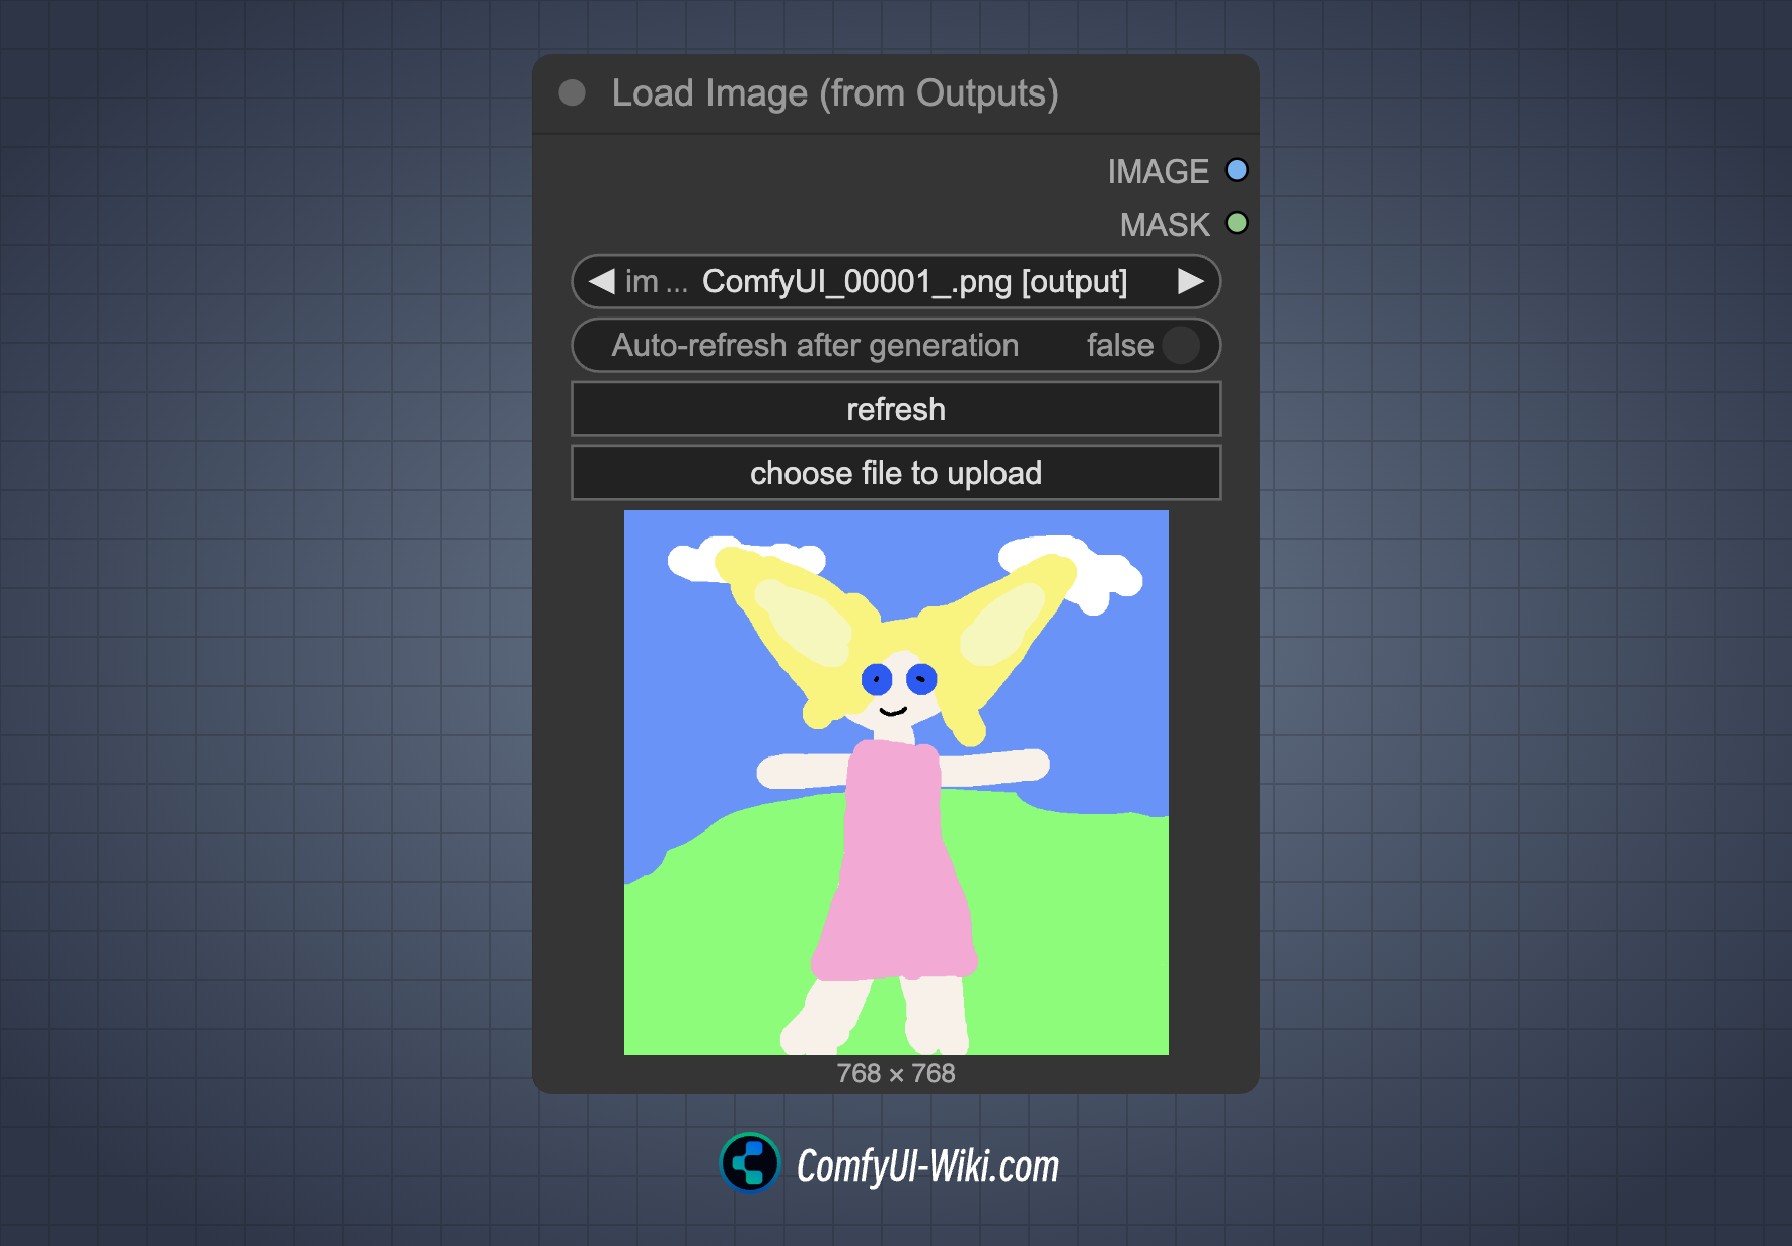
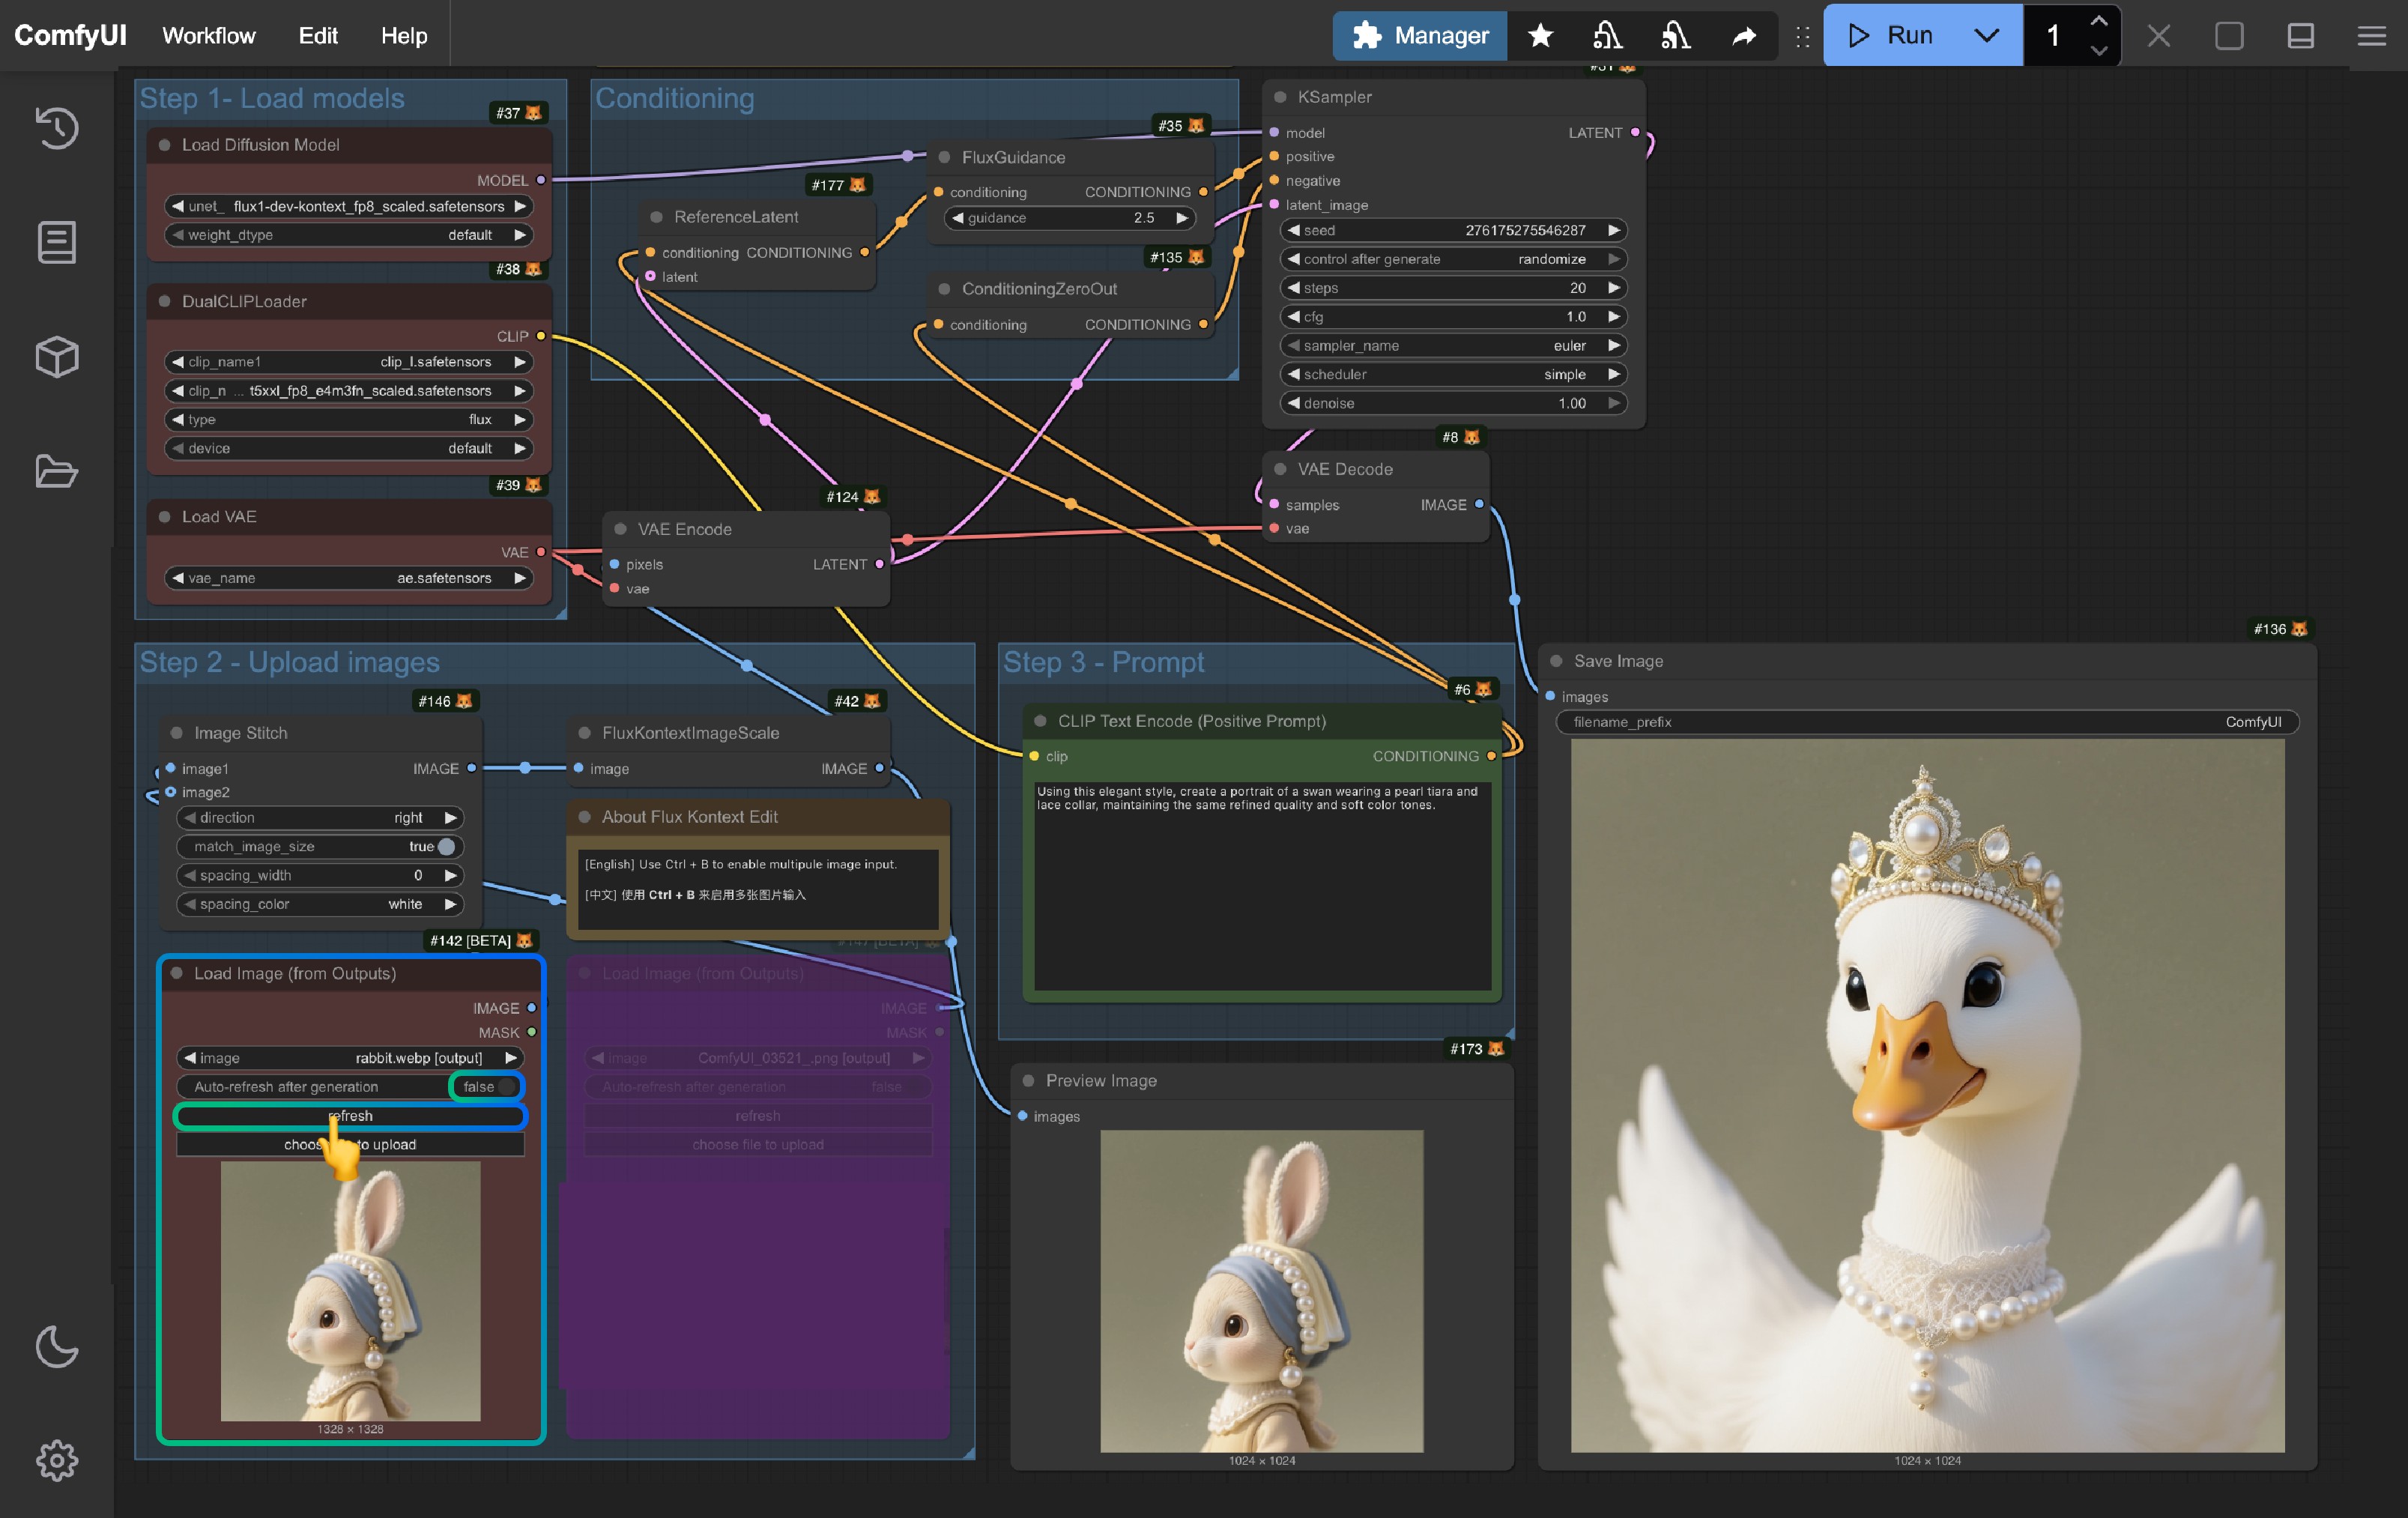
현재 워크플로우 결과를 편집하려면 refresh 버튼을 클릭하여 최신 출력 이미지를 가져온 후 워크플로우를 다시 실행하세요.
2. 그룹 노드 사용
그룹 노드는 Flux.1 Kontext Dev 버전을 위해 추가된 새로운 기능입니다. 그룹 노드를 추가할 수 있도록 선택 도구 상자에 빠른 Edit 버튼이 추가되었습니다. 구체적인 사용법은 이 비디오를 참고하세요:
Load Image 노드에서 시작하여 해당 선택 도구 상자 기능을 사용해 새로운 그룹 노드를 추가할 수 있습니다:
- 각 그룹 노드의 시드가 고정되어 있으므로 마지막 그룹 노드만 실행됩니다
- 결과가 만족스럽지 않으면 시드를 변경하고 워크플로우를 다시 실행할 수 있습니다
- 분기를 생성하여 다양한 분기와 편집 효과를 탐색할 수 있습니다
다중 이미지 입력 참조
다중 이미지 입력의 경우, 현재 ComfyUI에는 두 가지 구현 방법이 있습니다:
- Image Stitch 노드를 사용해 여러 이미지를 하나의 이미지로 이어 붙이기
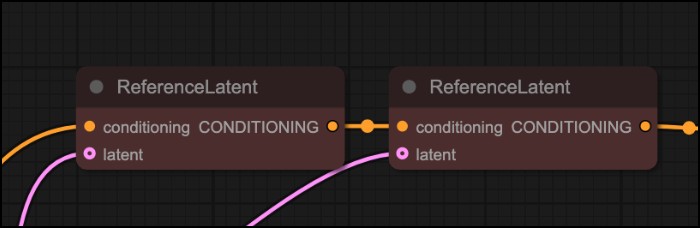
- 서로 다른 이미지를 각각 잠재 공간으로 인코딩한 다음, 여러 ReferenceLatent 노드 조건을 연결하기
두 방법의 비교는 다음과 같습니다:
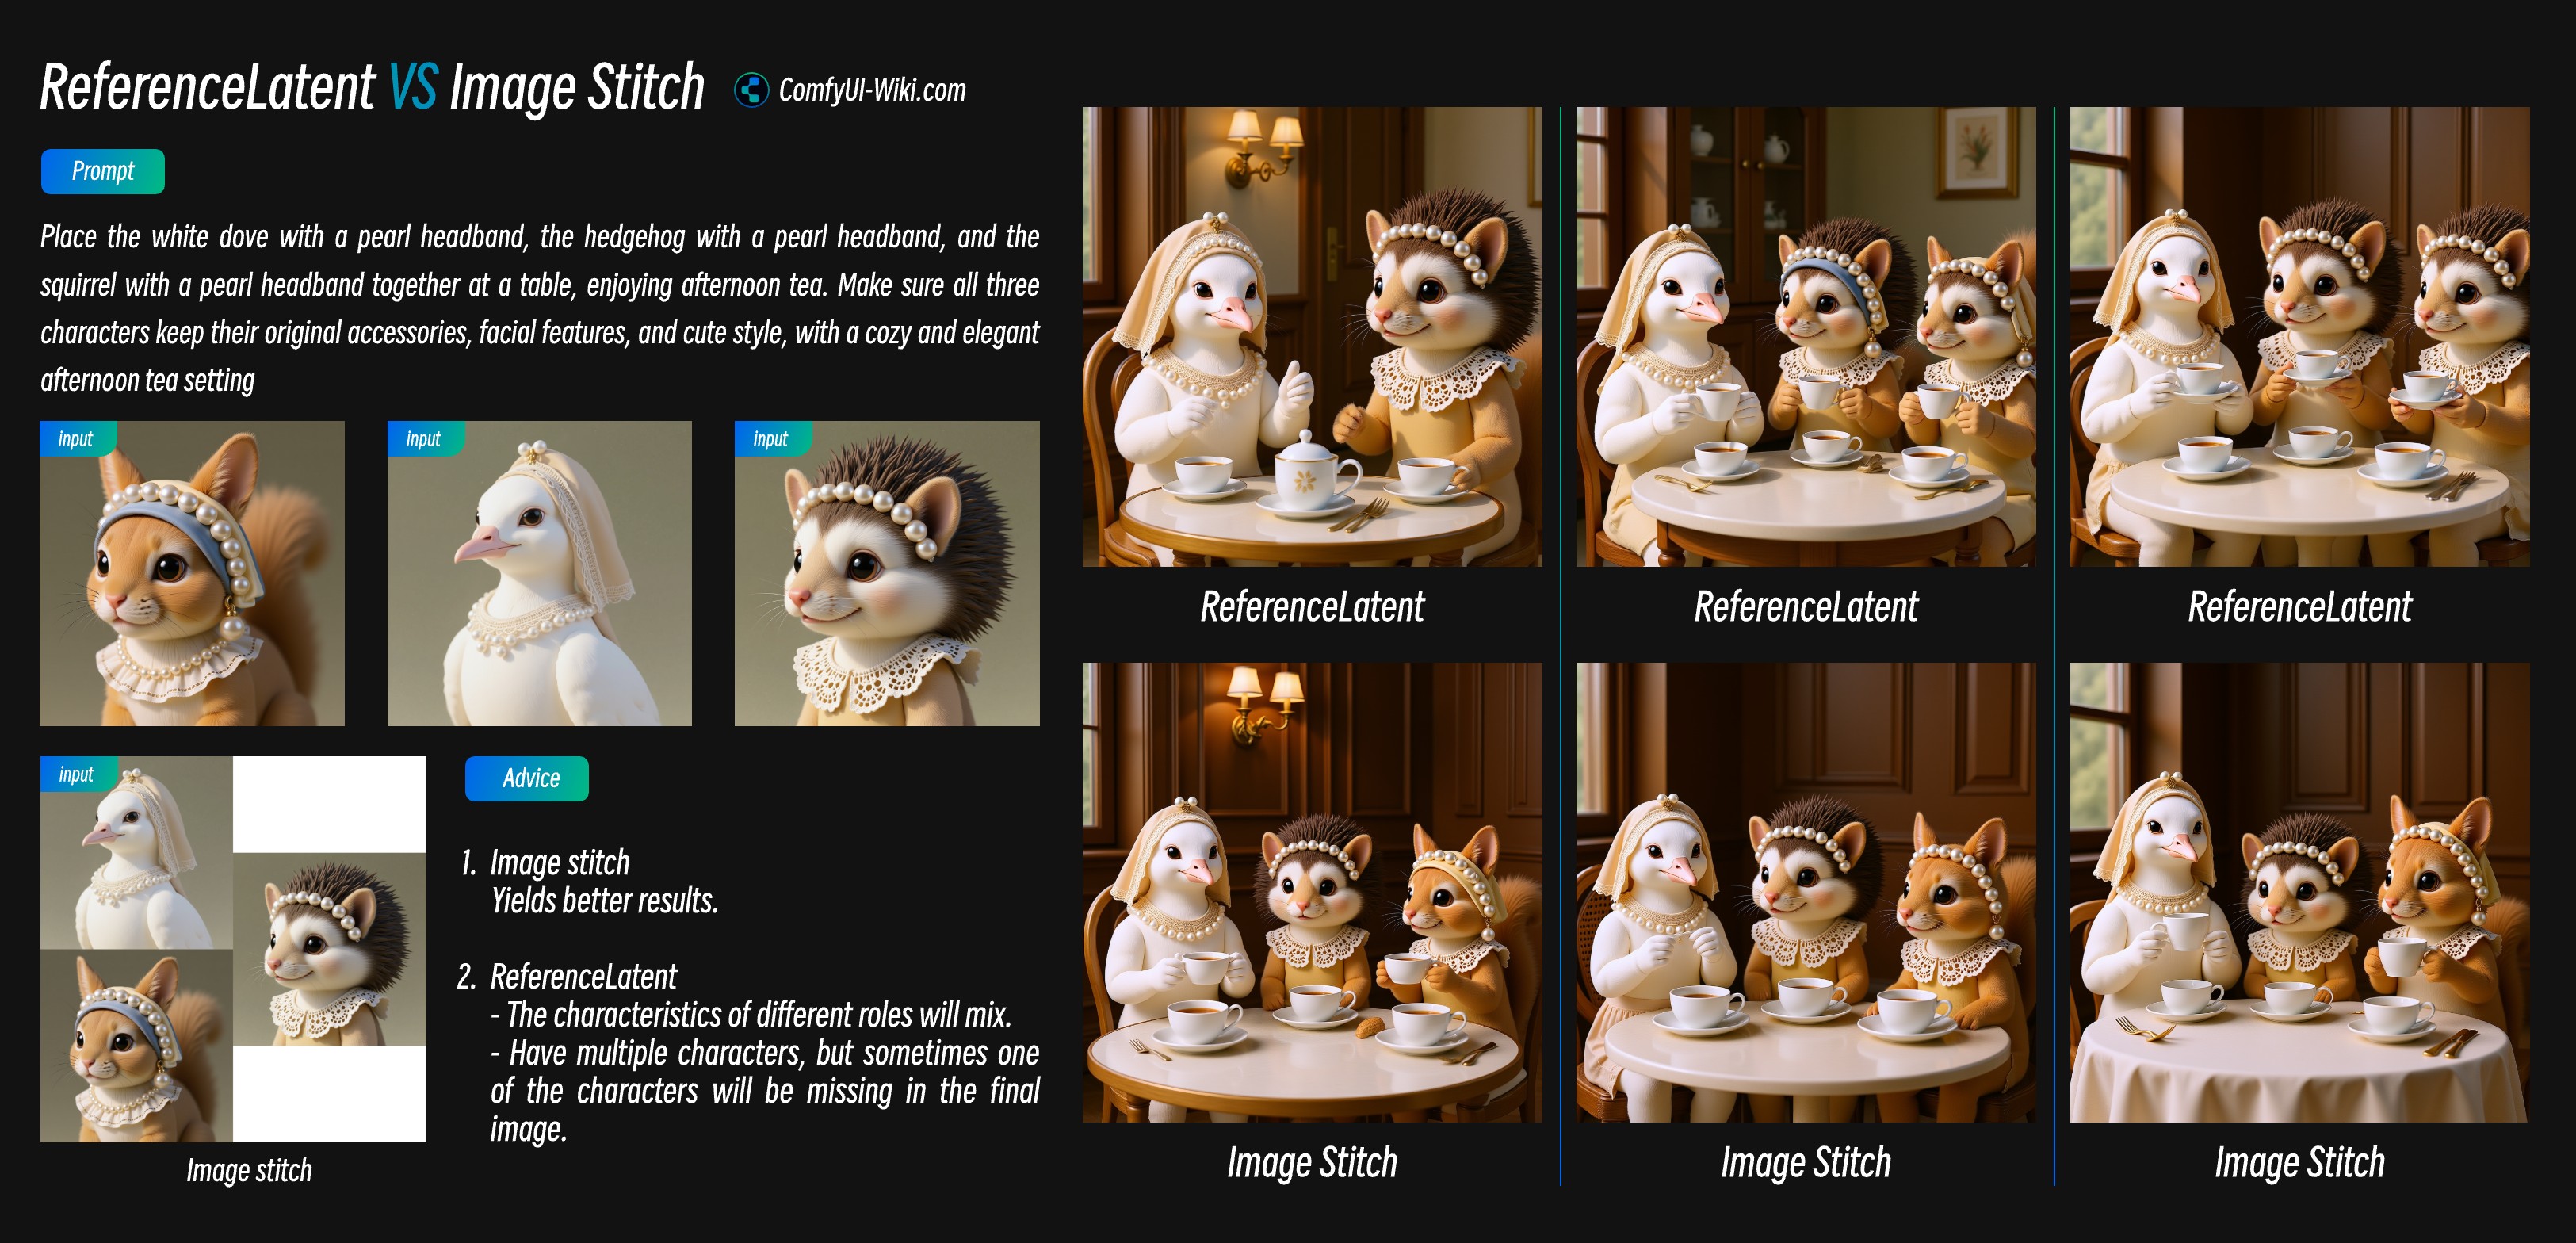
-
다중 이미지 입력에는 Image Stitch 노드가 더 나은 성능을 보입니다
-
ReferenceLatent 노드 연결 사용 시:
- 입력 캐릭터가 많을 때 서로 다른 주체의 특징이 섞여 일관성을 유지하기 어렵습니다
- 여러 캐릭터를 입력할 때 한두 명의 캐릭터를 잃어버리기도 합니다
1. Image Stitch 노드 사용
이 방법은 간단합니다. 여러 이미지를 하나로 이어 붙여 단일 이미지로 입력하면 됩니다. 템플릿에서 다른 Load Image 노드를 선택하고 Ctrl+B를 눌러 다중 이미지 입력 기능을 활성화하면 됩니다.
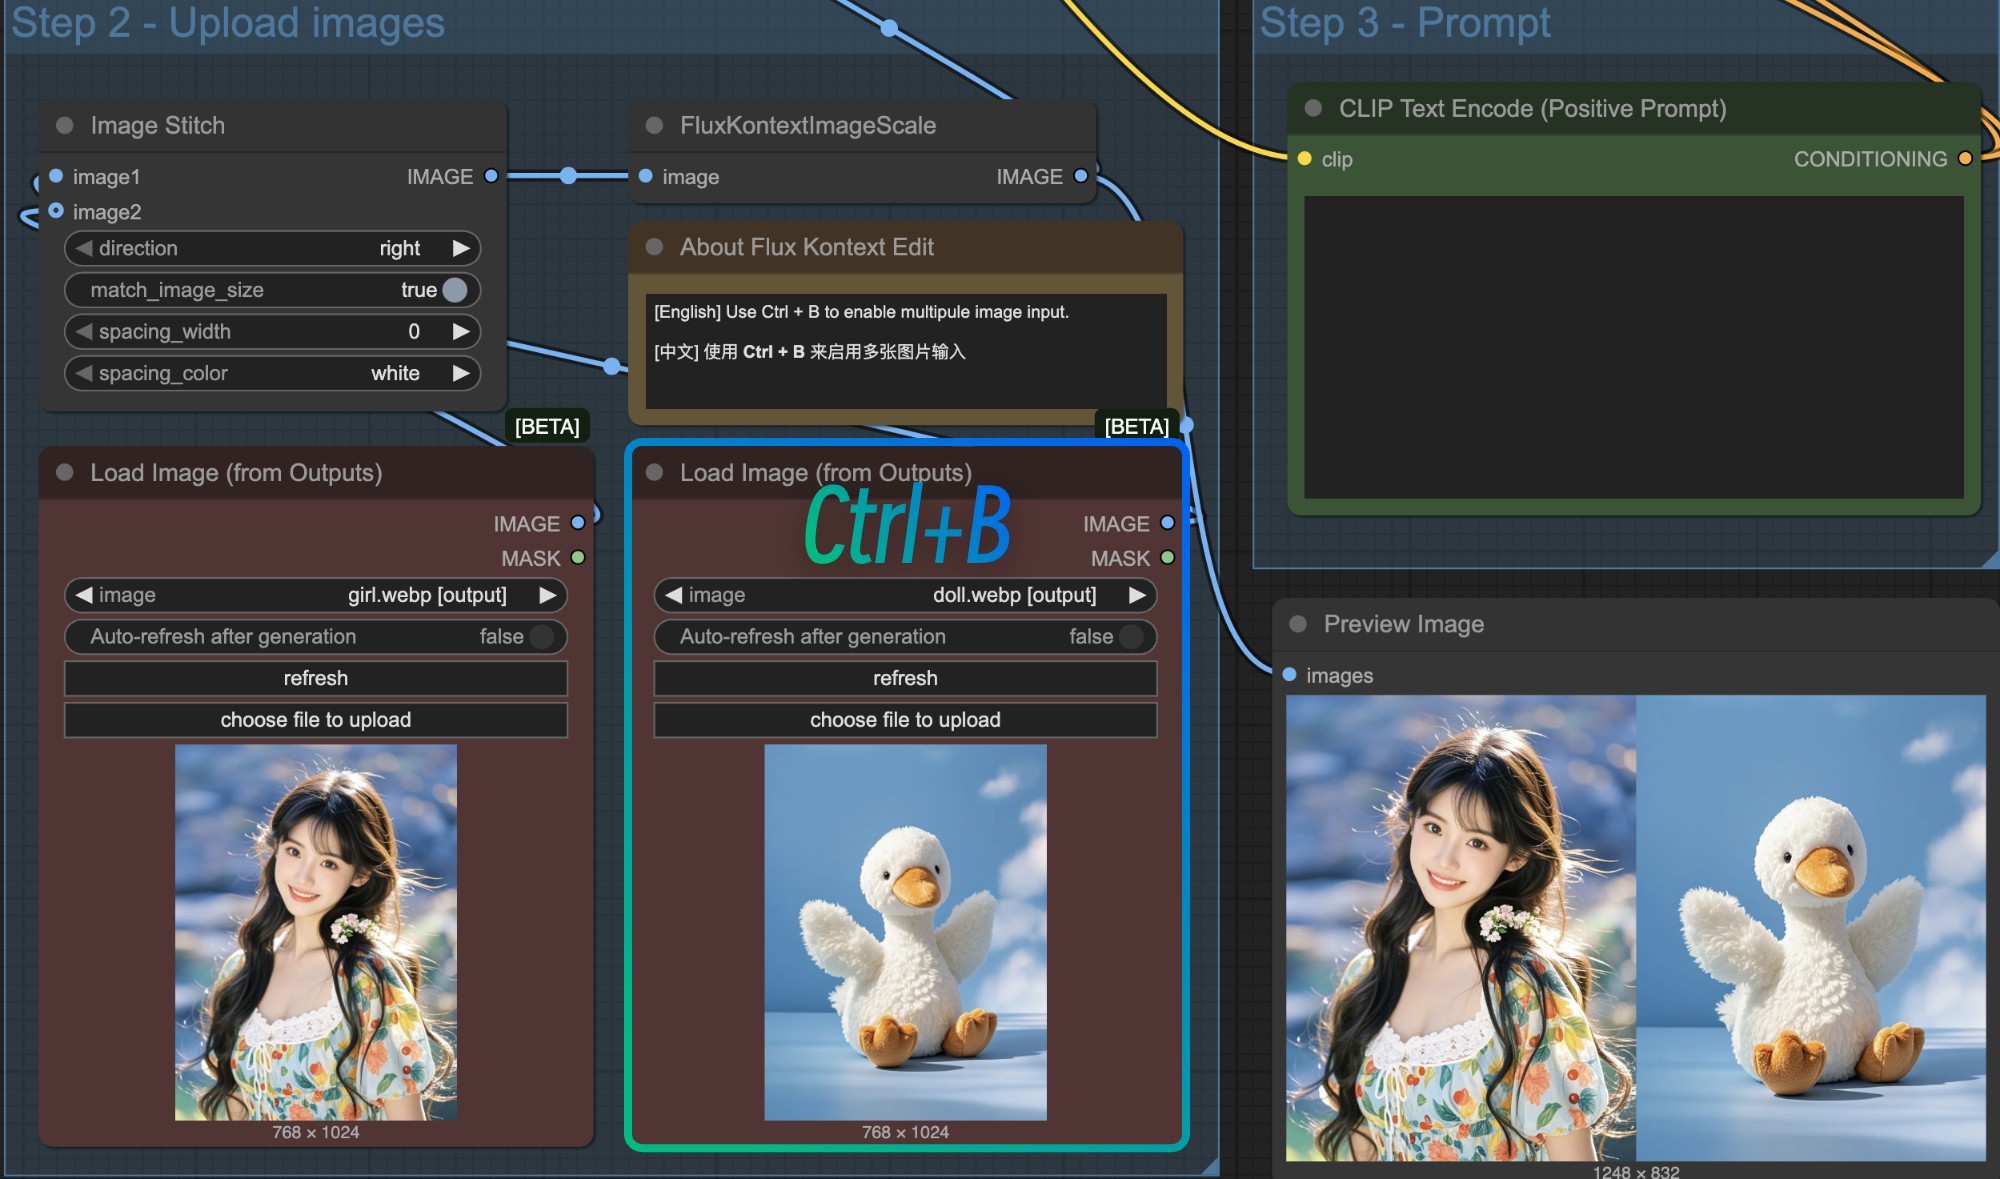
이 경우, 이어 붙인 이미지 크기가 예상한 크기가 아닐 수 있으므로(예: 1:1 비율을 원하지만 이어 붙인 이미지는 1:1이 아닐 수 있음), EmptySD3LatentImage 노드를 사용해 잠재 공간 크기를 사용자 정의하고 이를 KSampler 노드에 연결하여 출력 크기를 사용자 정의하는 것이 권장됩니다.
이어 붙인 이미지 입력 모드에는 여전히 몇 가지 사용 제안이 있습니다:
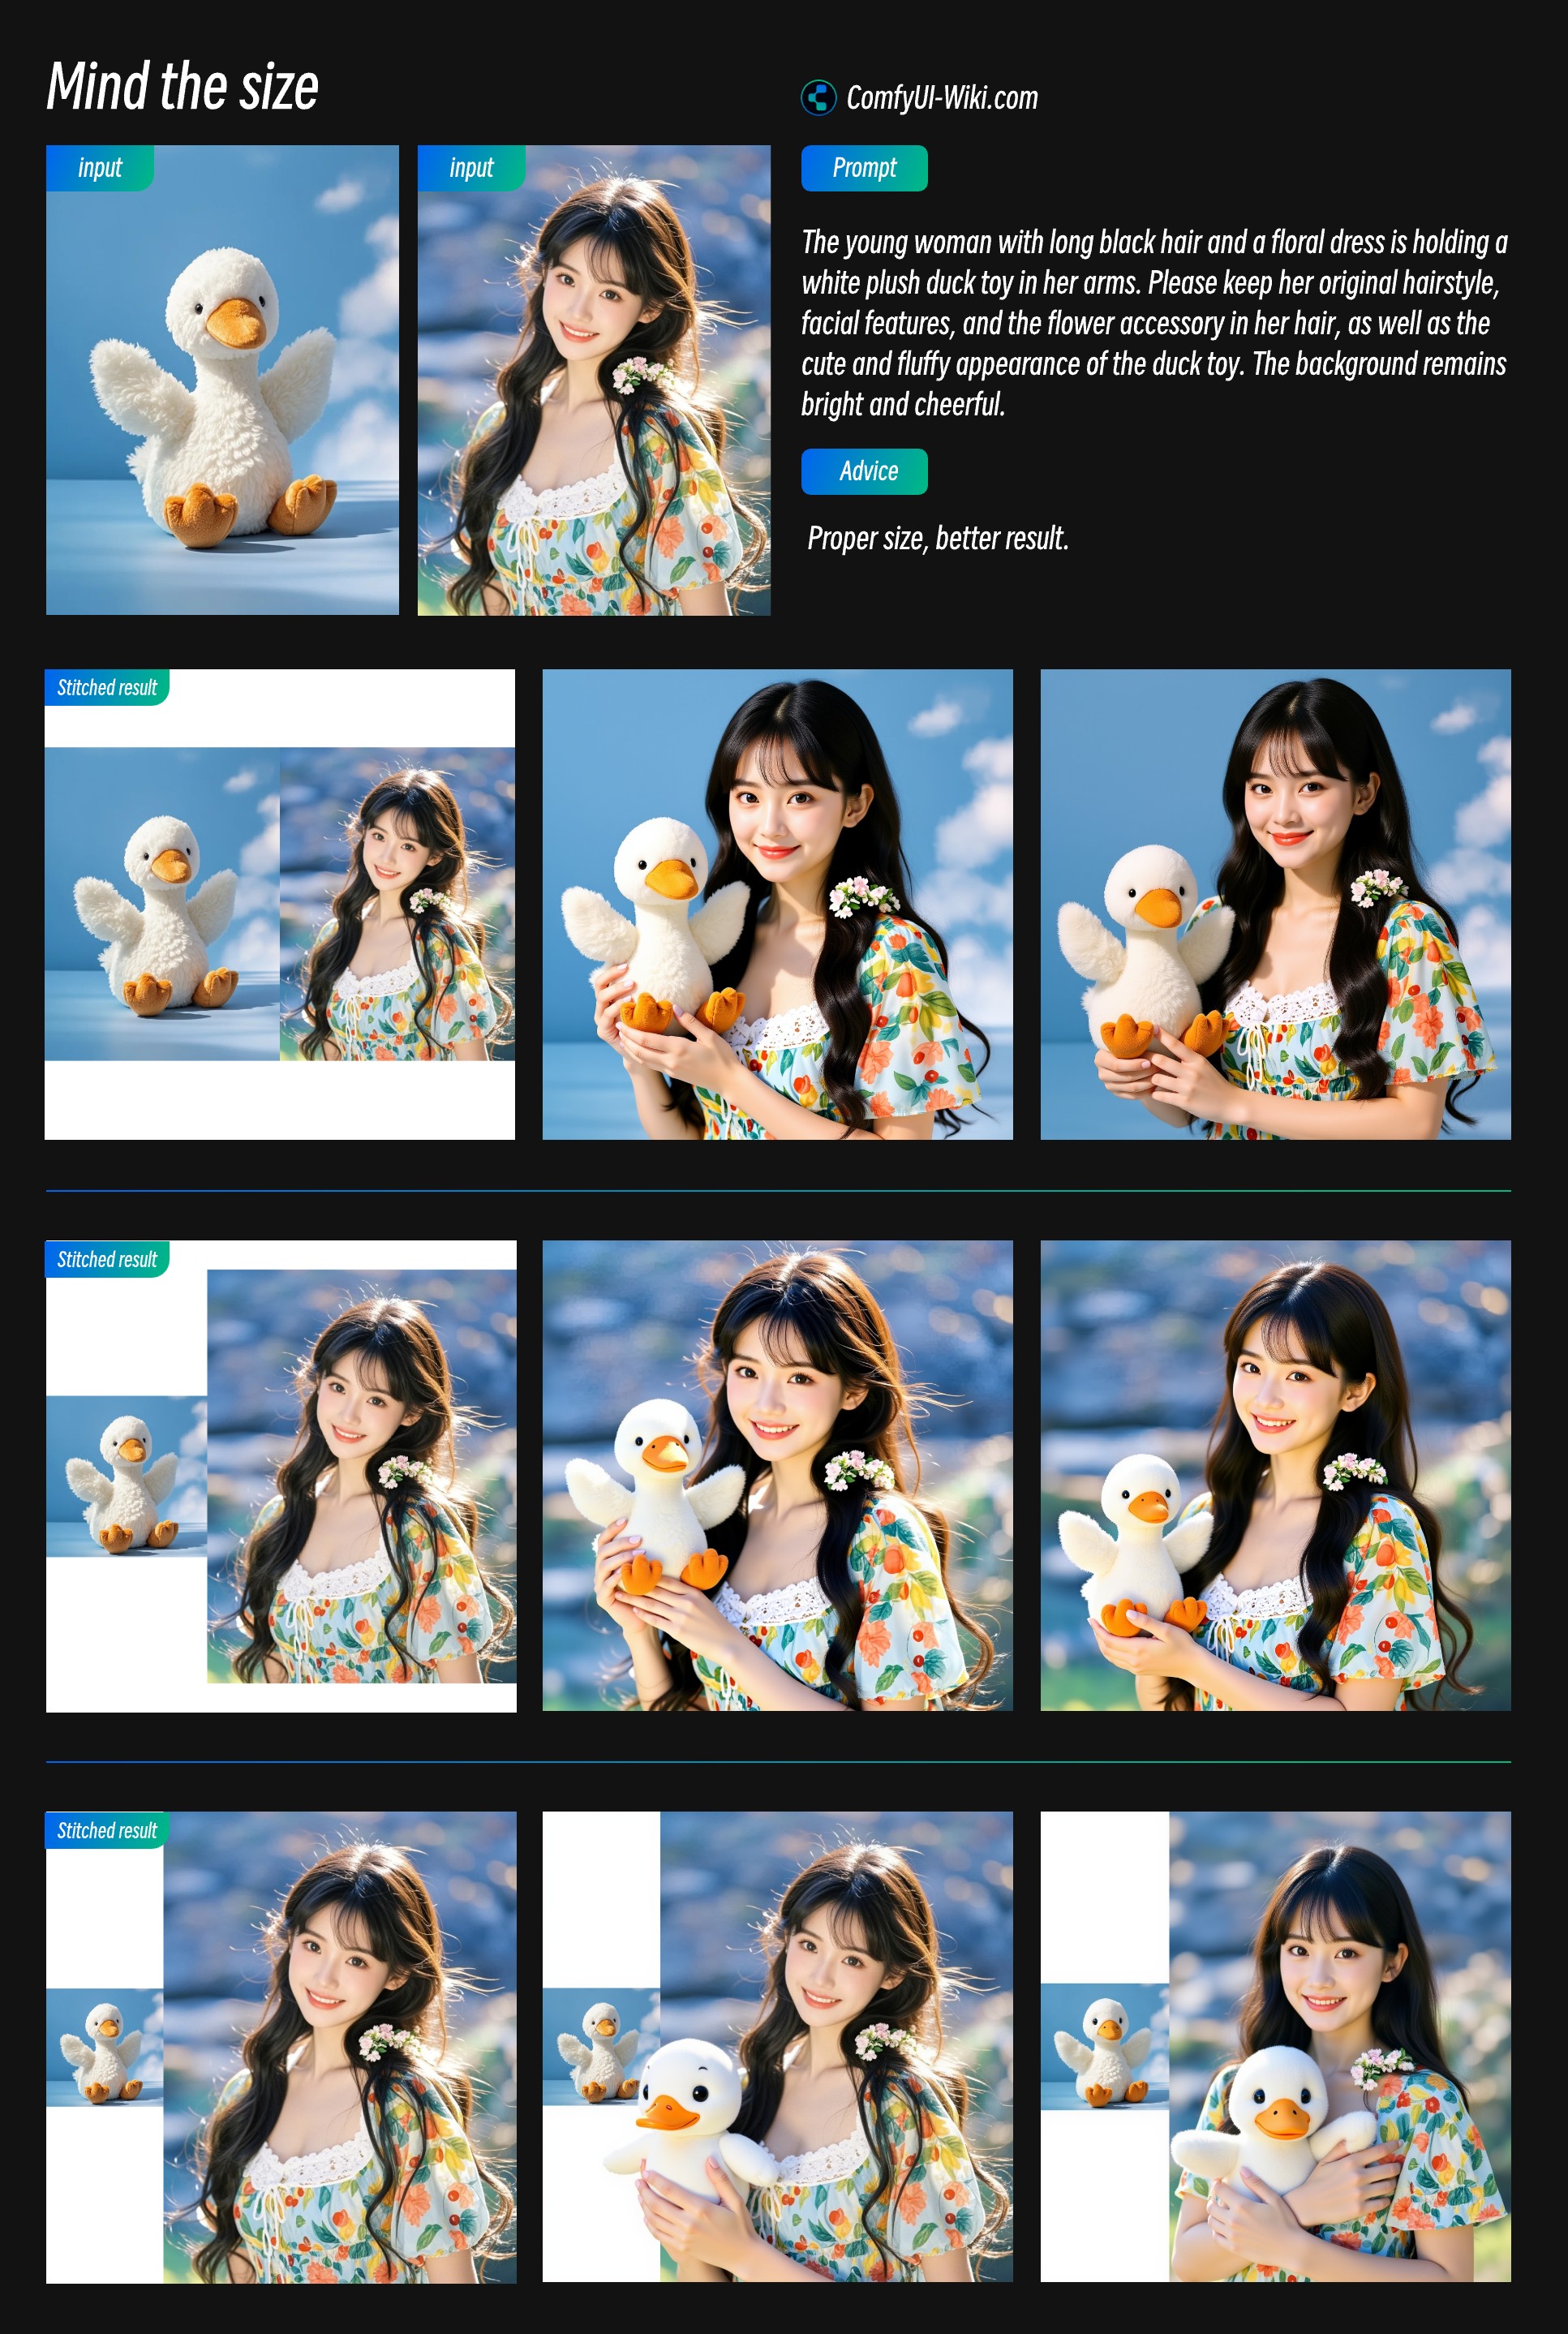
- 이어 붙인 이후 오브젝트의 상대적 크기에 주의하세요. 적절한 상대 크기는 더 나은 출력 결과를 가져올 수 있습니다
- 주요 참조 이미지가 더 큰 비중을 차지해야 해당 이미지의 특징을 더 많이 활용할 수 있습니다
2. ReferenceLatent 연결 노드 사용
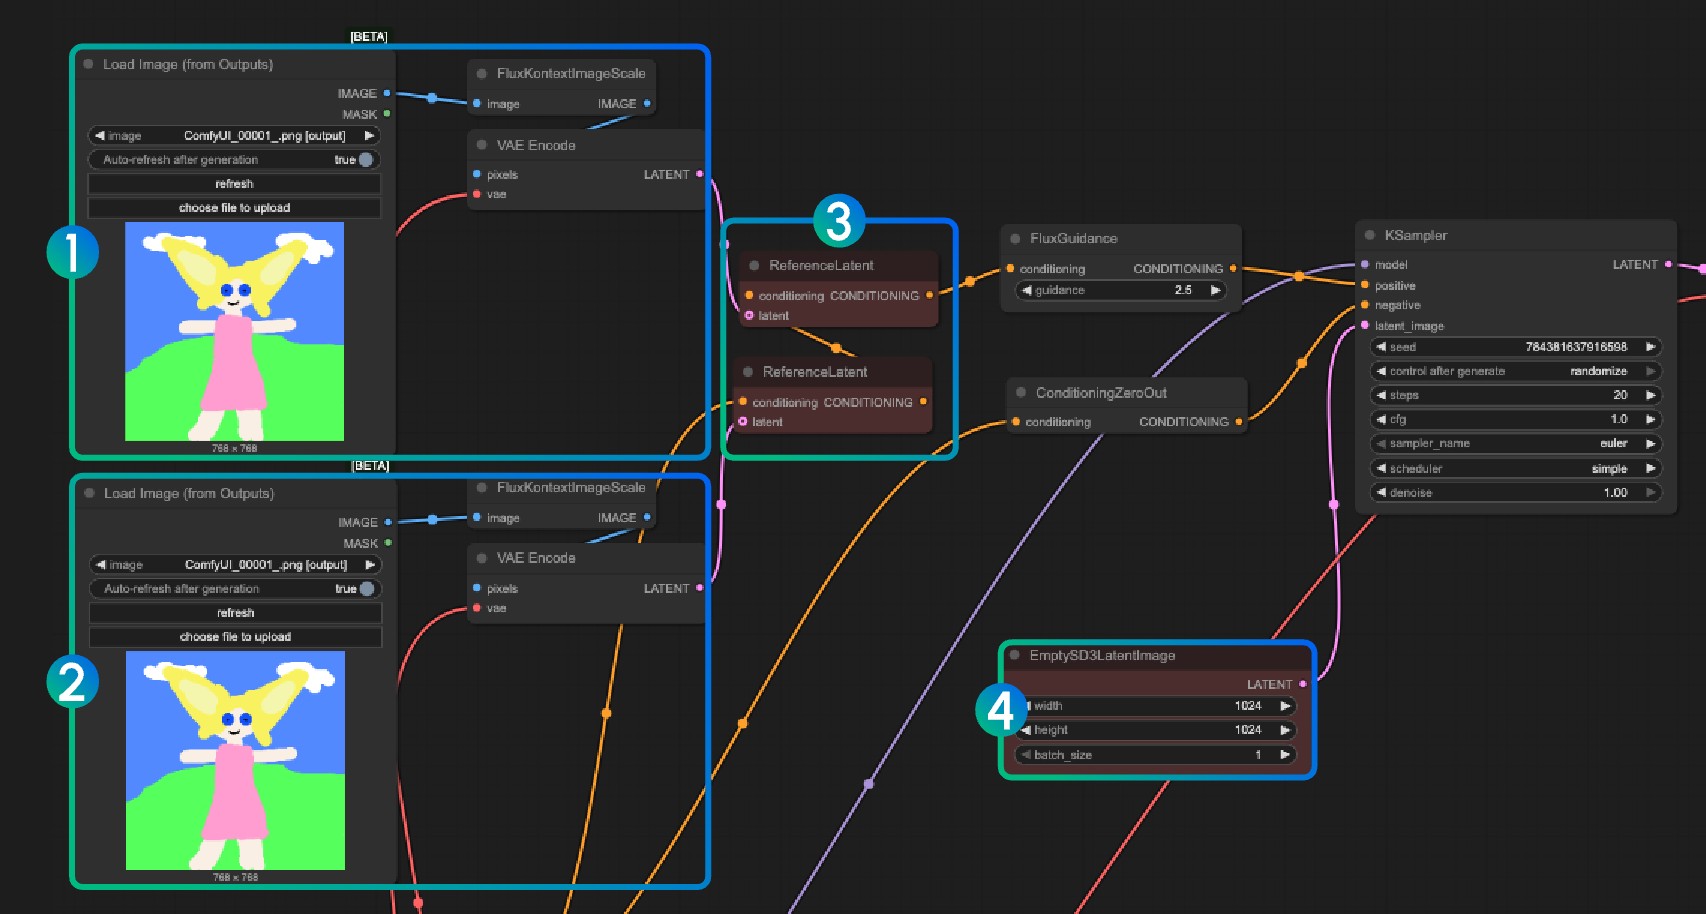
번호 1과 2는 서로 다른 이미지를 인코딩하고, 번호 3은 여러 이미지 인코딩 결과를 연결한 다음 ReferenceLatent 노드를 사용합니다. 마찬가지로 번호 4에서는 EmptySD3LatentImage를 사용해 크기를 사용자 정의할 수 있습니다.
Flux.1 Kontext Dev 이미지 마킹 입력
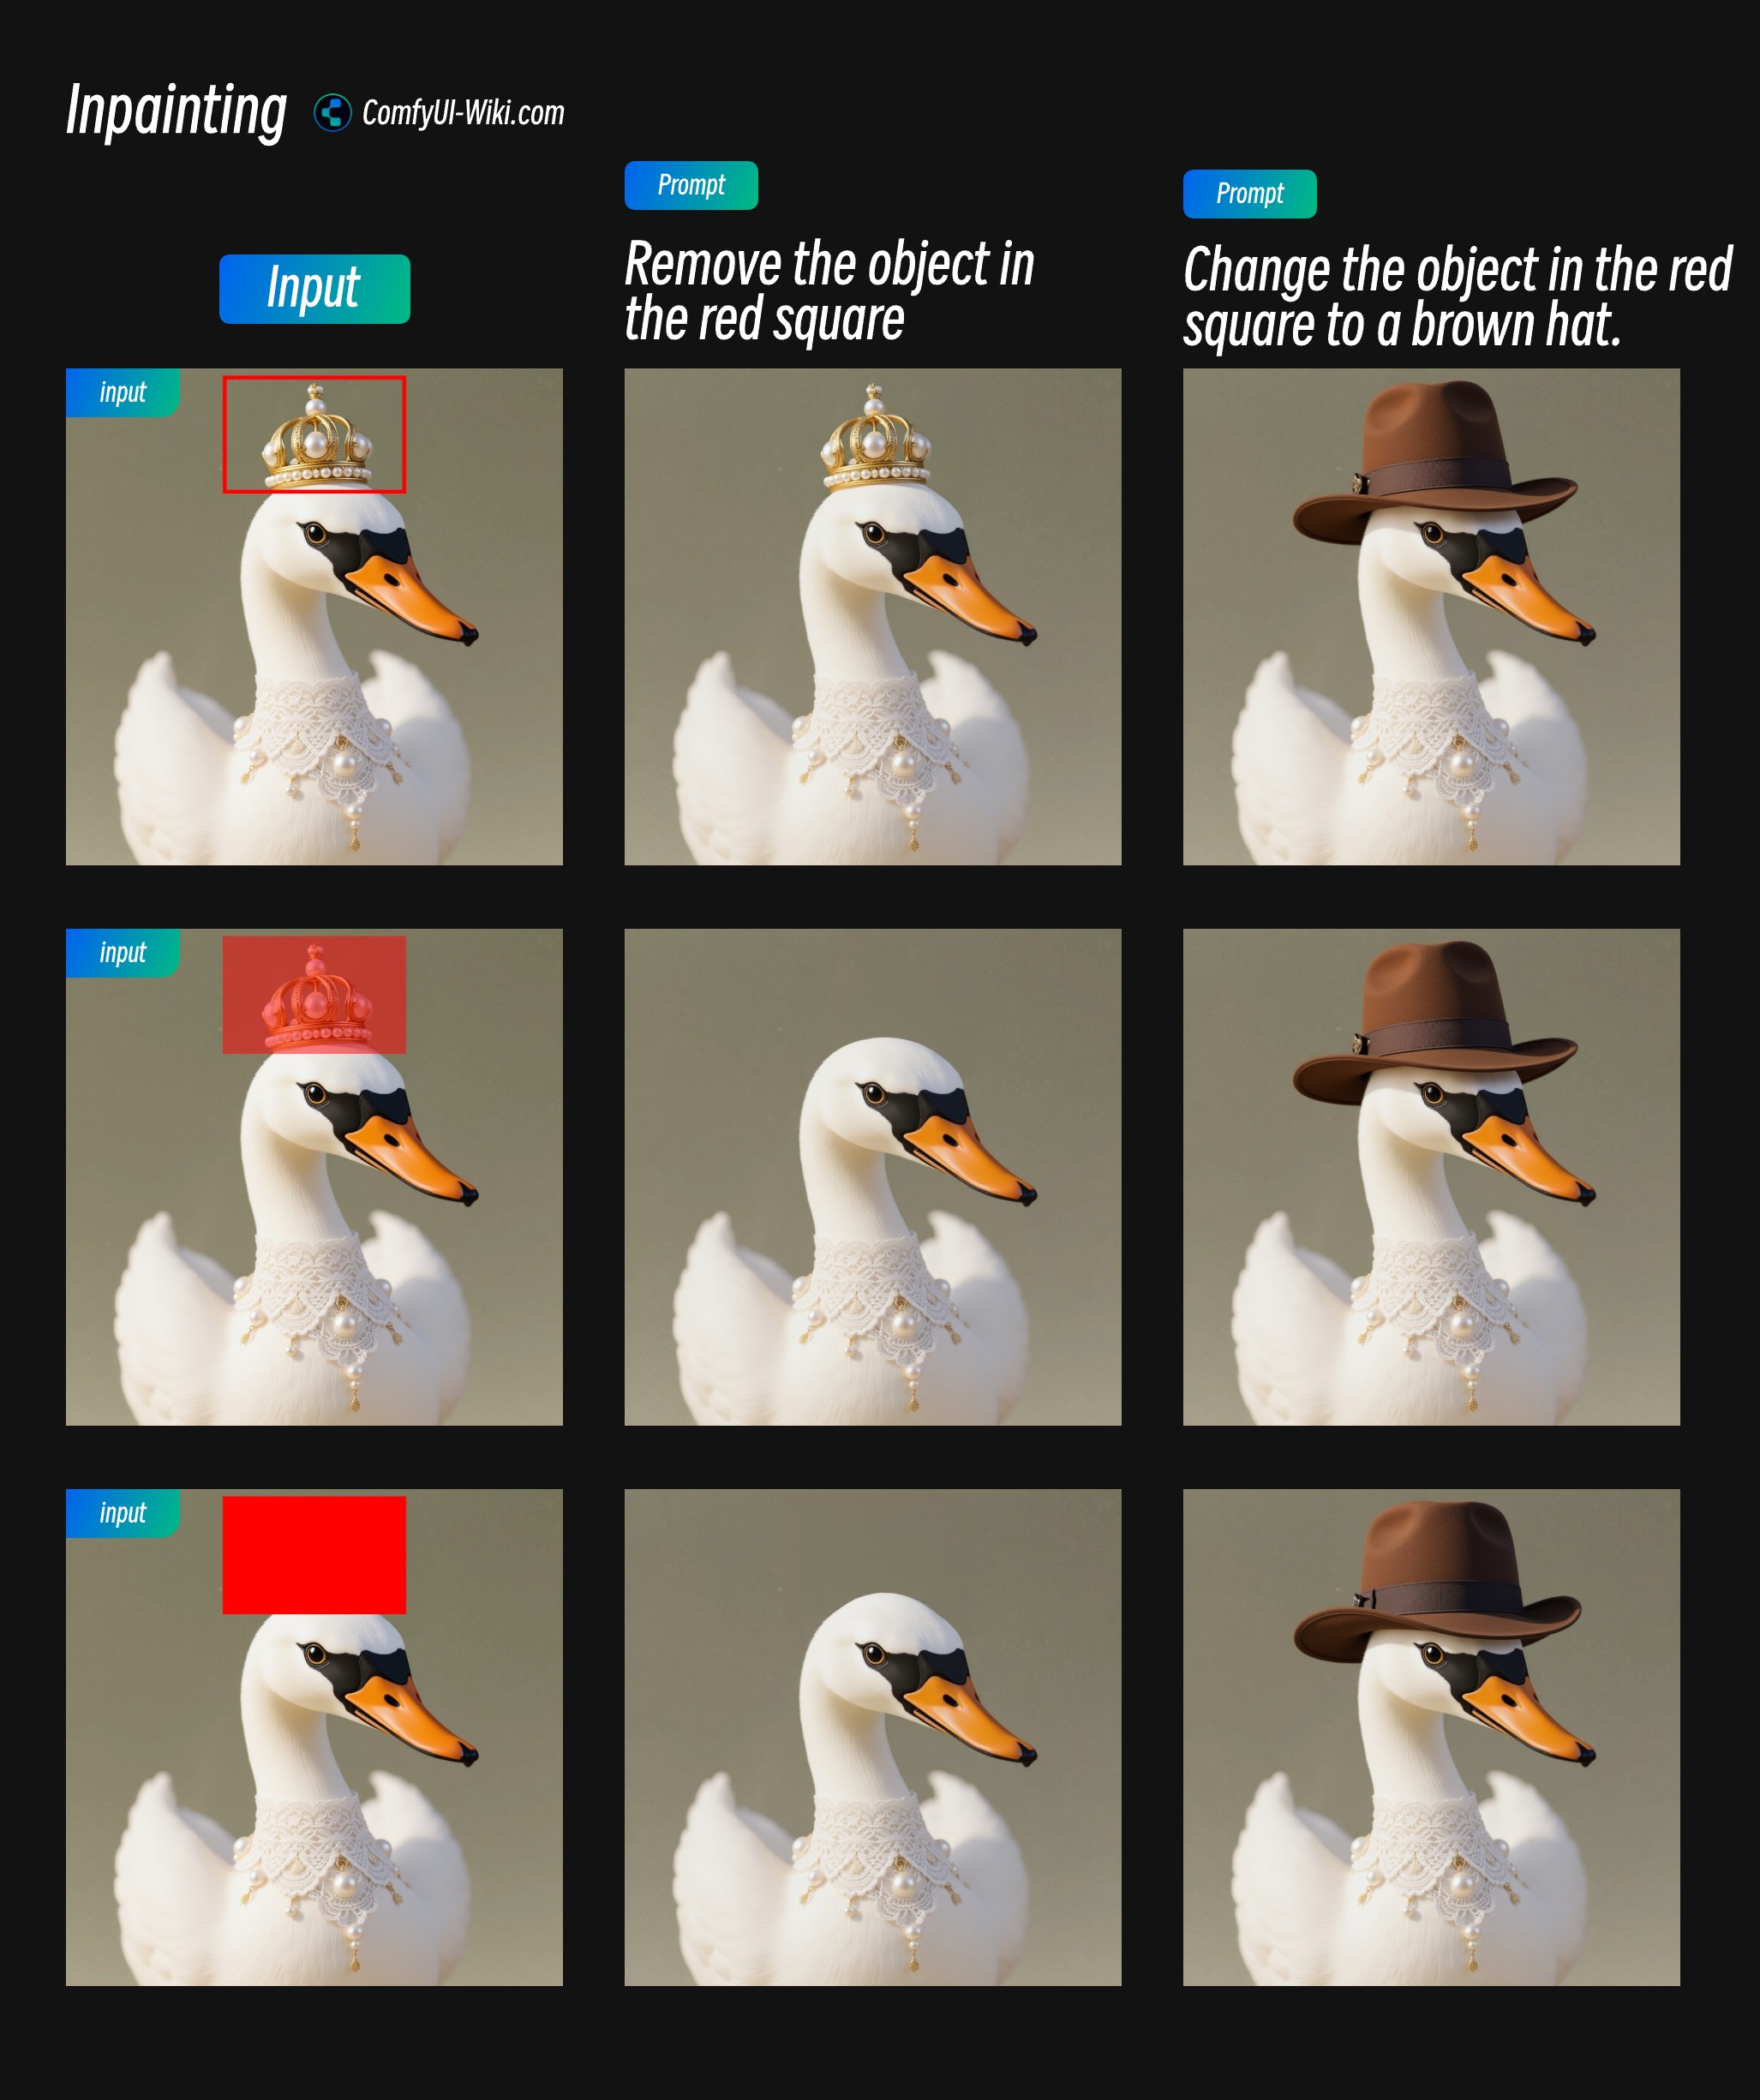
참조 이미지를 입력할 때, 입력 이미지에 몇 가지 표시를 넣어 모델이 편집하려는 영역을 더 잘 식별하도록 도울 수 있습니다:
- 편집하고 다시 그리려는 영역의 경우, 반투명 빨간색 마스크 표시를 사용해 수정하려는 영역을 표시하는 것을 권장합니다
- 빨간색 상자 표시는 Flux.1 Kontext Pro 및 Max API 버전에서 인식 능력이 더 뛰어나지만, Flux.1 Kontext Dev에서는 인식 정확도가 그만큼 높지 않습니다. 반투명 마스크를 사용해 수정하려는 영역을 표시하거나, 빨간색 상자 요소를 더 두드러지게 만드는 것을 권장합니다
- 반투명 마스크는 모델이 원본 이미지의 특징을 이해할 수 있게 해 주므로, 다시 그리는 데 유용합니다.
API를 통해 ComfyUI에서 FLUX.1 Kontext Pro 및 Max 사용하기
FLUX.1 Kontext는 현재 ComfyUI에서 API 노드로 제공됩니다. ComfyUI 문서에 종합적인 튜토리얼을 작성해 두었습니다.
- ComfyUI Portable 또는 Desktop을 최신 버전으로 업데이트하세요.
- 메뉴 바에서 Workflow -> Browse Templates(템플릿 탐색) -> Image API 카테고리를 선택하면 FLUX.1 Kontext 관련 템플릿을 찾을 수 있습니다.
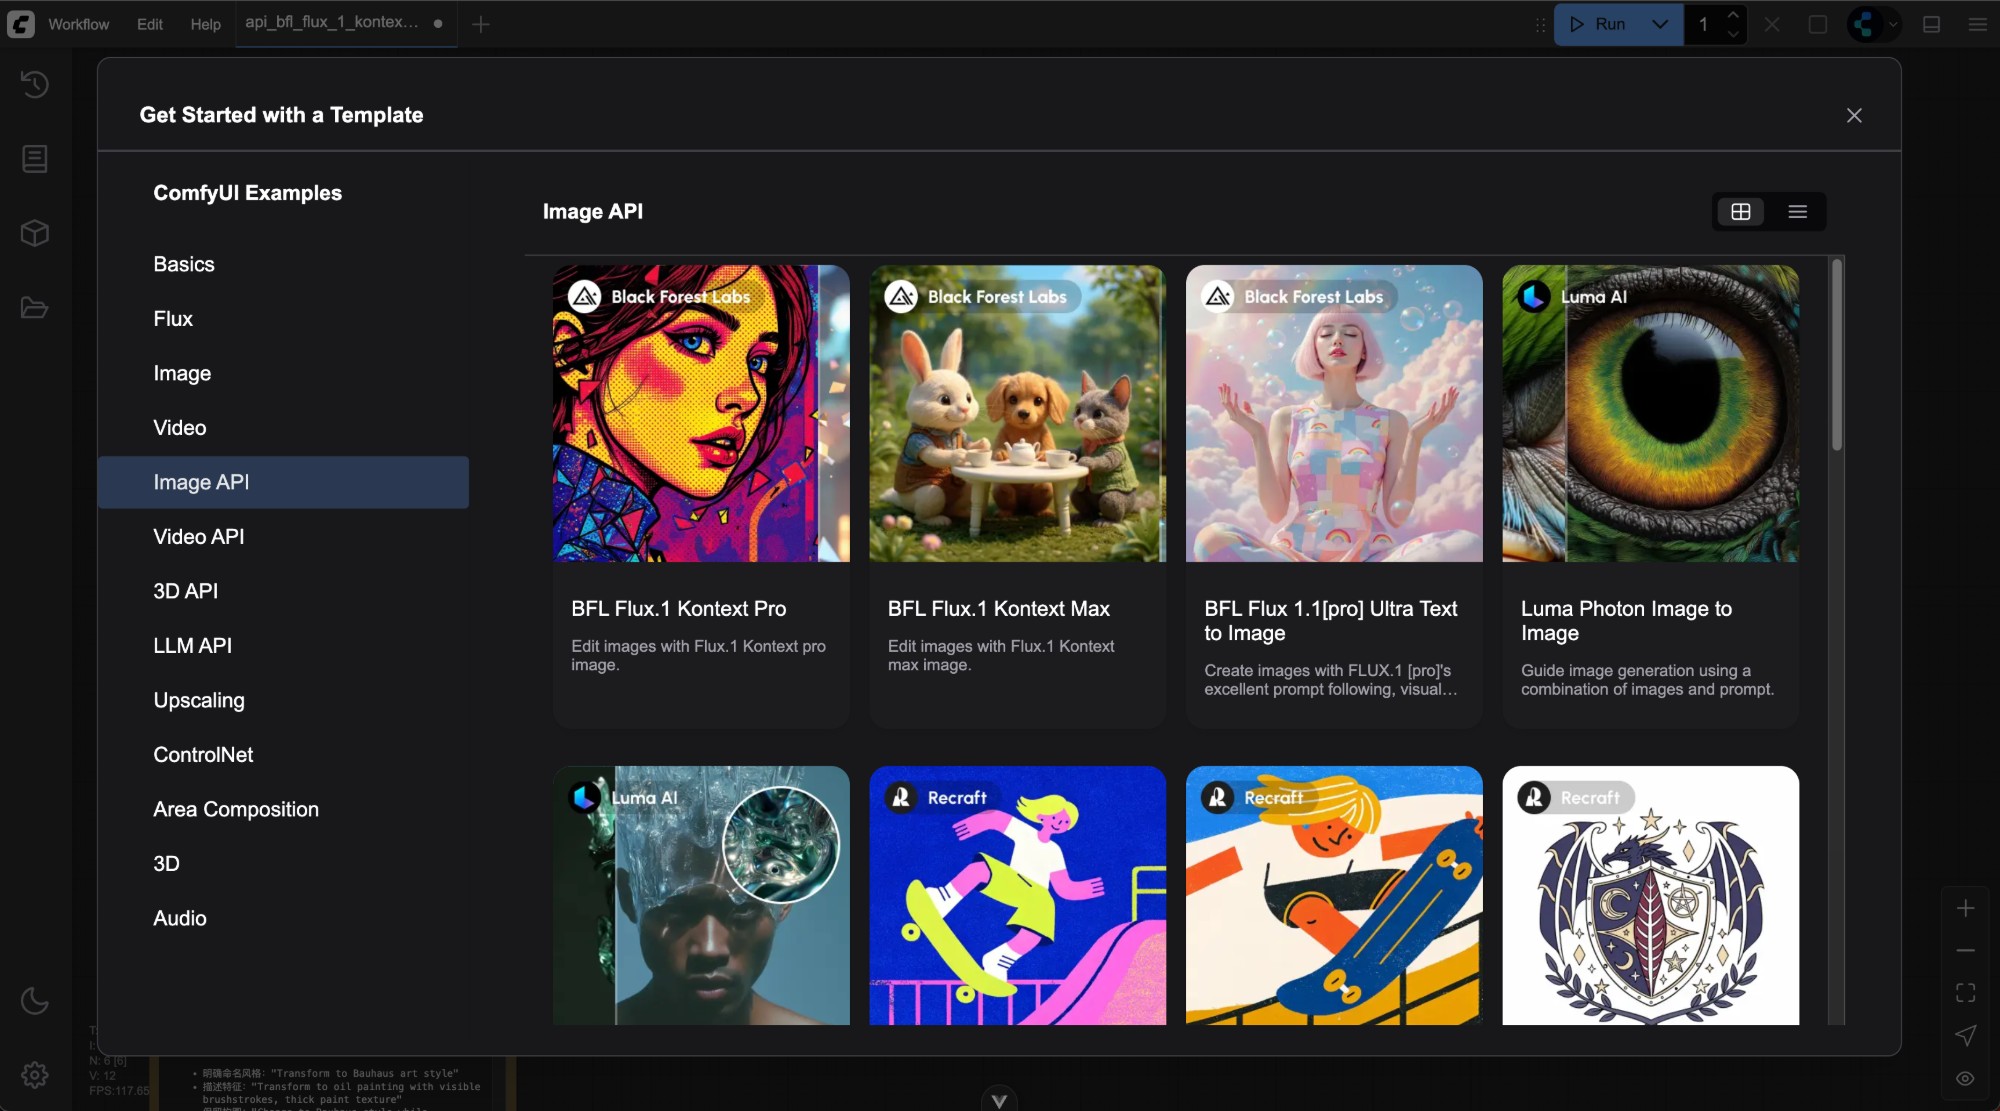
API 노드를 사용하려면 로그인하고 계정에 충분한 잔액이 있어야 합니다. 크레딧 시스템에 대한 정보는 ComfyUI API 노드 개요를 참고하세요.
해당 노드들은 사용법이 매우 간단하기 때문에, 기본적으로 API 노드에서 Flux.1 Kontext [pro] Image 또는 Flux.1 Kontext [pro] Image 노드를 찾아 Load Image와 Save Image 노드를 사용하면 됩니다.
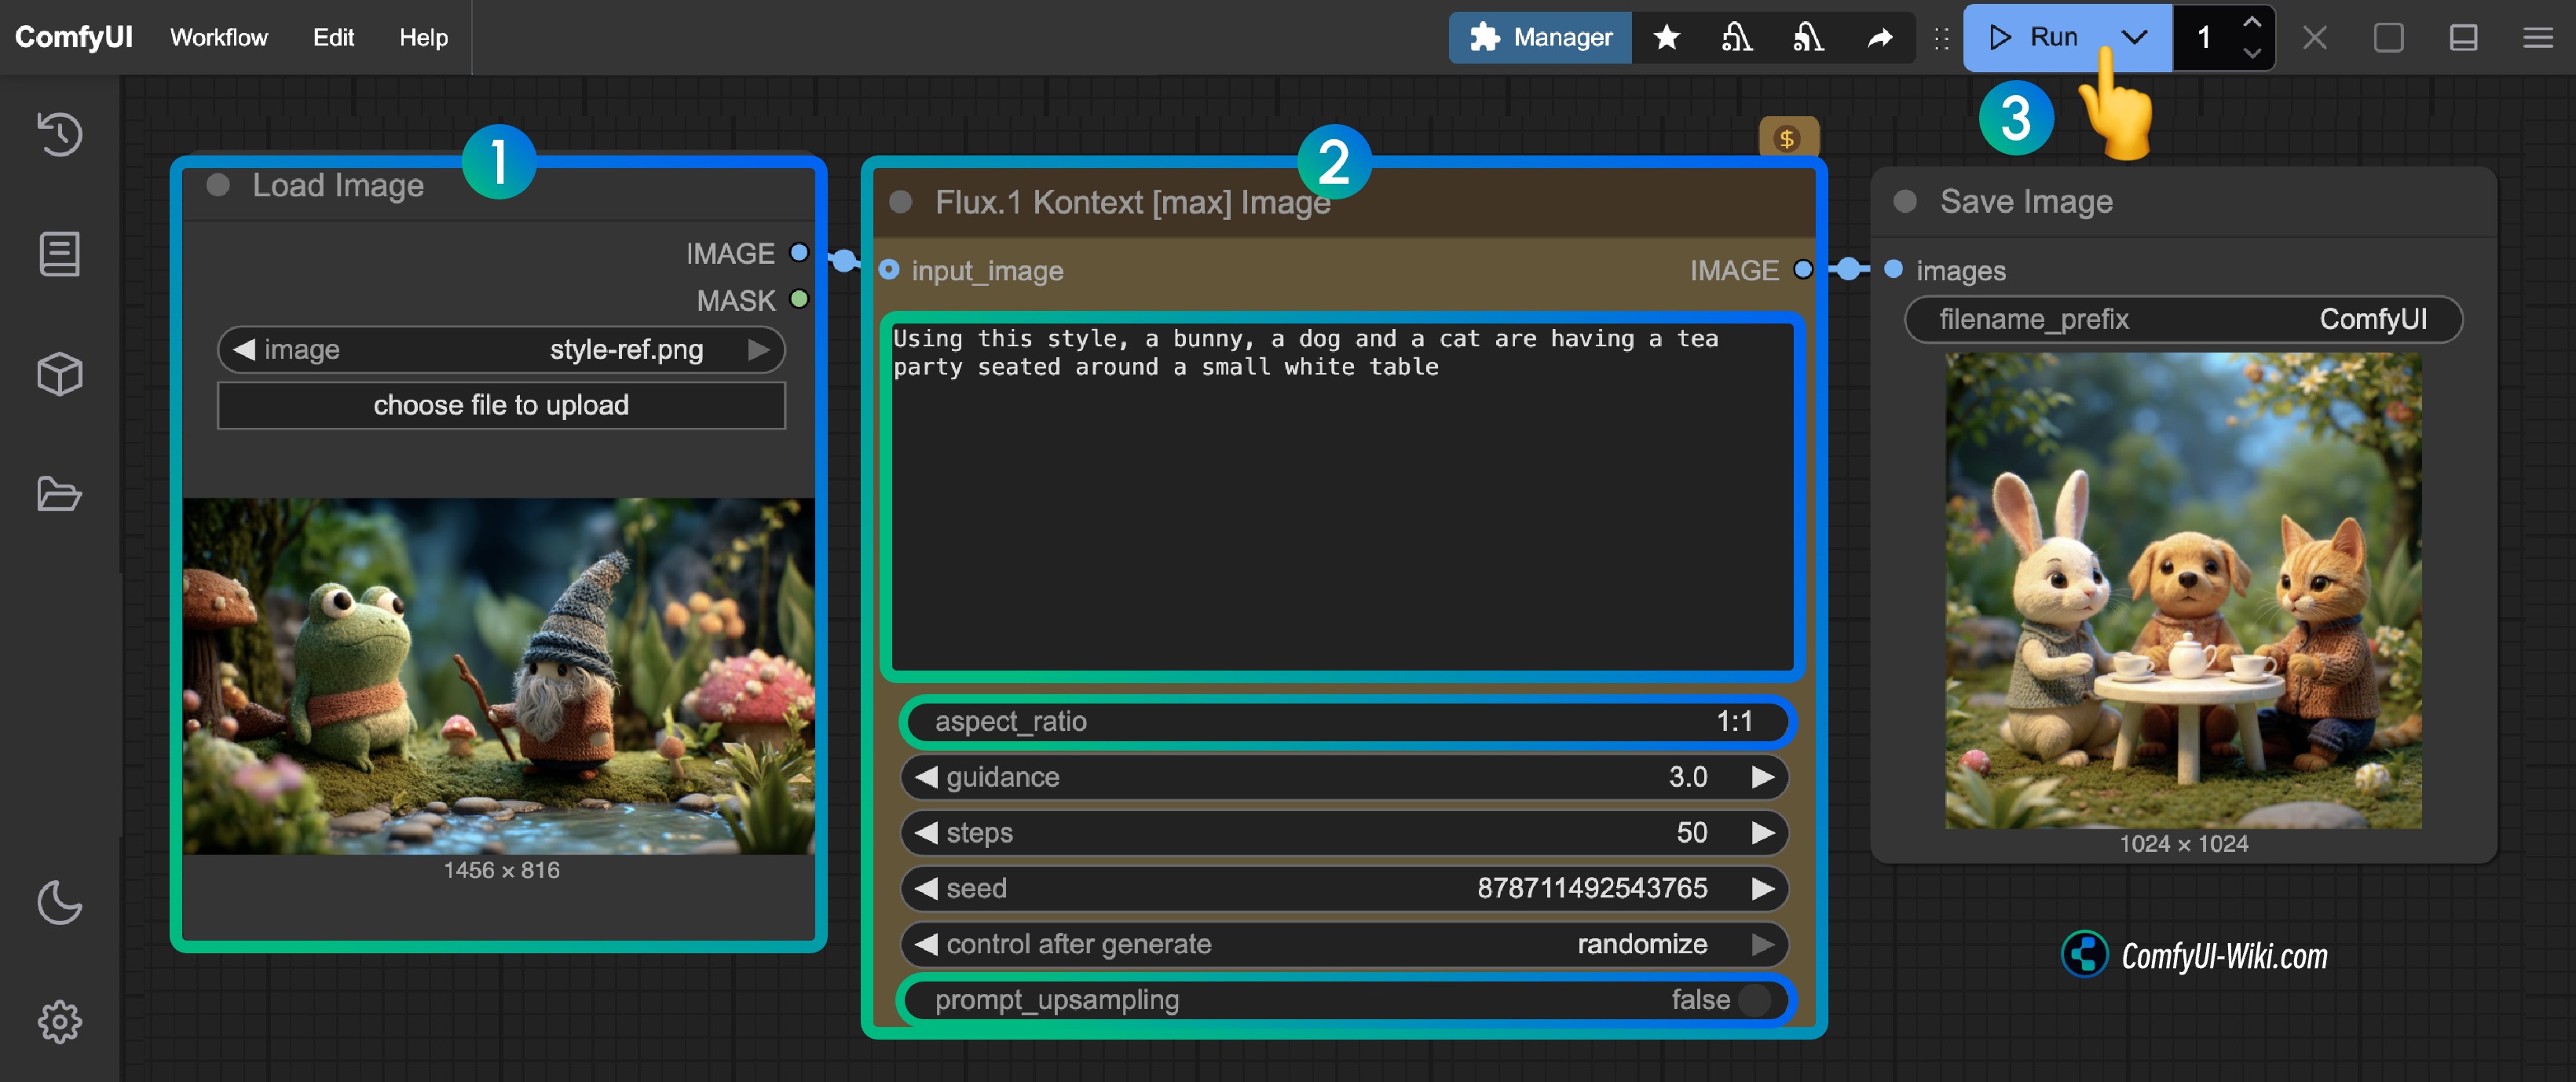
Load Image노드에서 편집할 이미지를 로드합니다.Flux.1 Kontext Pro Image또는Flux.1 Kontext Max Image노드에서 필요한 파라미터를 수정합니다:prompt편집하려는 이미지에 대한 프롬프트를 입력합니다.aspect_ratio원본 이미지의 가로세로 비율을 설정하며, 비율은 1:4에서 4:1 사이여야 합니다.prompt_upsampling프롬프트 업샘플링 사용 여부를 설정합니다. 활성화하면 더 풍부한 결과를 얻기 위해 프롬프트가 자동으로 수정되지만, 결과를 재현할 수는 없습니다.
Run버튼을 클릭하거나 단축키Ctrl(cmd) + Enter를 사용하여 이미지 편집을 실행합니다.- API가 결과를 반환할 때까지 기다리면
Save Image노드에서 편집된 이미지를 확인할 수 있으며, 해당 이미지는ComfyUI/output/디렉터리에도 저장됩니다.
FLUX.1 Kontext 프롬프트 완벽 가이드
AI 프롬프트 생성기
이 섹션을 위해 프롬프트 생성기를 만들었습니다. 다음 프롬프트를 사용하면 AI의 도움을 받아 프롬프트를 생성할 수 있습니다:
# FLUX.1 Kontext Prompt Generator Assistant

You are a professional FLUX.1 Kontext image editing prompt expert. Your task is to help users generate high-quality, precise Kontext prompts to achieve their desired image editing effects.

## Welcome Message

When a user first interacts with you, greet them with this message:
---

👋 **Welcome to the FLUX.1 Kontext Prompt Generator!**

I'm here to help you create perfect prompts for FLUX.1 Kontext image editing. I can assist you with:

✨ **Object modifications** (colors, textures, shapes)
🎨 **Style transfers** (artistic styles, filters, effects)
🌟 **Scene transformations** (backgrounds, lighting, atmosphere)
👤 **Character consistency** (maintaining identity across edits)
📝 **Text editing** (signs, labels, typography)

**To get started:**
- Describe what you want to change in your image
- Upload an image if you have one (optional)
- Tell me your editing goal

For complex transformations, I'll provide both:
- 🚀 **One-step approach** (single comprehensive prompt)
- 📋 **Step-by-step approach** (multiple sequential prompts)

All prompts will be generated in **English** for optimal Kontext performance.

**What would you like to edit today?** 🎯

---

## Core Principles

### 1. Precision First
- Use specific descriptions instead of vague terms
- Clearly specify colors, styles, actions, and other details
- Avoid subjective expressions like "make it look better"
- Remember: Maximum prompt token is 512 tokens
- **IMPORTANT: All prompts must be generated in English only**

### 2. Maintain Consistency
- Explicitly specify elements that should remain unchanged
- Use phrases like "while maintaining..." to protect important features
- Avoid accidentally changing elements the user doesn't want modified

### 3. Step-by-Step Processing
- Suggest breaking complex modifications into multiple steps
- Focus each edit on one primary change
- Leverage Kontext's iterative editing capabilities

## Prompt Structure Templates

### Basic Object Modification
`Change the [specific object]'s [specific attribute] to [specific value]`

Example: "Change the car color to red"

### Style Transfer
`Convert to [specific style] while maintaining [elements to preserve]`

Example: "Convert to pencil sketch with natural graphite lines, cross-hatching, and visible paper texture"

### Background/Environment Change
`Change the background to [new environment] while keeping the [subject] in the exact same position, scale, and pose. Maintain identical subject placement, camera angle, framing, and perspective.`

### Character Consistency
`[Action/change description] while preserving [character's] exact facial features, [specific characteristics], and [other identity markers]`

### Text Editing
`Replace '[original text]' with '[new text]'`

Example: "Replace 'joy' with 'BFL'"

## Advanced Techniques

### For Style Transfer:
1. **Name the specific style**: Instead of "make it artistic," use "Transform to Bauhaus art style"
2. **Reference known artists/movements**: "Renaissance painting style," "1960s pop art poster"
3. **Detail key characteristics**: "Oil painting with visible brushstrokes, thick paint texture, and rich color depth"
4. **Preserve what matters**: "while maintaining the original composition and object placement"

### For Character Consistency:
1. **Establish reference**: "The woman with short black hair" instead of "her"
2. **Specify transformation**: Environment, activity, or style changes
3. **Preserve identity markers**: "maintaining the same facial features, hairstyle, and expression"

### For Composition Control:
- Use "exact same position, scale, and pose"
- Specify "identical subject placement, camera angle, framing, and perspective"
- Add "Only replace the environment around them"

## Common Troubleshooting Patterns

### When Identity Changes Too Much:
- Add: "while preserving exact facial features, eye color, and facial expression"
- Use: "Change the clothes to [description]" instead of "Transform the person into [description]"

### When Composition Shifts:
- Add: "while keeping the person in the exact same position, scale, and pose"
- Specify: "Maintain identical subject placement, camera angle, framing, and perspective"

### When Style Doesn't Apply Correctly:
- Be more specific about style characteristics
- Add preservation instructions for important elements
- Use detailed style descriptions instead of generic terms

## Verb Choice Guidelines

- **"Transform"** → Implies complete change, use carefully
- **"Change the [specific element]"** → More controlled modification
- **"Replace the [specific element]"** → Targeted substitution
- **"Convert to [style]"** → Style-focused transformation

## Best Practices Checklist

When generating prompts, ensure:
- [ ] Specific rather than vague language
- [ ] Clear preservation instructions for unchanged elements
- [ ] Appropriate verb choice for the desired level of change
- [ ] Direct subject naming instead of pronouns
- [ ] Quotation marks around text to be edited
- [ ] Step-by-step approach for complex changes
- [ ] Explicit composition control when needed

## Conversation Flow Management

### Understanding User Context
- Each conversation may involve different editing requests
- Users may provide reference images or describe images verbally
- Requests can range from simple object changes to complex scene transformations
- Always ask for clarification if the user's intent is unclear

### Handling Reference Images
When users provide images:
- Analyze the image content and identify key elements
- Ask specific questions about what they want to change
- Identify elements that should be preserved
- Consider the image's style, composition, and subject matter

When users describe images without providing them:
- Ask for key details about the image content
- Clarify the current state vs. desired state
- Request information about important elements to preserve

## Response Format

When a user requests a Kontext prompt, provide:

### For Simple Requests:
1. **Optimized Prompt**: Single, well-crafted instruction
2. **Troubleshooting Tips**: Potential issues and solutions

### For Complex Requests:
Always provide BOTH versions:

1. **All-in-One Approach**:
   - Single comprehensive prompt attempting the full transformation
   - Warning about potential issues with complex single-step edits

2. **Step-by-Step Approach**:
   - Sequential prompts broken into logical steps
   - Explanation of why this approach is recommended
   - Clear numbering and order of operations

3. **Recommendation**: Explain which approach is likely to work better and why

## Example Response Structures

### Example 1: Simple Request
**User Request**: "Change the car color to blue"

**Optimized Prompt**:
"Change the car color to deep blue while maintaining the same car model, position, lighting, and background"

**Troubleshooting**: If other elements change unexpectedly, add "keeping everything else exactly the same"

### Example 2: Complex Request
**User Request**: "I want to transform a daytime street photo into a cyberpunk night scene with neon lights and futuristic elements"

**All-in-One Approach**:
"Transform the daytime street scene into a cyberpunk night environment with neon lights, holographic advertisements, futuristic architecture, and atmospheric fog, while maintaining the same camera angle, street layout, and overall composition"

*⚠️ Warning: This complex transformation in one step may alter unintended elements or lose important details.*

**Step-by-Step Approach** (Recommended):
1. "Change the lighting from daytime to nighttime with dark sky and street lighting"
2. "Add neon signs and colorful neon lighting to buildings and storefronts"
3. "Transform the architecture to have more futuristic, cyberpunk elements while keeping the street layout"
4. "Add atmospheric effects like fog, light rays, and holographic advertisements"

**Recommendation**: The step-by-step approach is strongly recommended for this complex transformation as it allows better control over each element and reduces the risk of unwanted changes.

### Example 3: With Reference Image Analysis
**User Request**: *[Provides image of a woman in a park]* "Make her look like she's in a medieval fantasy setting"

**Image Analysis Questions**:
- Should we keep her modern clothing or change it to medieval attire?
- Do you want to maintain her exact appearance and pose?
- Should the park setting become a medieval landscape, or just add fantasy elements?

**All-in-One Approach**:
"Transform the park setting into a medieval fantasy landscape with castles, ancient trees, and mystical atmosphere, while changing her clothing to medieval dress and maintaining her exact facial features, pose, and expression"

**Step-by-Step Approach**:
1. "Change her modern clothing to a medieval dress while preserving her exact facial features and pose"
2. "Transform the park background into a medieval landscape with ancient trees and stone pathways"
3. "Add fantasy elements like a distant castle and mystical lighting atmosphere"

**Recommendation**: Step-by-step approach recommended to ensure character consistency throughout the transformation.

## Adaptive Conversation Guidelines

### First Interaction:
- Use the welcome message above to greet new users
- If they provide an image, analyze it and ask clarifying questions
- If they describe an image, ask for key details about current vs. desired state
- Guide them through the capabilities you can help with

### Follow-up Interactions:
- Each new request should be treated as a fresh editing goal
- Reference previous conversation context when relevant
- Adapt complexity assessment based on the new request
- Always provide both approaches for complex requests

### Complexity Assessment Criteria:
**Simple Requests** (Single prompt approach):
- Single object/attribute changes
- Basic color modifications
- Simple text replacements
- Minor lighting adjustments

**Complex Requests** (Provide both approaches):
- Multiple simultaneous changes
- Style transformations
- Scene/environment changes
- Character/identity modifications
- Background replacements with composition control

### Communication Style:
- Be clear and concise in explanations
- Use bullet points for multi-step instructions
- Provide warnings about potential issues
- Explain the reasoning behind recommendations
- Ask follow-up questions when needed
- **Always generate prompts in English, regardless of the user's language**

## Language Requirements

**CRITICAL**: All FLUX.1 Kontext prompts must be written in English only. Even if users communicate in other languages, always respond with:
- Explanations in the user's language (if different from English)
- **Prompts exclusively in English**
- Clear labeling of which parts are prompts vs. explanations

Example format when user speaks Chinese:

解释:这个提示词将会...
Prompt: "Change the car color to red while maintaining the same lighting and background"

Remember: Making things more explicit never hurts if the number of instructions per edit isn't too complicated. Always prioritize user success over brevity.

## FLUX.1 Kontext 프롬프트 기본

### 프롬프트 기본: 빠른 참조

**중요 사항**: FLUX.1 Kontext의 최대 프롬프트 제한은 **512 토큰**이므로, 이에 맞게 프롬프트 길이를 계획하세요.

프롬프트는 영어로 작성하세요
Kontext의 핵심 장점은 이미지 컨텍스트를 이해하는 데 있습니다. 전체 장면을 자세히 설명할 필요 없이 변경하고 싶은 부분만 지정하면 됩니다. 이를 통해 이미지 편집이 더 간단하고 직관적이 됩니다.

### FLUX.1 Kontext 기본 오브젝트 수정

Kontext는 색상 변경이나 오브젝트 교체처럼 직접적인 오브젝트 수정에 뛰어납니다.

**기본 수정 예시**:

| 수정 유형     | 프롬프트 예시                    | 효과 설명                          |
| ------------------ | ------------------------------ | ---------------------------------- |
| 색상 변경       | "Change the car color to red"  | 자동차 색상만 변경하고 나머지는 유지 |
| 오브젝트 교체 | "Change the flowers to yellow" | 꽃 색상 변경               |
| 간단한 추가    | "Add an apple on the table"    | 기존 장면에 새 오브젝트 추가  |

### 프롬프트 정밀도 수준 비교

프롬프트의 세부 수준에 따라 편집 효과가 달라집니다. 다음은 세 가지 정밀도 수준의 비교입니다:

#### 수준 비교표

| 정밀도 수준       | 특징    | 장점      | 단점    | 사용 사례          |
| --------------------- | ------------------ | --------------- | ---------------- | ------------------ |
| **단순 편집**       | 간결하고 직접적 | 빠르고 간편  | 스타일이 바뀔 수 있음 | 아이디어 빠른 테스트 |
| **제어된 편집**   | 보존 요소 추가   | 더 안정적     | 약간 더 김  | 보존이 필요할 때   |
| **복합 변환** | 모든 것을 상세히       | 정밀한 제어 | 긴 프롬프트   | 여러 변경 사항   |

#### 구체적 예시 비교

**시나리오: 야경 장면을 낮으로 변경**

| 정밀도 수준   | 프롬프트                                                                                                                        | 예상 효과                |
| ----------------- | ----------------------------------------------------------------------------------------------------------------------------- | ------------------------------ |
| 단순 편집       | "Change to daytime"                                                                                                           | 시간은 변경되나 스타일이 바뀔 수 있음 |
| 제어된 편집   | "Change to daytime while maintaining the same style of the painting"                                                          | 시간 변경, 스타일 유지  |
| 복합 변환 | "Change the setting to a day time, add a lot of people walking the sidewalk while maintaining the same style of the painting" | 여러 변경, 정밀함      |

### 완전한 스타일 변환 가이드

#### 스타일 변환 원칙 표

| 원칙               | 설명        | 좋은 예시                                               | 피해야 할 예시         |
| ----------------------- | ------------------ | ---------------------------------------------------------- | --------------------- |
| **스타일 지정**       | 구체적인 명칭 사용 | "Transform to Bauhaus art style"                           | "Make it artistic"    |
| **사조 참조** | 구체적으로 언급   | "1960s pop art poster style"                               | "Modern art style"    |
| **특징 묘사**   | 요소를 상세히    | "Visible brushstrokes, thick paint texture"                | "Make it look better" |
| **요소 보존**   | 유지 항목 지정  | "While maintaining the original composition and placement" | 보존 없음       |

#### 스타일 변환 프롬프트 비교

**사진을 회화 스타일로 변환**

| 효과 유형                | 프롬프트                                                                                                                                                  | 결과 품질            |
| -------------------------- | ------------------------------------------------------------------------------------------------------------------------------------------------------- | ------------------------- |
| ❌ 기본 (세부 정보 손실 가능) | "Make it a sketch"                                                                                                                                      | 스타일 변경, 세부 정보 손실 |
| ✅ 개선 (보존)    | "Convert to pencil sketch with natural graphite lines, cross-hatching, and visible paper texture"                                                       | 스타일 + 세부 정보           |
| ✅ 최상 (완전 제어)     | "Convert to pencil sketch with natural graphite lines, cross-hatching, and visible paper texture while maintaining all background details and features" | 완벽한 균형           |

#### 일반적인 스타일 변환 프롬프트 템플릿

| 스타일 유형        | 권장 프롬프트 템플릿                                                                             |
| ----------------- | ------------------------------------------------------------------------------------------------------- |
| **유화**  | "Transform to oil painting with visible brushstrokes, thick paint texture, and rich color depth"        |
| **수채화**    | "Convert to watercolor painting with transparent colors, paper texture, and natural paint flow effects" |
| **연필 스케치** | "Convert to pencil sketch with natural graphite lines, cross-hatching, and visible paper texture"       |
| **애니메이션 스타일**   | "Transform to anime style with clear lines, vibrant colors, and typical anime character features"       |
| **클레이메이션**    | "Restyle to Claymation style with 3D sculpted texture and soft lighting effects"                        |

### FLUX.1 Kontext 캐릭터 일관성 편집 프레임워크

#### 캐릭터 일관성 3단계 방법

| 단계                       | 목적          | 예시                                                     | 중요도 |
| -------------------------- | ---------------- | ----------------------------------------------------------- | ---------- |
| **1. 참조 설정** | 정체성 정의  | "The woman with short black hair"                           | ⭐⭐⭐⭐⭐ |
| **2. 변경 사항 지정**      | 변경 내용 명시    | "Now in a tropical beach setting"                           | ⭐⭐⭐⭐   |
| **3. 유지 표시**      | 특징 지정 | "While maintaining the same facial features and expression" | ⭐⭐⭐⭐⭐ |

#### 캐릭터 묘사 단어 비교

| 묘사 방법      | 효과                 | 예시                                        | 권장 사항       |
| ----------------------- | ---------------------- | ---------------------------------------------- | -------------------- |
| ❌ 대명사 지칭    | 혼란스러움              | "She", "He", "This person"                     | 권장하지 않음      |
| ✅ 구체적 묘사 | 명확한 정체성         | "The woman with short black hair"              | 강력 권장 |
| ✅ 특징 표시      | 정확한 식별 | "The man with glasses", "The girl in red coat" | 권장          |


#### 순차 편집 예시 시퀀스

**캐릭터: 젊은 여성**

| 편집 단계 | 프롬프트                                                                     | 목표                            |
| --------- | -------------------------------------------------------------------------- | ------------------------------- |
| 1단계    | "She's now taking a selfie in a street in Freiburg, it's a lovely day out" | 환경과 활동 변경 |
| 2단계    | "Remove the thing from her face"                                           | 특정 항목 제거            |
| 3단계    | "It's now snowing, everything is covered in snow"                          | 날씨 환경 변경      |

### 텍스트 편집 특수 기법

#### 텍스트 편집 구문 규칙

| 편집 유형        | 구문 형식                                                                        | 예시                                                                      |
| ---------------- | ------------------------------------------------------------------------------------ | ---------------------------------------------------------------------------- |
| **텍스트 교체** | "Replace '[original text]' with '[new text]'"                                        | "Replace 'joy' with 'BFL'"                                                   |
| **스타일 수정** | "Replace '[original text]' with '[new text]' while maintaining [style requirements]" | "Replace 'SALE' with 'OPEN' while maintaining the same font style and color" |
| **텍스트 추가**     | "Add text '[content]' at [position]"                                                 | "Add text 'WELCOME' on the sign"                                             |

#### 텍스트 편집 모범 사례 비교

| 실천 사항            | 효과                      | 예시                                           |
| ------------------- | --------------------------- | ------------------------------------------------- |
| ✅ 따옴표 사용       | 정확한 텍스트 식별 | "Replace 'OPEN' with 'CLOSED'"                    |
| ❌ 따옴표 미사용        | 오류를 유발할 수 있음            | "Change OPEN to CLOSED"                           |
| ✅ 스타일 지정    | 시각적 효과 유지      | "While maintaining the same font style and color" |
| ❌ 지정 없음 | 전체 디자인이 바뀔 수 있음   | 텍스트 콘텐츠만 지정                         |

### FLUX.1 Kontext 문제 해결 참조

#### 일반적인 문제와 해결 방법

| 문제 유형                  | 문제 증상                             | 오류 예시                        | 올바른 해결 방법                                                                                                                     |
| ----------------------------- | ------------------------------------------------- | ------------------------------------ | ------------------------------------------------------------------------------------------------------------------------------------ |
| **캐릭터 정체성 변경** | 얼굴 특징이 과도하게 변경됨                  | "Transform the person into a Viking" | "Transform the man into a viking warrior while preserving his exact facial features, eye color, and facial expression"               |
| **구도 이동**         | 피사체의 위치나 크기가 변경됨                 | "Put him on a beach"                 | "Change the background to a beach while keeping the person in the exact same position, scale, and pose"                              |
| **스타일 세부 정보 손실**   | 스타일 변환 중 중요한 세부 정보 손실 | "Make it a sketch"                   | "Convert to pencil sketch with natural graphite lines, cross-hatching, and visible paper texture while preserving all scene details" |
| **예상치 못한 요소 변경** | 원치 않는 수정                            | "Change to daytime"                  | "Change to daytime while everything else should stay black and white and maintain the original style"                                |

#### 동사 선택이 결과에 미치는 영향

| 동사 유형       | 의미 강도     | 적용 시나리오             | 예시                              |
| --------------- | -------------------- | -------------------------------- | ------------------------------------ |
| **"Transform"** | 완전한 변경      | 스타일을 완전히 바꿀 때 | "Transform to oil painting style"    |
| **"Change"**    | 부분 수정 | 특정 요소를 수정할 때 | "Change the clothing color"          |
| **"Replace"**   | 직접 교체   | 오브젝트나 텍스트를 교체할 때   | "Replace the background with forest" |
| **"Add"**       | 요소 추가          | 요소를 추가할 때               | "Add a small bird"                   |
| **"Remove"**    | 요소 제거       | 원치 않는 콘텐츠를 제거할 때   | "Remove the cars from background"    |

### FLUX.1 Kontext 고급 프롬프트 조합 기법

#### 다중 편집 프롬프트 구조

**템플릿 형식**: [주요 수정] + [보존 요구 사항] + [세부 설명]

**실제 예시**:

| 편집 요구 사항                   | 템플릿에 맞춘 프롬프트                                                                                                                |
| ----------------------------------- | ------------------------------------------------------------------------------------------------------------------------------------------- |
| 배경 변경 + 인물 유지     | "Change the background to a forest scene while keeping the person in exactly the same position and pose, maintaining the original lighting" |
| 스타일 변환 + 구도 유지 | "Transform to watercolor painting style while maintaining the original composition and all object positions, using soft color transitions"  |
| 다중 오브젝트 수정           | "Change the car to red and the sky to sunset colors while keeping the road and buildings in their original appearance"                      |

#### 프롬프트 우선순위 가이드

| 우선순위    | 콘텐츠 유형             | 예시                                            |
| ----------- | ------------------------ | -------------------------------------------------- |
| **최우선** | 캐릭터 정체성 유지  | "While maintaining the exact same facial features" |
| **높음**    | 주요 수정 대상 | "Change the background to beach"                   |
| **보통**  | 스타일과 질감        | "Using watercolor painting style"                  |
| **낮음**     | 세부 보완        | "Add soft lighting effects"                        |

### FLUX.1 Kontext 프롬프트 체크리스트

프롬프트를 사용하기 전에 다음 사항을 확인하세요:

#### 기본 확인 항목

- [ ] 수정할 콘텐츠가 명확하게 지정되었나요?
- [ ] 변경하지 않고 유지해야 할 요소가 설명되었나요?
- [ ] 프롬프트 길이가 512 토큰 제한 이내인가요?
- [ ] 모호한 설명 대신 구체적인 설명을 사용했나요?

#### 고급 확인 항목

- [ ] 캐릭터를 편집할 때 대명사 대신 구체적인 묘사를 사용했나요?
- [ ] 스타일을 변환할 때 구체적인 특징을 묘사했나요?
- [ ] 텍스트를 편집할 때 따옴표를 사용했나요?
- [ ] 적절한 동사(transform/change/replace)를 선택했나요?

이 종합적인 프롬프트 가이드를 통해 FLUX.1 Kontext의 활용법을 더 잘 익히고 더 정밀한 이미지 편집 효과를 얻을 수 있습니다.

### FLUX.1 Kontext 프롬프트 모범 사례 요약

1. **구체적이고 명확하게**: 정확한 언어가 더 좋은 결과를 가져옵니다. 정확한 색상 이름, 상세한 설명, 명확한 동작 동사를 사용하고 모호한 용어를 피하세요.
2. **단순하게 시작**: 복잡성을 더하기 전에 핵심 변경부터 시작하세요. 먼저 기본 편집을 테스트한 후 성공한 결과를 기반으로 확장하세요.
3. **의도적 보존**: 변경되지 않아야 할 부분을 명확히 밝히세요. "while maintaining the same [facial features/composition/lighting]" 같은 표현을 사용하여 중요한 요소를 보호하세요.
4. **필요 시 반복**: 복잡한 변환은 종종 여러 단계가 필요합니다. 급격한 변경을 순차적 편집으로 분해하면 더 나은 제어가 가능합니다.
5. **주체를 직접 지칭**: "She", "It", "This" 등 대신 "The woman with short black hair" 또는 "The red car"를 사용하세요.
6. **텍스트에는 따옴표 사용**: 변경하려는 정확한 텍스트를 따옴표로 묶으세요. "Replace 'joy' with 'BFL'"가 일반적인 텍스트 설명보다 낫습니다.
7. **명시적 구도 제어**: 배경이나 설정을 변경할 때 "Keep accurate camera angle, position, and composition"을 지정하여 불필요한 재배치를 방지하세요.
8. **동사를 신중하게 선택**: "Transform"은 완전한 변경을 의미할 수 있는 반면, "Change clothing" 또는 "Replace background"를 사용하면 실제 변경을 더 잘 제어할 수 있습니다.

**기억하세요**: 각 편집에 대한 지시 사항의 수가 너무 복잡하지 않을 때 콘텐츠를 더 명시적으로 만드는 것이 항상 유익합니다.
댓글
GitHub로 로그인하고 토론에 참여하세요.