How to Install ComfyUI?
The official CoomfyUI Github Repository (opens in a new tab) provides a basic guide for installation methods including Windows, Mac, Linux, Jupyter Notebook, etc.
However, the official tutorial may be challenging for users without a coding background or those who are new to Stable Diffusion, so I have reorganized the tutorial and combined my own experience to provide an easy-to-follow installation guide.
If you cannot install it smoothly for various reasons, I have also provided some online platforms at the end of this article where you can run ComfyUI online (some may require payment for an enhanced experience).
Hardware Requirements for Installing ComfyUI on Windows
Below is a table I have compiled regarding the hardware requirements for ComfyUI.
| Component | Requirement |
|---|---|
| GPU | At least 4GB VRAM, NVIDIA graphics cards are recommended, preferably RTX3060 or higher. |
GPUs with less than 3GB VRAM can run with the --lowvram option, but performance may decrease. | |
| CPU | Can run on CPU, but the speed is slower, use the --cpu option. |
| Memory | At least 8GB of system memory is recommended. |
| Operating System | Supports Windows system. |
| Provides Mac installation instructions for Macs with Apple Silicon. | |
| Storage | It is highly recommended to use an SSD to speed up the loading and running of model files, and at least 40GB of hard disk space is recommended. |
| Software Dependencies | Python (opens in a new tab) environment is required, but a Python environment is also embedded in the installation package. |
Python libraries such as torch, transformers, etc., need to be installed. | |
| Some plugins may require Git (opens in a new tab) for installation. | |
| Note | Specific requirements may change with updates to ComfyUI, it is recommended to check the official documentation (opens in a new tab). |
For hardware, my personal suggestion is that no matter what your computer's configuration is, you can first install ComfyUI, and if you find that the software runs too slowly, then upgrade your hardware to improve the experience.
Installing ComfyUI Locally
This section will explain two methods of installation: using a third-party integrated package and using the official ComfyUI installation package. Since I only have a Windows host and an Apple computer with an Intel chip, the installation of ComfyUI on other systems is based on official and online tutorials.
If you are new to ComfyUI or do not want to spend too much time on environment configuration, I strongly recommend using the integrated package for installation, which will save you a lot of configuration issues.
[Method One] Using the Aaaki ComfyUI Launcher
Here I recommend using the ComfyUI integrated package made by Bilibili @秋葉aaaki (opens in a new tab) Reasons for recommendation:
- Suitable for Windows system
- Supports Simplified Chinese, Traditional Chinese, English, and Japanese
- Integrates some commonly used ComfyUI plugins to save you time exploring
Download the aaaki's ComfyUI Integrated Package
Download link: https://pan.quark.cn/s/41302f448cec (opens in a new tab)
@秋葉aaaki (opens in a new tab)'s official release address for the Aaaki ComfyUI Launcher package: https://www.bilibili.com/video/BV1Ew411776J/ (opens in a new tab)
The file in the cloud disk is as follows
ComfyUI-aki
├── Getting Started Workflow     // Sample files for getting started (optional download)
├── Models                       // Stable diffusion model files (download if you are using Stable diffusion  for the first time)
├── Old Versions                 // Historical versions of ComfyUI-aki (optional download)
├── controlnet                   // ControlNet model files (download if your computer does not have the ControlNet model)
└── ComfyUI-aki-v1.3.7z          // The main package, please download this file
Please download ComfyUI-aki-v1.3.7z
Unzip the Integrated Package File
Unzip to the local directory where you want to install ComfyUI.
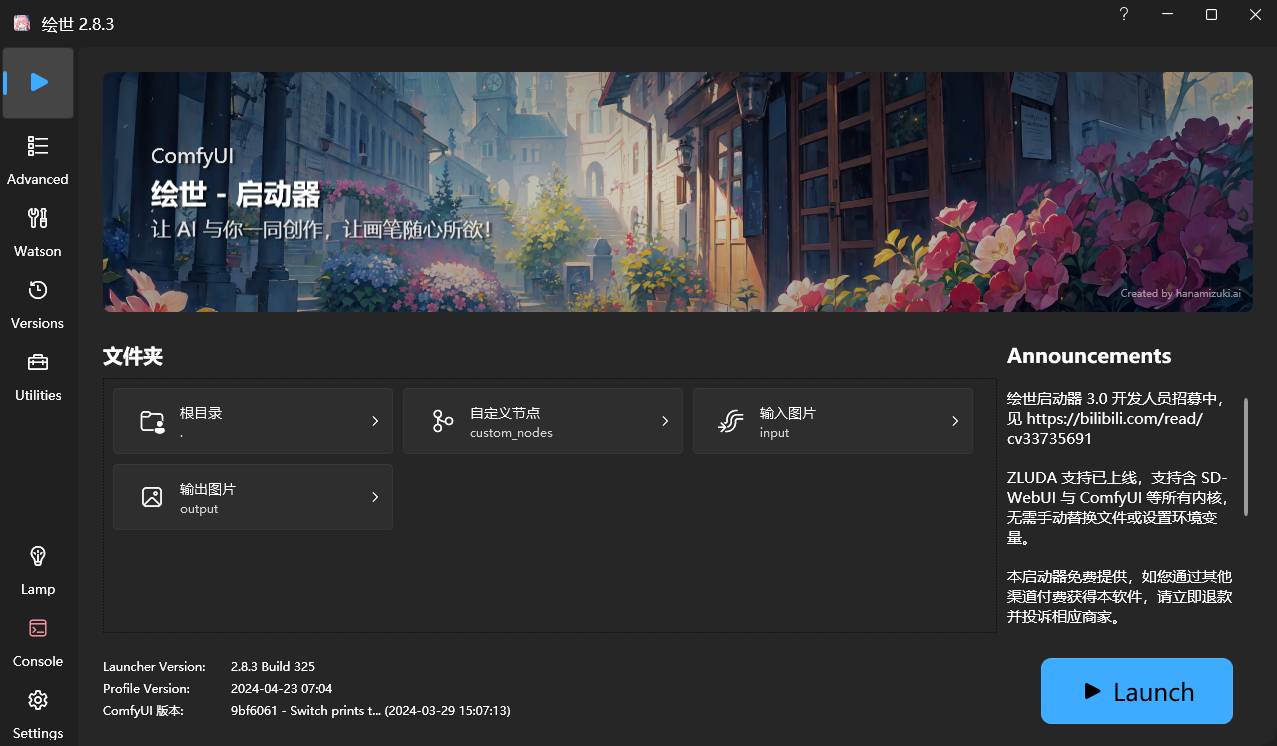
Launch Aaaki ComfyUI Launcher
This step mainly checks whether the Aaaki ComfyUI Launcher can run normally. Find the corresponding icon of Aaaki ComfyUI Launcher in the unzipped folder, double-click to start Aaaki ComfyUI Launcher. After starting, it should automatically display according to your system language.
The first run may involve downloading and loading some environment configuration files, so make sure your network is smooth.
(Optional) Modify Language Settings

If your language display is incorrect, you can modify it in the settings
 As shown in the above picture, you can set and modify the interface language in the
 interface Language section
A complete tutorial on using the Aaaki ComfyUI Launcher will continue to be updated in the Aaaki ComfyUI Launcher Tutorial section
Install Models
Since @秋葉aaaki has previously made an integrated package for WebUI, considering the redundancy of model files, this package does not directly integrate the corresponding Stable diffusion model. Below I provide two methods for installing models
For users who only use ComfyUI
- Download the provided anything-v5-PrtRE.safetensors file from the cloud disk or download the Checkpoint model from model sites such as civitai - anything-v5 (opens in a new tab), liblib (opens in a new tab)
- Put the corresponding model into the ComfyUI directory
models/checkpointsfolder
ComfyUI_windows_portable
├──ComfyUI
│  ├── models

│  │  ├── checkpoints                               // Please put the checkpoint model files here
│  │  └── ...Other files are omitted
│  └──    ...Other files are omitted
└──       ...Other files are omitted
I will list some recommended checkpoints in the Stable diffusion models section, which you can download based on your needs.
Please refer to the instructions on this page for sharing model configurations in different GUIs and modify the extra_model_paths.yaml.example.
Existing Users of A1111 WebUI
If you are using the WebUI, please follow the method below for installation.
How to Share Models Between ComfyUI and A1111 WebUILaunching ComfyUI
Click on the blue icon ▶︎ One-click Start on the launcher's homepage to launch ComfyUI with one click. If the operation is correct, it should automatically open the console for you to run the relevant scripts.
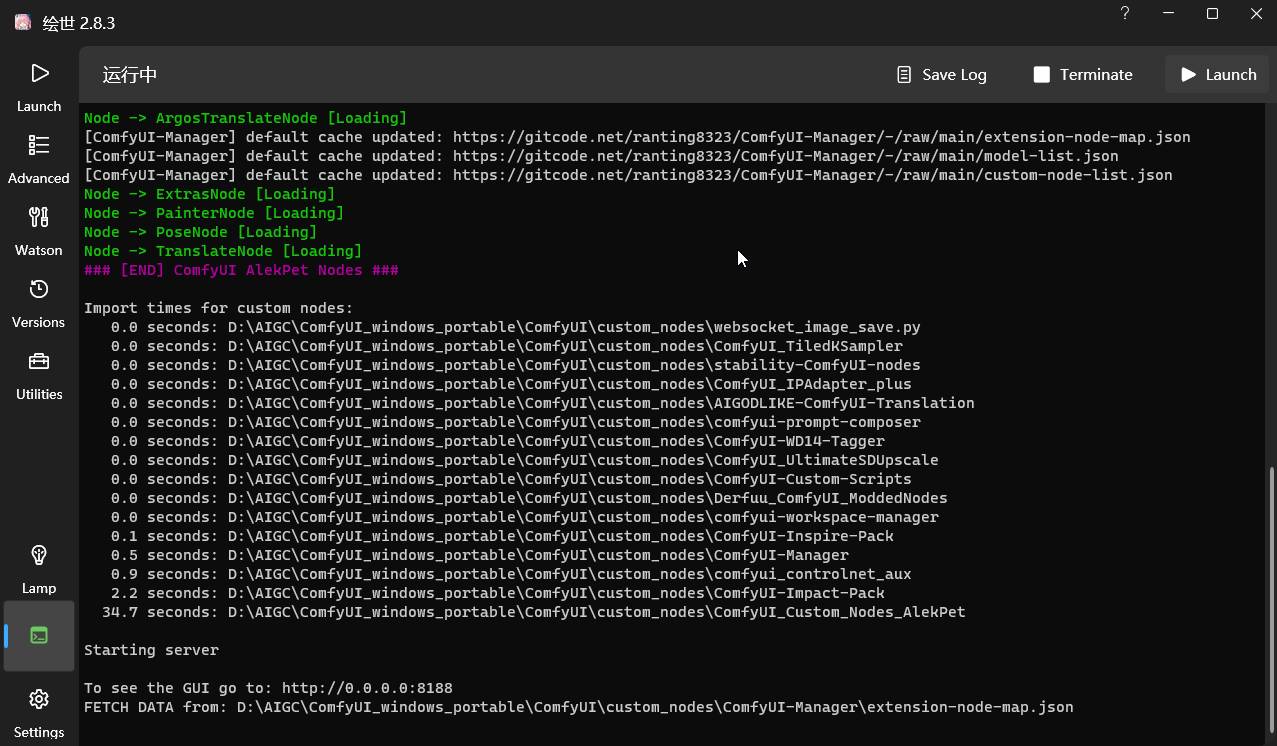
As shown in the figure above, when you see
Starting server

To See the GUI go to: http://0.0.0.0:8188  // The URL here may vary depending on the device display
It means that ComfyUI has been successfully launched. If the browser does not start normally, you can directly access the website after To See the GUI go to: through the browser, such as in the example above, it should be http://0.0.0.0:8188 (opens in a new tab).
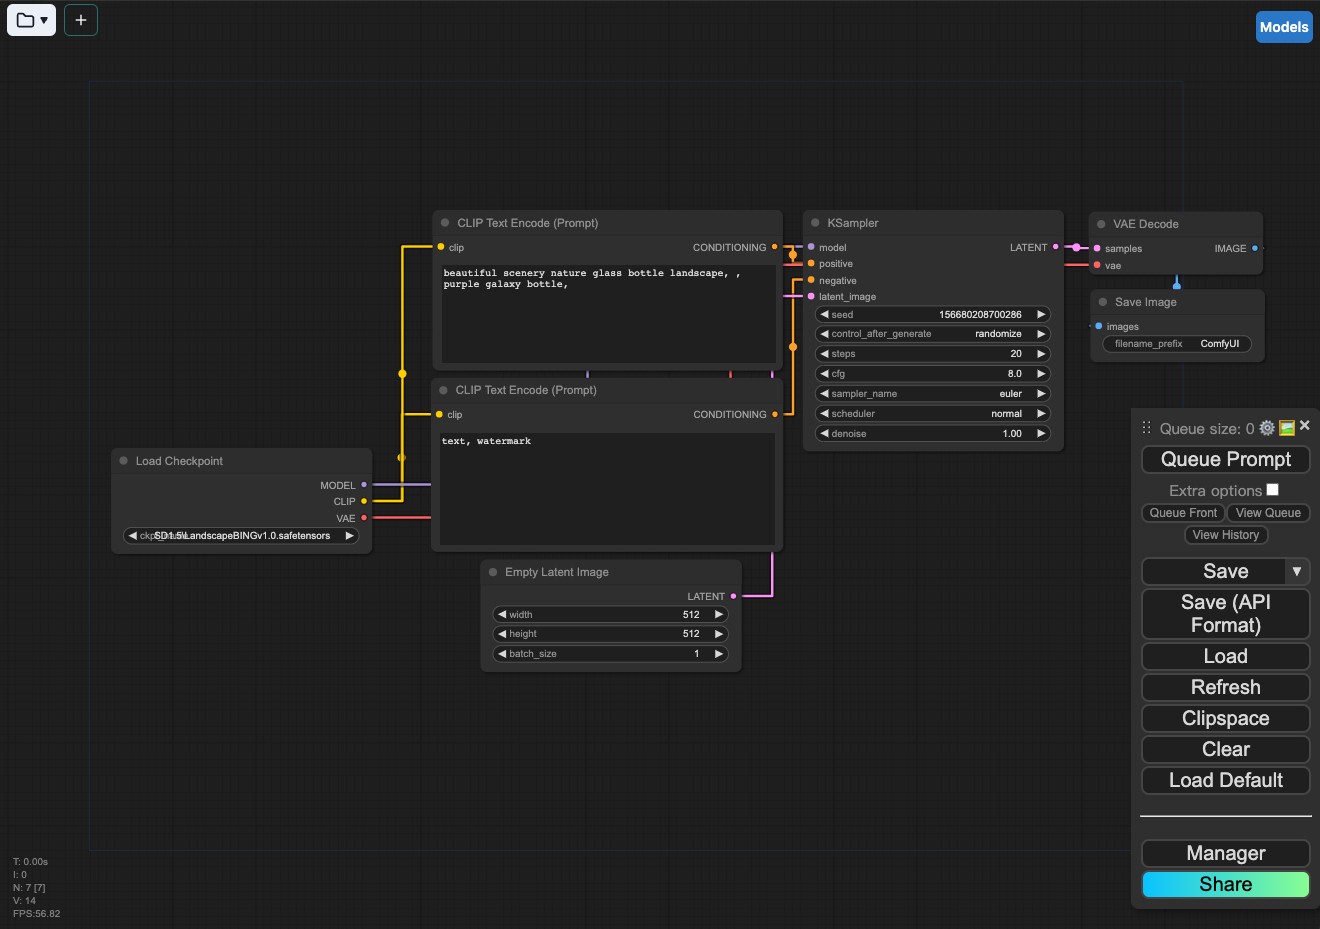
By default, the ComfyUI's default workflow will be automatically loaded after the start, as shown in the figure below.
 If the interface is blank or the default workflow is not loaded, please click on the
 Load default / Load default in the lower right corner menu to load the default workflow.
If your browser only displays the web page title ComfyUI after opening, but there are no GUI elements, this situation may be due to browser incompatibility. It is recommended to use the latest version of Chrome Browser (opens in a new tab).
First Image Generation
- First, you need to confirm that the model file loaded in the Load checkpoint in your workflow has been loaded normally.
- If there are no errors, you can click on
Queue Prompt. - Wait for the operation to be completed. If everything goes well and the image is generated, congratulations! You have completed the installation of ComfyUI.
If you want to continue exploring, you can visit the following content to continue learning about the basic operations of the ComfyUI interface.
Basic Operations of ComfyUI InterfaceOther Third-Party Integration Package Resources
https://github.com/6174/comflowyspace/ (opens in a new tab) 🚧 To be updated
[Method Two] Installing with the Official ComfyUI Installer Package
The following steps use the official installer package.
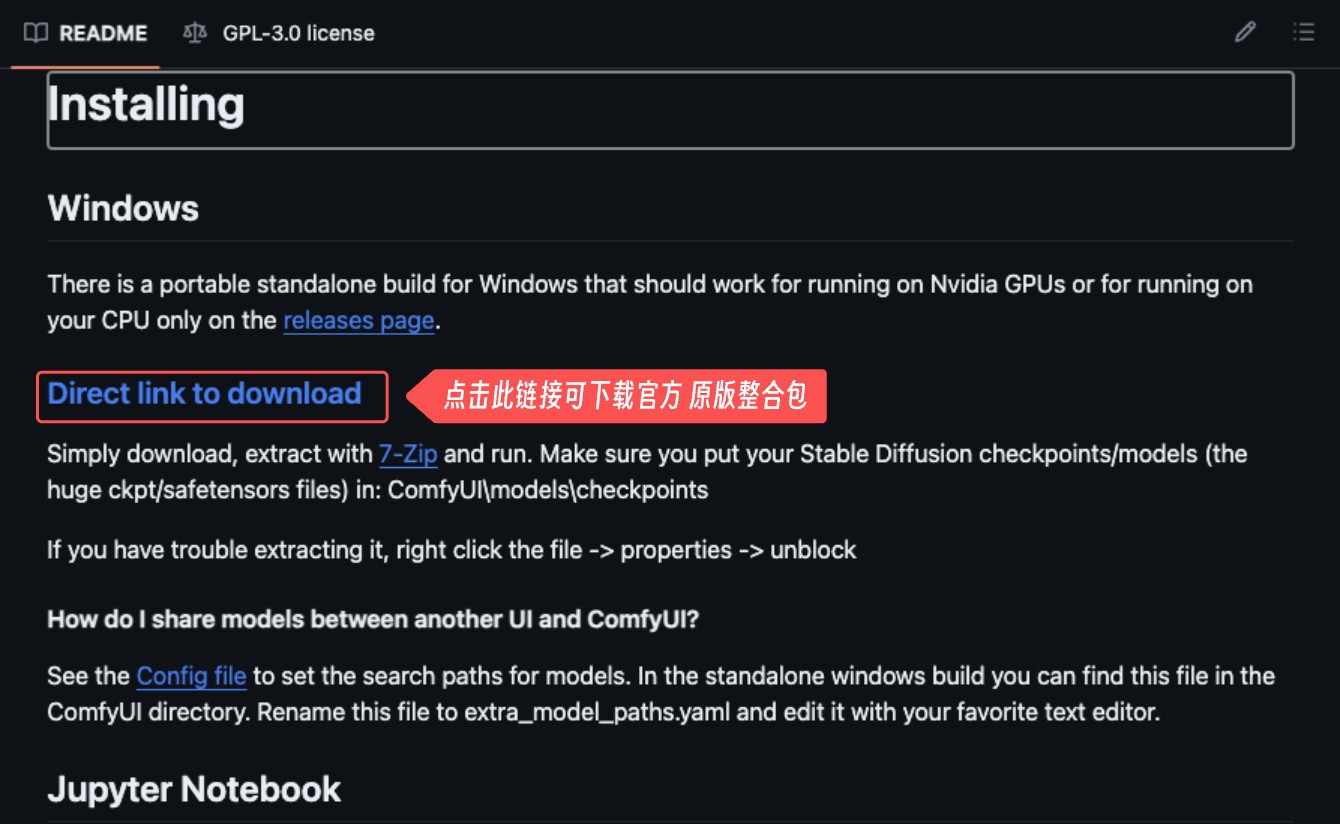
Download the Official Installer Package
ComfyUI Official Repository Address: ComfyUI's Github Repository (opens in a new tab) You can find the blue link of Direct Link to download in the ReadMe section of the repository, click to download the integrated package organized by the official.
Use the Unzipping Software to Unzip the Corresponding Integrated Package
Unzip the integrated package to the local directory where you want to install ComfyUI. After unzipping, the files should be consistent with the ComfyUI File Directory section I mentioned.
Install the Model
- Download the provided anything-v5-PrtRE.safetensors file from the cloud disk folder or download the Checkpoint model from model sites such as civitai - anything-v5 (opens in a new tab), liblib (opens in a new tab).
- Put the corresponding model into the
models/checkpointsfolder in the ComfyUI directory
ComfyUI_windows_portable
├──ComfyUI
│  ├── models
│  │  ├── checkpoints                           // Please put the checkpoint model file here
│  │  └── ...Other files are omitted
│  └── ...Other files are omitted
└── ...Other files are omitted
I have also recommended some checkpoint models in the Model Recommendations section, which you can download according to your needs. If you are already using A1111's WEBUI, you can refer to the following tutorial.
How to Share Models Between A1111 WebUI and ComfyUIRun ComfyUI
In the unzipped directory, you can see two files run_cpu.bat and run_nvidia_gpu.bat, you can choose to run according to the following instructions
ComfyUI_windows_portable
├── ...Other files are omitted
├── run_cpu.bat                                 //  Double-click to run it to start ComfyUI when your graphics card is A card or only CPU
└── run_nvidia_gpu.bat                           // Double-click to run it to start ComfyUI when your graphics card is N card (Nvidia)
As shown in the figure above, when you see
Starting server

To See the GUI go to: http://0.0.0.0:8188  // The URL here may vary depending on the device display
It means that ComfyUI has been successfully launched. If the browser does not start normally, you can directly access the website after To See the GUI go to: through the browser, such as in the example above, it should be http://0.0.0.0:8188 (opens in a new tab).
By default, the ComfyUI's default workflow will be automatically loaded after the start, as shown in the figure below.
If the interface is blank or the default workflow is not loaded, please click on the Load default / Load default in the lower right corner menu to load the default workflow.
If your browser only displays the web page title ComfyUI after opening, but there are no GUI elements, this situation may be due to browser incompatibility. It is recommended to use the latest version of Chrome Browser (opens in a new tab).
First Image Generation
- First, you need to confirm that the model file loaded in the Load checkpoint in your workflow has been loaded normally.
- If there are no errors, you can click on
Queue Prompt. - Wait for the operation to be completed. If everything goes well and the image is generated, congratulations! You have completed the installation of ComfyUI and related basic content.
If you want to continue exploring, you can visit the following content to continue learning about the basic operations of the ComfyUI interface.
Basic Operations of ComfyUI Interface